Setting up the Installed Client
Scenario: You want to set up an Installed Client. For launching the local Installed Client on Server no special communication security settings are required.
This scenario describes steps for loggin on to the Installed Client on the setup type – Client or FEP by setting up secured Client/Server connection. For securing the Client/Server connection in this workflow the Windows store based security certificates are used.
Reference: For background information, see the reference section.
Workflow diagram:
Prerequisites:
- For working with SMC, the logged in user on the Server/Client/FEP station has Administrator rights.
- You have acquired the Client/FEP machine’s logged in user’s name in order to share the Server project with that user.
In workgroup environment, for working with Client/Server setup, the user with which want to share the Server project, must also be present on the Client/FEP machine and have the same password on both the machines.
On Server:
- The Setup type – Server is installed.
- SMC is launched and a project is restored or created and an HDB is linked to it.
- The root, host certificates used for securing the Client/Server communication are imported in the appropriate Windows Certificate store on Server station and set as default.
- The root certificate (.cer file) is imported in the Trusted Root Certificate Authorities (TRCA) store.
- The Server root certificate is the source of all host certificates used for communication. Therefore, it must be the same for all host certificates and must be available on the Server and all its clients.
- The Server and Client/FEP host certificate must be generated using the same Server root certificate.
- The subject name of the Server or Client/FEP host certificates must be different than subject name of the Server or Client certificate.
- The Server host certificate (.pfx file) is imported in the Personal store.
- The Client/FEP host certificate (.cer file and .pfx file) is created and available on the disk.
- The system key is exported from the Windows Key store to the configured location on Server.
On Client/FEP:
- The Server root certificate (.cer file) and the Client/FEP host certificate (.pfx file) is available on the disk.
You can either copy the root and the client or FEP host files to a removable drive that you can then use at the client or FEP station to import the certificates, or, you can use the network access between the Server and the Client/FEP to import the root and Client/FEP host into the Client/FEP station. - You have installed the Setup type – Client and SMC is launched.
- The security certificates are imported in the appropriate Windows Certificate store and set as default.
- The root certificate (.cer file) is imported in the Trusted Root Certificate Authorities (TRCA) store.
- The Client/FEP host certificate (.pfx file) is imported in the Personal store.
The communication certificates should be specific. Therefore, it is recommended to use different host certificates for Client and Server. - On the FEP the same Windows key file as that on the Server, to which it is connected, is imported in the Windows Key store.
Steps:
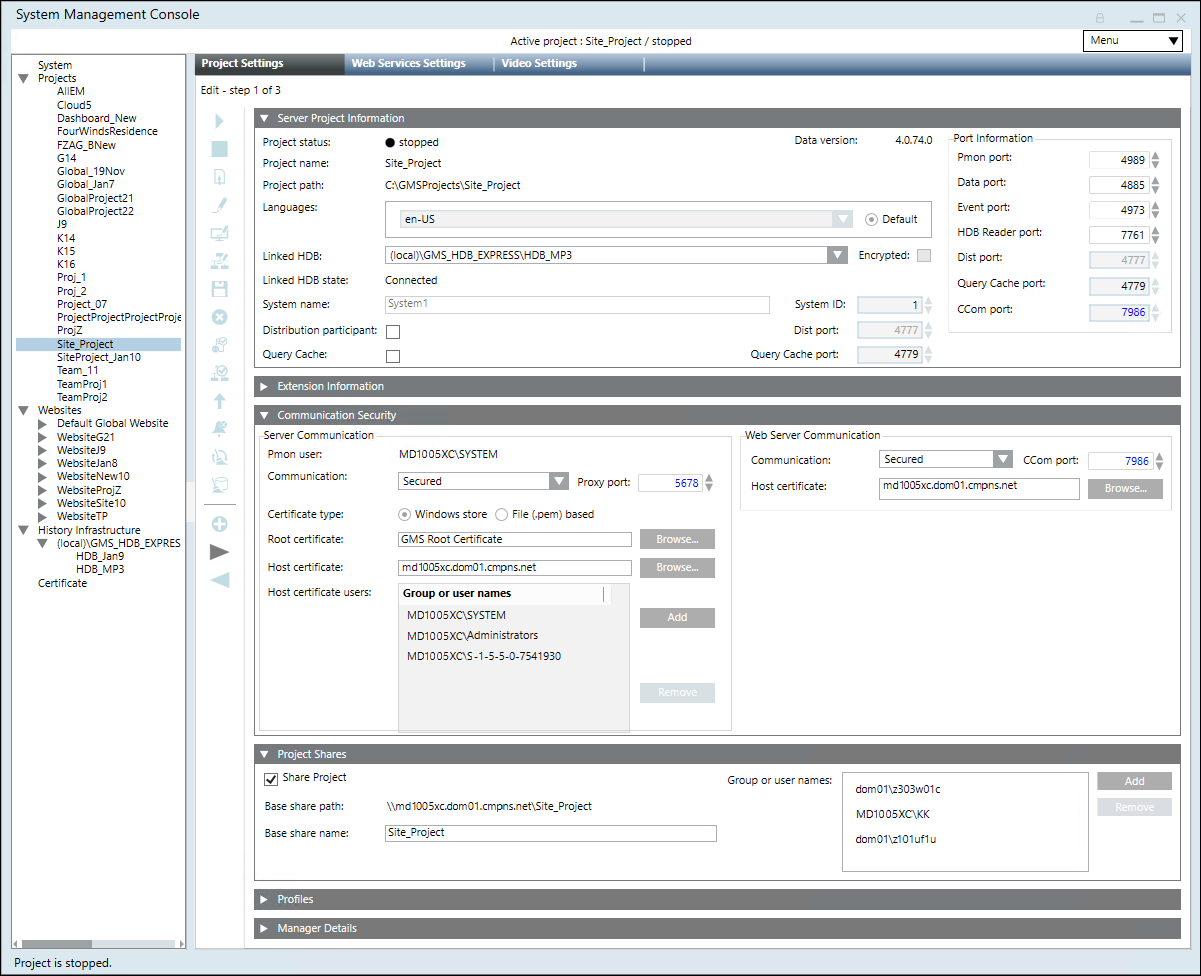
You can edit the Server project parameters to modify the port number, languages and so on. It also allows you to secure the Client/Server Communication, share the Server project folder.
- At least one project is available under the Projects root folder and it is
Stopped.
- In the SMC tree, select Projects > [project].
- Click Edit
 .
.
- Some fields of the Server Project Information and Communication Security expanders are enabled.
- In the Server Project Information expander modify the following parameters:
- Edit the port numbers for the Pmon, Data, Event, HDB Reader setting according to the given range and making them unique.
- In the Communication Security expander, provide the edit the details as required:
- Modify the default Server Communication mode to Secured for enabling a secure communication between Client/FEP and the Server project.
- Make sure that the Proxy port, used to establish the secure communication between Client/Server, has unique port number. The default Proxy port number is 5678.
- Certificate type is displays the default Windows store and is enabled only when you change the client/server communication type to Secured. The default set Root certificate and Host certificate are displayed.
- Add the Server project’s Pmon user in the Host certificate users ensuring it has rights on the Server host certificate’s private key.
- In the Project Shares expander, provide the details as follows:
- Select the Share Project check box to share Server project. This automatically sets the Base share name as the project name, which is appended to the shared project path, that is set when you save the changes.
- Click Add to add the Client/FEP logged-in user using the Select User or Group dialog box to the list of Group or user names.
- Click Save
 .
.
- If you have changed the security settings including the Server Communication mode, Proxy port, Certificate type and so on once you have established Client/Server connectivity, a message displays indicating you that you must realign the Client/FEP project linked with the modified Server project.

The Installed Client on the Server runs in the context of an active project on the Server. Perform this procedure only when you want to launch the Installed Client on Server.
- Click Activate
 .
.
- A confirmation message displays.
- Click Yes.
- The selected project becomes active.
For starting a project at least one active project must be available under Projects in the SMC tree.
- The project is active and stopped and has unique port numbers.
- Click Start
 .
.
- The project is started.
For working with the Server project, you can launch an Installed Client on the Server.
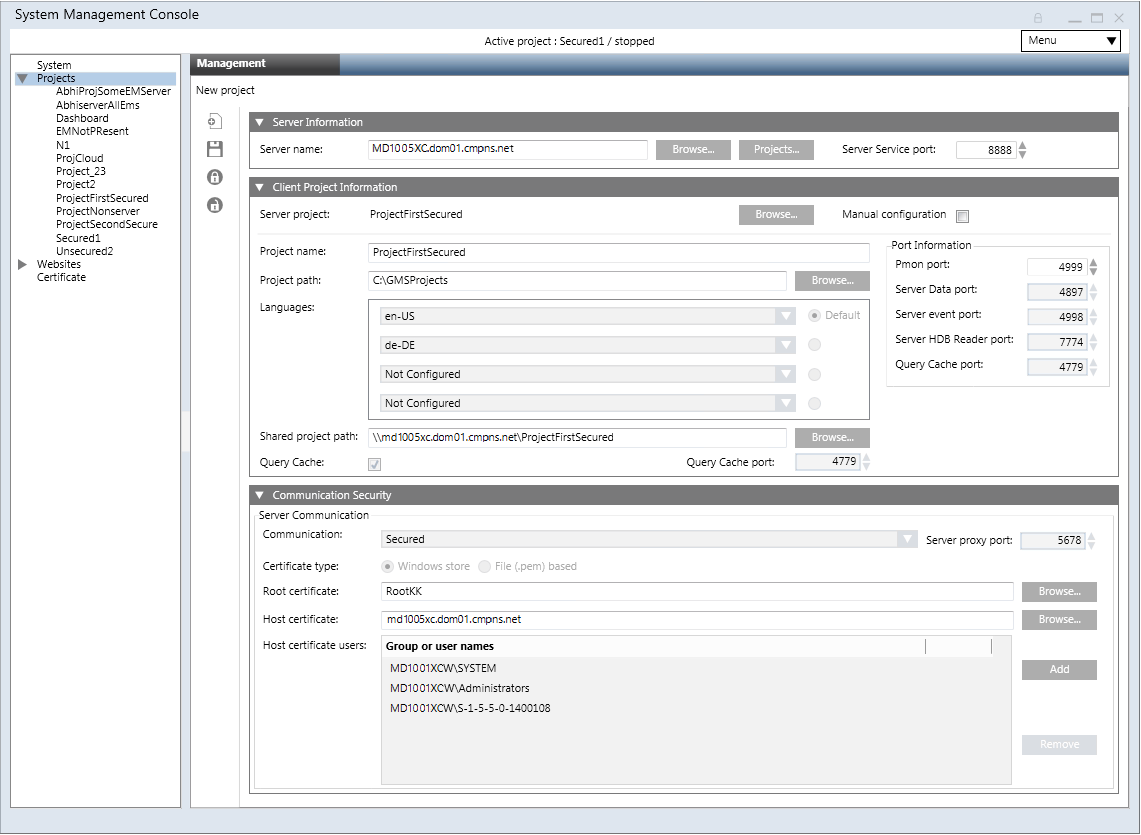
It is recommended to use the default project creation mode, the Automatic configuration mode for Client/FEP project creation. In this mode, the Communication mode and the Certificate type are automatically set to match with those of the selected Server.
- Using SMC, Server root and Client/FEP host certificates created from the Server root certificate are imported in the appropriate Windows Certificate store.
- In the SMC tree, select Projects.
- Click Create Project
 .
.
- In the Server Information expander, do the following:
a. In the Server name field, type the Full computer name of the server or click Browse to locate and select the server using the Workstation Picker dialog box.
NOTE: To troubleshoot the messageServer is not available, see troubleshooting steps.
b. Click Projects to browse for Server projects using the Project Information dialog box.
c. In the Project Information dialog box select a server project configured for secured Client/Server communication that you want to connect to and click OK.
- The details of the selected server project, including the Shared project path are added in the Client Project Information expander. The default Communication Security details are modified and are set to match the security configuration details of the selected server project.
- In the Client Project Information expander, do the following:
a. (Optional) Edit the project name, if a project with the same name already exists in the SMC tree.
b. (Optional) Edit the project path.
- In the Communication Security expander, add the project’s Pmon user to the list of user’s in Host certificate user, if the Pmon user is not an administrator user or already added in the list. Adding the user in the Host certificate user provides access to the user on the host certificate and its private key.
NOTE 1: Only users and groups listed for the selected host certificate can launch the Desigo CC Client on the Client/FEP.
NOTE 2: Even if the logged-on user of the Client/FEP operating system is a member of the Administrators group and has rights on the private key of the host certificate provided, you must still explicitly assign this user rights on the host certificate’s private key by adding the user to the Host Certificate User list.
- Click Save
 .
.
- The new project is created as a child under the Projects node in the SMC tree and is stopped. Also, the project folder with subfolders and files is created at the specified path.


NOTE:
When applying security for Closed mode configuration, consider the following: GMSDefaultUser is Windows user that must have read/write access rights to the [Installation Drive:]\[Installation Folder]\[Project Name] folder on the Server (for example [Installation Drive]:\GMSProjects\MyProject).
Using Windows Explorer, you can enable such access in the security properties of the project folder.
For more information about folder security, refer to Windows documentation.
If you use a secure client/server connection, GMSDefaultUser must be included in the list of host certificate users of the project. You can configure such list in the Security expander of SMC Server.
The very first project that you create, restore or create from template is activated automatically. Use the following procedure to activate all the subsequent projects that you create/restore.
- (Required only for projects on Client/FEP) You have provided Shared project path when you create a project on Client/FEP.
- Click Activate
 .
.
- A confirmation message displays.
- Click Yes.
- The selected project becomes active.
For starting a project at least one active project must be available under Projects in the SMC tree.
To start the Client or FEP project, you must first start the server project to which it is connected to.
- The project is active and stopped and has unique port numbers.
- Only applicable for Projects on FEP)
- You have copied and imported the same Windows key file, as that on the Server computer, on the disk of the FEP computer.
- You have re-aligned the Client/FEP Project with the updated project on the Server.
- Click Start
 .
.
- The Client/FEP project is started.
Do this procedure to start Desigo CC on a computer where the Desigo CC software is installed as a normal Windows application.
- Start Desigo CC from the Windows Start button or by clicking the icon on the desktop.
- The logon dialog box displays. You can log on to the system as a Desigo CC user or Windows user.
- Enter your username and password.
- Select the domain.
- Click Logon.
