Project Modification Settings
You can view and modify the selected project’s configuration details including the communication security, distribution parameters and so on using the expanders of Project Settings tab and the toolbar icons.
Note that the particulars of Client/FEP project parameter’s modification, if any, are mentioned wherever applicable.
In addition to Communication Security expander and Manager Details expander, for modifying the Client/FEP project settings use the Server Information expander and the Client Project Information expander.
The Project Settings toolbar on Server, Client/FEP contains the following icons.
Project Settings Toolbar | ||
Icon | Name | Description |
| Allows you to start a stopped project. | |
| Allows you to stop a started project. | |
| Allows you to make a project ready to connect to Installed Client. By default, the very first project that you create using the SMC becomes active, provided no old projects are present. You must manually activate all subsequent projects that you create or restore. You can activate a started or stopped project. | |
| Edit | Allows you to edit the following only when a project is stopped. |
| (Available only on Server) | |
| (Available only on Server and for distribution enabled started projects) Allows you to add/edit/remove the distribution participants manually or automatically. | |
| Allows you to save the project configuration. | |
| Allows you to delete a stopped project. This icon is enabled only when the selected project is not started. | |
| (Available only on Server) It is generally used to run diagnostics on project’s shared subfolders before creating the project on the Client/FEP or creating the Web application for working with Windows App client. | |
| (Available only on Server) It is generally used to run diagnostics on projects in distribution before launching the Installed Client. | |
| Upgrade | The icon is enabled in Server, Client/FEP SMC only when the project status is |
| (Available only on Server) Allows you to delete all events from a project. By default this icon is disabled and is available only when the project is stopped. | |
| This icon becomes available only when you stop a project for which distribution is enabled. It allows you to clear the name cache from the project (located at the path [installation drive:]\[installation folder]\[project]\data) on the Local system in distribution. | |
| (Available only on Server) This icon becomes available only when there are HD2 files present in the path for a project at the location located at the path [installation drive:]\[installation folder]\[project]\data. | |
| (Available only on Server) This icon is dynamically added and is available only when the project status is: | |
| (Available only on Server) Allows you to add an extension to the project. This icon is available only when | |
| (Available only on Server) Allows you to remove an extension from the project. This icon is available only when | |
| Next | (Available only on Server) Allows you to navigate to the next page. This icon is available only when the project contains at least one extension and you have some configuration steps specific to that extension. |
| Previous | (Available only on Server) Allows you to navigate to the previous page. This icon is available only when the project contains at least one extension and you are on the next page. |
| (Available only on Client/FEP) This icon is available only when you edit the StartSmc.bat file under [installation drive:]\[installation folder]\GMSMainProject\bin by adding the /support switch. | |
| (Available only on Client/FEP) Allows you to align the client project with the changed settings of the selected Server project. | |
The Server Project Information expander displays some read-only information such as project status, project name, project path and data version (only on Server SMC) and so on while it lets you edit some project configuration when you click Edit icon  .
.
If you have configured multiple languages in the project, you can change the language of the project when editing the project (see tips) and importing the localized text from the System Libraries.
The System Name and System ID can be modified only using the Change System Info  icon, whereas the database to be linked (Linked HDB) with the project can be modified at all times when you select the project.
Project Status
It indicates the status of the currently selected project, for example, started, stopped – inconsistent progs file (in red), stopped, starting, running-incomplete, stopped - last repair failed (in red), stopped - repair on next start, outdated -check on upgrade(in red), outdated (in red), stopped - inconsistent configuration file (in red), and so on.
The project status indicator allows you to check the project status. Its color and animation indicate the connection status as follows.
Project Status | ||
Appearance | The icon is... | Description |
| Yellow and not animated | This icon indicates one of the following statuses: |
| Green and animated | Project is started without errors. |
| Black and not animated | This icon indicates one of the following statuses: |
| Red and not animated | Project is |
Status: Stopped - Last Repair Failed
When a project is stopped abruptly, for example, due to system shut down, the project database may get corrupted. When you start such a project, the SMC internally attempts to repair the corrupted database. However, if this repair attempt fails, the project does not start and the Repair on next start  icon becomes available.
When you click Repair on next start, it internally changes the project status to stopped - repair on next start. The next time you start the project, the SMC will attempt to repair the project database.
If you start a project whose database was corrupted, and the SMC is still internally repairing the database when the startup timeout elapses, the project status will be indicated as running - incomplete. In this case, it is recommended to wait until the database repair is complete and the project status changes to started. However, you can also stop the project.
Linked HDB State
Displays the History database linked to the currently selected project. From the Linked HDB drop-down list, it allows you to select the database from the list of available databases for linking to the project. You should link an History database to keep a log of project’s data.
You should link one History database to only one project. Linking an History database to multiple projects is not recommended. If the selected database is no longer available (deleted), it displays as Unknown (in red).
Select the Encrypted check box to encrypt the communication between a project and the History database.
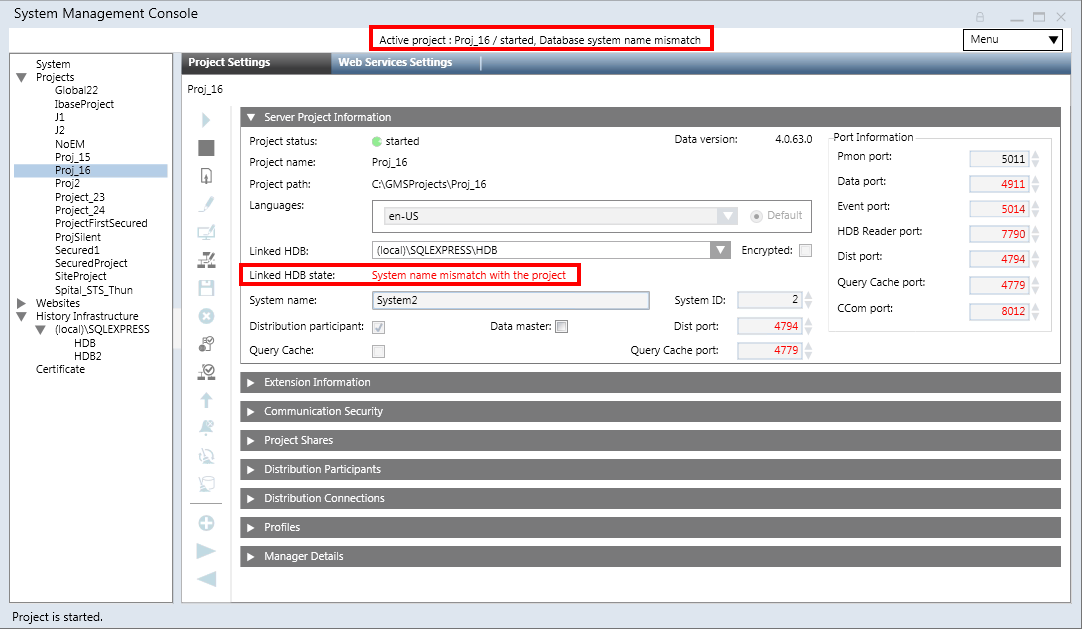
The Linked HDB state is updated depending on the HDB linked to the project. The following table provides the state and its meaning:
Linked HDB State | Description |
Not reachable – secured (in red) | Database not reachable with encrypted connection |
HDB user mismatch (in red) | Pmon user does not match the HDB user in the HDB |
Access denied (in red) | Logged on user does not have access on HDB |
Not Configured (in red) | HDB is not linked to the project. |
Not reachable - unsecured (in red) | HDB is not reachable, for example, the selected HDB is deleted. |
Outdated (in red) | HDB is outdated, for example if the HDB version is different than the current HDB version. |
Connected - secured | HDB is configured in the project without errors and system name in the HDB is same as the system name of the linked project. |
System name mismatch (in red) | The system name in the HDB is different than system name of the project to which the HDB is linked. |
Unknown issue (in red) | Unknown issue with HDB. |
Maintenance not running (in red) | Automatic maintenance is not being performed on HDB. Following are the possible conditions: |
Connected – unsecured (in red) | Connection to HDB is unsecured. To make the connection secured, see Setting up Server Project with Remote HDB (SQL Server) |
Enable Distribution
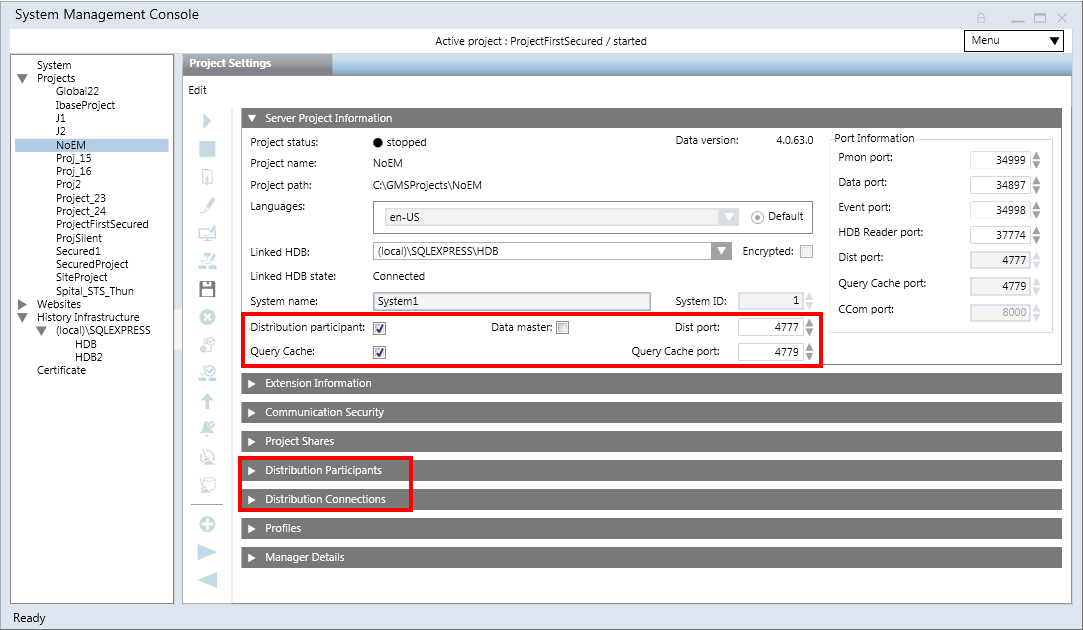
On the Server SMC, when you modify the project, the Distribution participant check box is enabled. Selecting the check box has the following effects:
- enables the Dist port with the default port number as 4777.
- adds and enables the Data master check box.
- adds, enables, and selects by default the Query Cache check box and the Query Cache port field (default port number is 4779). The Query Cache internally increases the performance in case of distribution scenarios.
- adds the Distribution Participants and Distribution Connections expanders.
- enables the Project Shares expander, if the server communication of the selected project is set to standalone and the Web Server communication is
Disabled. - by default, it adds an entry for the local system (Originator project) in the Distribution participants expander.
Set Project as Data Master
Select the Data master check box that becomes available when you enable the distribution by selecting the Distribution participant check box.
Select the Data master check box to set the project as global data master. The data master is a dedicated project/system which synchronizes global data (for example, global users and global groups) to all connected systems. In a distributed system, there must be exactly one data master.
You can set the project as data master when the project is stopped as well as when it is running. When set at runtime it takes a while till the running system detects the configuration change. We recommend setting the data master when the project is stopped for configuring the distribution partners.
The data master must have access to all connected systems of the distribution (this is important for distributions which use one-way connectivity).

NOTE:
If you have a project and the Installed Client is launched, now you stopped the project and enabled the distribution and Data master (the Installed Client is disconnected but not closed), now after starting the project, you need to restart the Installed Client to take the effect of change.
Tips for Configuring and Editing Project Languages
- The default project language is used as the default language, it can only be changed when a project is stopped and not outdated.
- If you do not select a language in addition to the default, the project is created with the default (en-US) language only.
- Languages, other than the default, that become available for configuration depend on the number of language packs installed at the time of installation. The SMC does not allow you to configure more than four languages.
- You can edit the default project language by setting another language (which is added in the project) as a default language.
- You cannot add a new language after project creation or modification. However, a librarian can edit the language after project creation using the Project Settings tab in the Server Project Information expander using a
/librarianswitch. For more information, see Modifying the Language Settings of a Project.
After language edit you have to manually importing the localized texts for the edited language. - Do not change the project language after doing any libraries customization.
- Do not change the order of project languages after doing any library customization. This causes inconsistent language behavior.
The Extension Information expander lists all the extensions that are configured in a project. This expander is not available on the Client/FEP.
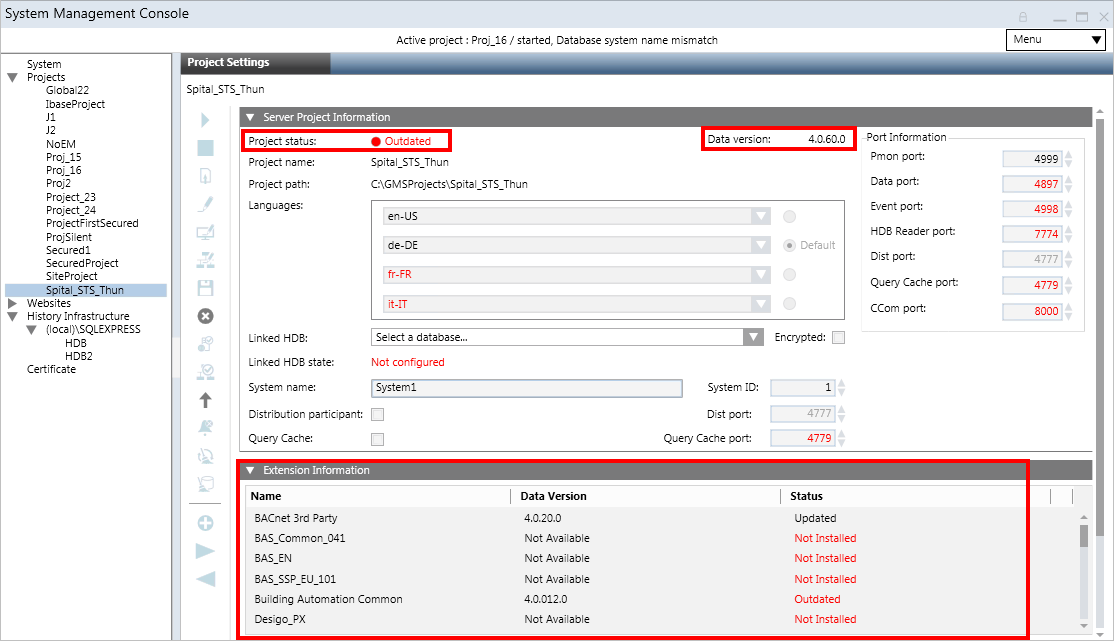
It also displays the version of each installed extension in the Data Version column. The value shown here is taken from the VersionInfo.txt file located at
[installation drive:]\[installation folder]\GMSMainProject\_Upgrades\_Extensions\[EMName]\[Latest Version folder]\
If this version information is not available with the extension, the default version 1.0.0.0 is used. The version of the each installed extension is compared with the extension version configured in the project config file located at
[installation drive:]\[installation folder]\[project]\config.
If the project extension version is older (Outdated) than the installed extension version, you must upgrade the project. The Status column shows the outcome of this comparison as follows.
Extension Status | Description |
| The installed version of the extension and the version of the extension configured in the project are the same; you do not need to upgrade the project. |
| The extension version configured in the project is older than the installed extension version; you must upgrade the project. |
| The extension version configured in the project is newer than the installed extension version. |
| The project configurations include an extension that is not installed. |
The CommunicationSecurity expander allows you to configure the proxy port for secured Client/Server communication. It also allows you to configure security settings for Client/Server communication and Web communication by use of certificates.
For securing the Client/Server communication you can use either file (.pem) based certificates or certificates from the Windows store. The file (.pem) based certificates must be available on the disk (.pem). The Windows store certificates must be imported into the appropriate Windows certificate store.
For securing the Web Server communication over the CCom port, only certificates available in the Windows store can be used.
On a Server SMC
On a Server SMC, when you edit a project you can configure the security settings for Client/Server communication using the Server Communication section. In addition, you can modify the Web Server communication settings and the CCom port number.

Communication Security Expander – Server Communication Section
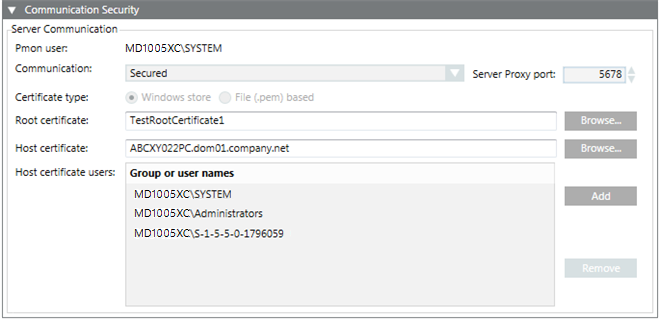
The Project Settings section of the Communication Security expander allows you to configure the details of the project, including the type of Communication, the Server Proxy port number, and Windows store or File (.pem) based certificates for root and host.
Project Settings Section | |
Item | Description |
Process monitor (Pmon) user | Displays the Pmon user configured for the current project. If you change the System account user after project creation, there is an inconsistency between the System account user and the Pmon user and causing the Pmon user to display in red. To synch, you must stop the project, edit and save it. |
Communication | Allows you to secure the communication between the Server project and the Client connected to that project. It provides the following Client/Server communication types: |
Server Proxy port | This is enabled only when you set the communication type as secured. |
Certificate type | This is enabled only when you select communication type as secured. The default certificate type is Windows store. You can change this and select the option file (.pem) based. |
Root certificate | This is enabled only when you set the Client/Server communication type as Secured. By default, it displays the root certificate that you set as default. |
Host certificate | This is enabled only when you set the communication type as secured. By default, it displays the host certificate that you set as default. |
Host certificate users | This field is available only when you set the communication type as secured and the certificate type selected is Windows store. |
Host key | This is enabled only when you set the communication type as secured and the certificate type as file (.pem) based. Allows you to browse for the host key certificate from the disk. This field is only available for File (.pem) based certificates. |
Communication Security Expander – Web Server Communication
The Web Server Communication group in the Communication Security expander allows you to configure secure web communication between Server project and IIS (typically remote web server) that takes place over the CCom port. The communication is secured using host certificate.
For securing the communication between Server and the local web server, you can leave the web server communication as local (without certificates).
You can configure the web server communication during project creation and modification on Server, Client/FEP installations.

NOTE:
With Version 5.0, the Unsecured communication type is replaced with Local. It is recommended to configure the communication of all remote web applications to Secured as Unsecured communication will not work.

Communication Security Expander | |
Item | Description |
Communication | Allows you to secure the communication between the Server and web server (IIS) by configuring the CCom port and the host certificate. The web server (IIS) may be installed on the same computer as the Server (as a local web server) or it may be installed on a separate computer (acting as a remote web server). |
CCom port | (Available only on Server SMC) Default port number is 8000 and the support range is 1 through 65535. The CCom port is used by the CCom manager of a project to communicate with web server (IIS), which is required for working with Windows App client. |
Host certificate | This field is enabled only when you select Secured from the Web communication drop-down list. By default, it displays the host certificate that you have set as default. However, you can browse and select another host or self-signed certificate using the Select Certificate dialog box. |
On a Client/FEP SMC in Automatic Mode
When you edit a project on a Client/FEP SMC, the Communication Security expander allows you to configure security details setting Server Communication to Automatic configuration or Manual configuration.
In automatic mode, once you select the Server and the Server project, the appropriate security settings for that project are automatically set. For example, if you select an unsecured or stand-alone Server project the all the fields of the Communication Security expander are disabled.
If you select a secured Server project, the certificate type is set to match that of the Server project. For example, if you select a secured Server project that has secured communication using Windows store certificates, the certificate type is automatically set to Windows store during the Client/FEP project creation/modification. Note that, for the Windows store certificate type, you must add the host certificate users, who can launch the Desigo CC Client on the Client/FEP station.
On a Client/FEP SMC in Manual Mode
When you edit the Client/FEP project in the Manual configuration mode, you must manually enter the same server communication details for the selected Server project.


NOTE1:
When modifying a project on a Client/FEP, if you select a Server project with Secured Client/Server communication, you must provide the same root certificate configured for Client/Server communication in the selected Server project. The host certificate can be different; but it must be created using the root certificate provided on Client/FEP. Otherwise, the Desigo CC Client application does not launch.
NOTE 2:
The host certificate is used by the Desigo CC Client/FEP. Therefore, the Client/FEP logged-in operating system user must be given access to the private key of the host certificate stored in the Windows Certificate store.
NOTE 3: On Server/Client stations, for Windows store certificate type, you cannot use a CNG certificate with ECDSA signature algorithm as a root or host certificate.
The Project Shares expander allows you to share the individual subprojects of the server project folder and set the necessary permissions on them for the Windows users and user groups. Typically you need to share project subfolders and assign permissions to the user logged onto the operating system of the Client/FEP station or to the Web application user on the remote web server. All Windows accounts of users running a Client/FEP installation or a remote web server must have access to the project subfolders with the rights.
The Project Shares expander displays only in the Server SMC. This expander becomes available in the Project Settings tab in the following cases:
- The project was created with web communication set to secured/local.
- You modify the project and set Client/Server communication to secured/unsecured.
- You have modified the project and enabled the Distribution participant check box.
Once the Project Shares expander becomes available, you can always share the project and add or remove users. Sharing the project internally shares individual folders within the project (devices, documents, graphics, libraries, profiles, and shared) for the user or group. It also sets permissions on them.
You can also share the project folder externally, using Windows. To verify that the security permissions are set appropriately it is recommended to check the project share consistency by clicking the Check Project Share Consistency  icon.
icon.

Project Shares Expander | |
Item | Description |
Share Project | When selected allows you to share the project folder for the selected project. It automatically sets the Base share name as the project name. |
Base Share path | Displays the path of the shared Project folder. |
Base Share name | Displays the project name as the default share name. |
Group or user names | Displays the list of users or groups that have permissions on the shared project folder. |
Add | Allows you to add users or groups from the current station domain or from the list of available network domains using the Select User or Group dialog box. |
Remove | Allows you to remove the user /user group from the list of Group or user names. This button becomes enabled when you select a user or a group from the list of Group or user names. |
Tips
- Project folder can be shared without adding any user/user group.
- Removing all the users does not automatically revoke sharing of a project folder.
- Deselecting the Share Project check box, removes all the added uses in the project share as well as removes the project share.
- Once the project is shared and you change the Client/Server communication mode to stand-alone and the web communication mode to disabled, the project shares as well as users will be removed and the Project Shares expander becomes unavailable.
- You have to add and remove the users one by one, each time clicking Add/Remove.
- Unless you save the changes the users are not added to or removed from the list of Group or user names.
- Once a user is removed from the list of Group or user names, that user no longer has share permissions. You can verify this in Windows (using Computer Management > System Tool > Shared Folders > Shares, and by selecting the Share Permissions check box for the shared folders).
- After creating a project, if you share the project folder using Windows, and select the project in SMC, the Project Shares expander will display those project share settings. That is, the Share Project check box will be selected, and the Group or user names list will include the user/user groups to whom you assigned permissions on the shared project folder.
- In workgroup environment, for working with Client/Server setup or distributed system, the user with which you have shared the Server project folder, must also be present on the Client station or on the distribution partner machine and have the same password on both the systems.
The Distribution Participants expander is enabled when you select the Distribution participant check box, that in turn enables the distribution.
It provides all the required configuration parameters for setting up the projects in distribution. You can set up the projects in distribution on the same (single) server as well as on a different server. The distributed systems that you set up can be fully meshed or hierarchical.
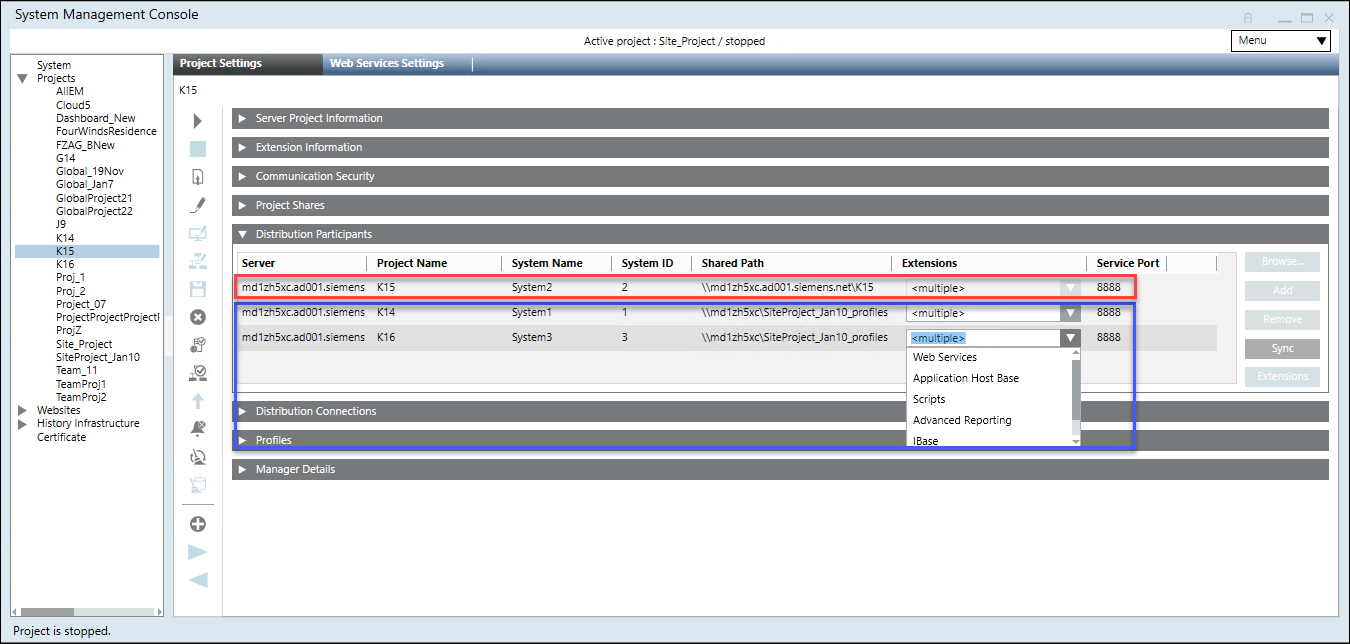
When you enable the distribution, a default and very first entry for the Local System (Originator) is added. This entry includes the details of the current project configuration including the current Server Name, Server Project name, System Name, and so on. This is a read only entry. You can neither edit the details of Local System entry nor delete it.
Using the Distribution Participants expander you can configure the distribution participants (projects) available on the same Server or from other Server. You can do this in two ways:
Automatic Mode
When you click the Browse button in the Distribution Participant expander for adding the distribution partner entry, you are working in automatic mode. This is because, once you select the project on the selected Server from the domain/workgroup, all the configuration details of the selected project including the extensions are automatically added as a distribution partner project’s entry in the Distribution Participants expander.
Manual Mode
When you click the Add button in the Distribution Participants expander for adding the distribution partner’s entry, you are working in manual mode. In manual mode, you need to provide all the configuration details of the distribution partner project. You can add the extensions for the distribution partner project using Extensions.

NOTE:
While working in distribution environment in manual or automatic mode, make sure that the distribution partner project’s details including Server name, project name, system name, system ID, the shared path, and the extensions configured in the selected project are valid. Otherwise, the distribution does not work.
For example, if the extensions are incorrectly configured when working in manual mode, the corresponding profiles will not be present on the originator (Local) system; therefore, you cannot to load the corresponding application for the profile.
The Distribution Participants expander comprises of following:
Distribution Participants Expander | |
Item | Description |
Server | Allows you to type in the name of the Server computer or IP address of the distribution participant when you click Add and work in the manual mode. |
Project Name | In the manual mode, type in the name of the project on the selected Server that you want to set up in distribution. |
System Name | In manual mode, type in the system name configured in the selected project on the selected Server in manual mode. |
System ID | Type in the system ID configured in the selected project on the selected Server in manual mode. |
Shared Path | Type in the path of the shared Project folder on the selected Server in Manual mode. |
Extensions button and the Extensions column | The Extensions button is enabled only when a new distribution partner project’s entry is added to the distribution participants list or when you select an existing distribution partner’s entry. |
Browse | Use the Browse button to work in automatic mode. |
Add | When clicked, adds a blank row. You can manually enter the details of the distribution participant project that you want to set up in distribution. |
Remove | This button is enabled only when a distribution participant’s entry (other than the Local System entry) is added to the distribution participant’s list either using manual mode or automatic mode. |
Sync | Click Sync to harmonize the distribution configuration details of all the distribution partner projects listed in the Distribution Participants and Distribution Connections expanders. Sync also allows you apply the Originator project’s distribution details to all the distribution partners. |
Service Port | (Default value is 8888) In the Manual mode, provide the service port number configured using systems in SMC. Note that the service port for all the projects on the Local System is same. |
Browse For Distribution Partner Dialog Box
This dialog box allows you to select a Server computer from the accessible networks, in the domain or in the workgroup for configuring the distribution when you click the Browse button in the Distribution Participants expander. This expander becomes available when you select the Distribution participant check box available in the Server Information expander.
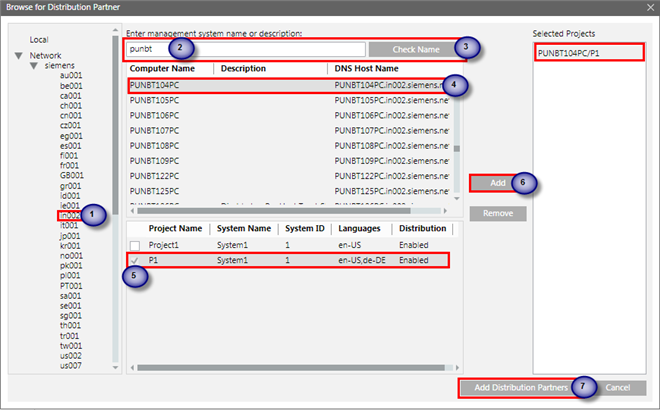
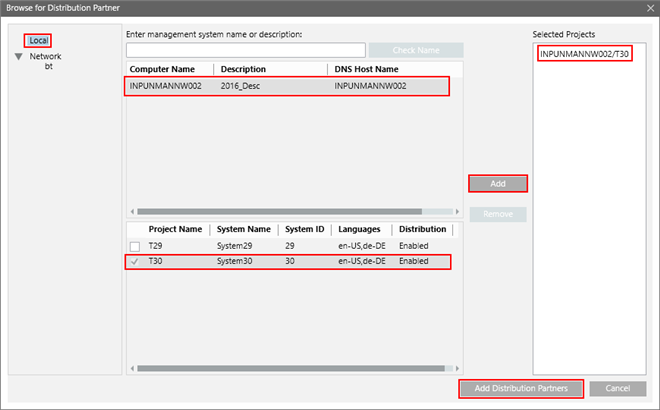
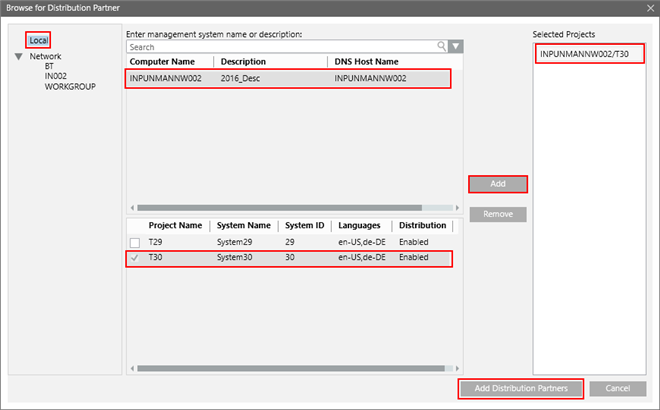
The Browse for Distribution Partner dialog box consists in the following elements:
Browse for Distribution Partner Dialog Box — Domain | |
Name | Description |
Local | When you select the Local node, current machine name and its projects are displayed. |
Check Name (applicable only servers in Domain) | Type the Server computer name into the Enter management system name or description field and click Check Name. |
Get Projects | Available only when the Service port of the selected Server is other than the default 8888 or if the WCF service for the selected Server is stopped/unreachable, a message displays. |
Filtered Server Computers’ List | List view that displays the list of all the Server computers matching the search criteria for the selected domain. |
Available Projects’ List | Select the check box adjacent to the project that you want to add as a distribution participant. You can select multiple projects. |
Add | This button is enabled once you select one or more project as distribution participant. |
Remove | This button is enabled only when the projects are added to the Selected Projects list. |
Add Distribution Partners | This button gets enabled when you have at least one project added to the Selected Projects column. |
This Distribution Connections expander is enabled when you select the Distribution participant check box for a project.
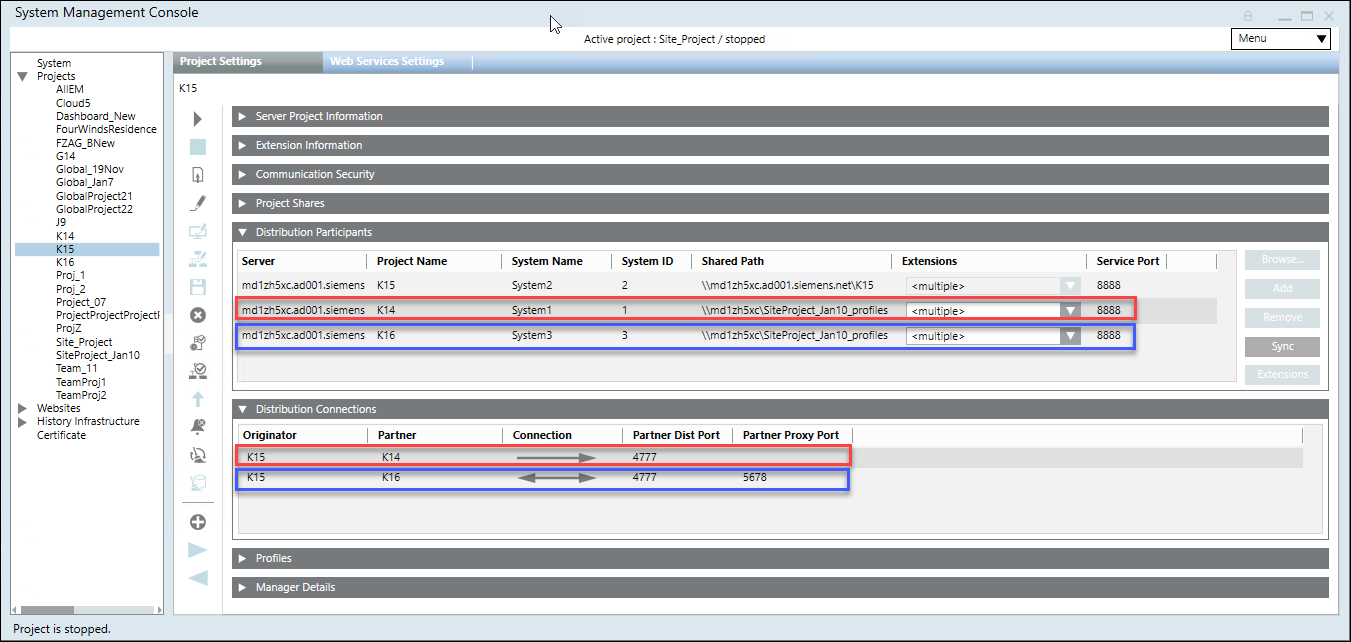
Once you add the distribution partner project, manually (by clicking Add) or automatically (by clicking Browse), an entry is added in the Distribution Connections expander.
You can modify the distribution connection parameters including the connection type, partner dist port, and the partner proxy port for a selected distribution participant.
The Distribution Connections expander comprises of the following:
Distribution Connections Expander | |
Item | Description |
Originator | (Read only) Displays the name of the project (currently selected project) to which you are adding the distribution participants. |
Partner | (Read only) Displays the name of the distribution partner project configured in the currently selected entry in the Distribution Participants expander. |
Connection | (Bi-directional):
(Unidirectional)
(Unidirectional): |
Partner Dist Port | Allows you to type in the dist port of the selected distribution partner project. This port is used to set up the distribution between two systems (projects). |
Partner Proxy Port | This port is the proxy port configured for secured server communication on the linked distribution partner project. |
When you edit the project, you can work with the Profiles expander.
The Profiles expander lists all the profiles for the originator project including profiles for its extensions. It also displays the profiles for all the linked distribution partner project (including profiles for the configured extensions), if any.
The Desigo CC profiles determine the appearance and behavior of the Summary bar, Event List, and other system functions involved in handling alarms. The extension profiles are designed to meet extension specific needs.
Why Do We Merge Profiles of the Local System with Partner System?
The distribution partner project has its own set of profiles depending on the extensions configured. When you add a distribution partner project to the originator project in automatic mode, the profiles of the linked distribution partner project along with those of the configured extension s are automatically added to the originator project (…\profiles folder on the installation drive). However, when you configure the distribution partner in manual mode, you must manually add the extension s configured in the distribution partner project, which in turn adds the corresponding extension profiles to the originator project.
This is done, so that when you log onto the Installed Client, depending on the distribution connection type and the profiles configured, you can work with the respective functionalities of the linked distribution partner project.
You can add extension s to the originator project using Add to Project, and if the newly added extensions are already installed on the distribution partner project, on Sync, the extensions along with the profiles are updated on the distribution partner project.
The corresponding applications related to the extension do not display, when the profiles are not merged.
The following table describes the relationship between the Distribution Connection type and the profiles of the linked distribution partner project, when added to the originator project.
Distribution Connection Type | Profiles of the Linked Distribution Partner Project |
Originator Project | Added to the Originator Project. |
Originator Project | Added to the Originator Project. |
Originator Project | Not added to the Originator Project. |
When you remove the distribution partner project, the profile entries for that distribution partner are removed from the Profiles expander as well as from the ..\profiles folder of the originator project. Similarly, when you remove the extension of the distribution partner, the corresponding profile entry is removed from the Profiles expander as well as from the ..\profiles folder of the originator project (when no other distribution partner project has this extension configured).

The Profiles expander comprises of the following:
Profiles Expander | |
Item | Description |
Profile Name | Displays the name of the Profile for the Originator project as well as for all the linked distribution partner projects, if any. It also lists the profile names of any extensions configured in the Originator or linked distribution partner project. |
Host Module | Displays the name Platform, if the selected profile is Desigo CC profile. |
Profile Type | Displays the type of profile for the Originator and/or linked distribution participant project. The Profile type can be: |
Profile Source | Displays the profile source: |
For the profiles depending on the selected event schema provided by Headquarters, see the UI Customization Profiles.
Additional Profiles, designed to meet specific needs, can be installed as an extension and added in the project.
It lists all the managers that are configured in a project along with their status.

Before starting the Installed Client or Windows App Client, it is recommended to wait until all the managers of a project except for the managers with manual mode (excluding the process monitor manager), are running. A manager in red with a project status stopped – inconsistent progs file (in red) indicates that the progs file is corrupt. Check the Smc.log file located at
[installation drive :]\[installation folder]\GMSMainProject\log.
Manager Details Expander | |
Item | Description |
Manager | Description of a manager |
Name | Name of the manager |
Mode | Displays the following modes: |
Status | Displays the following statuses: |
Options | Displays manager parameters associated with a manager. |


 .
.


 : Default distribution connection type, which is configured when you set up the projects in distribution manually or automatically. You can configure the Fully Meshed distributed systems using the bi-directional connection type.
  : Allows you to set up the Hierarchical distributed systems, by changing the default distribution connection (bi—directional).
  ).
).