SMC System Settings
This section provides reference and background information for configuring of Desigo CC with SMC System Settings. For related procedures, see step-by-step section.

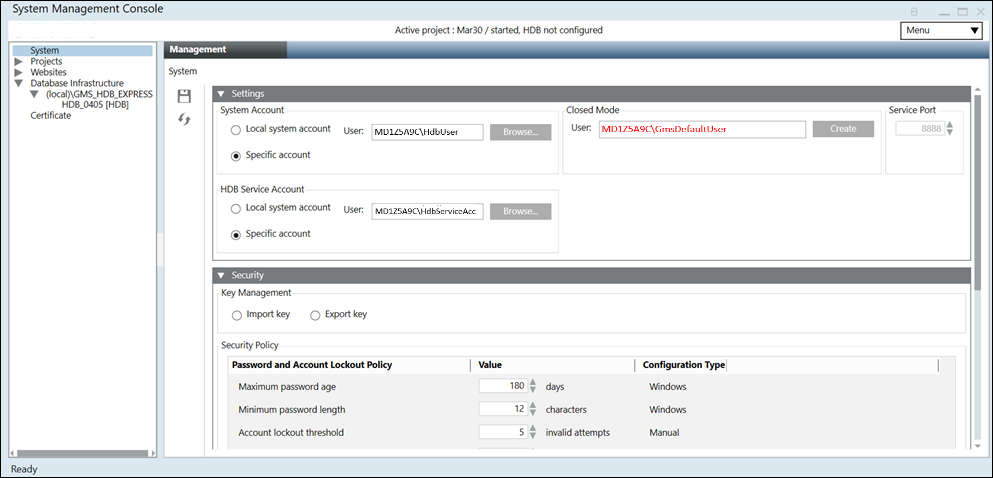
The System node is the default selection in the SMC tree of the SMC. It provides you with the following expanders.
The Settings expander allows you to specify settings for System Accounts, HDB Service Account, Closed Mode and Service Port (only on Server).
System Account Settings
Before creating a project and history database, it is recommended to check and, if required, configure the System Account, by changing the default. However, you may edit them after creating the project and history database.
System Account settings allow you to specify the user that internally runs the Pmon service of the project and is the HDB user, see Configure the System Account in System Settings Procedures. Using this user, the HDB is accessed for read and write operation.
System Accounts contains the following two options:
- Local system account (default selection): The local system account option sets the default, read-only value [Machine name\SYSTEM].

- Specific Account: Using the Specific Account option, you can change the default value (user). If you change the default, you must provide the valid password and confirm it. Changing the default (SYSTEM) internally changes the projects Pmon user and history database’s HDB user. This displays in red when you select the project and HDB. You must edit the project and HDB, which internally syncs the Pmon user and HDB user. The GMS_WCCILpmon_[Project Name] service gets configured in Windows to start under this specific account. The changed user is set as the HDB user.
- This user is set for all the projects. If you change the System Account user after creating a project, it displays in red in the Communication Security expander of the Project Settings tab, after you select a project node in the SMC tree. This indicates that it must be adapted by modifying the Server Project Parameters.
- This user is also set for all the history databases. If you change the System Account user after creating the history database, it displays in red in the Security expander of the Historic Databases tab, when you select the HDB node in the SMC tree. This indicates that it must be adapted by stopping and editing the history database.

Tips
- You can configure the user as a Windows (local/domain) user.
- Make sure that the Windows (local/domain) user configured using the Specific accounts has the Log on as service right.
- To create a new Windows local user, right-click Users and select Computer Management > Local Users and Groups > New User.
(See http://windows.microsoft.com/en-US/windows7/Create-a-user-account)
In the New User dialog box, if the User must change password at next logon check box is selected, a message informs you that before logging on for the first time, you must change the password. - It is recommended to specify the domain account user as a Specific account in the System Account if you want to perform an active directory synchronization to import users from the active directory (LDAP) to Desigo CC . Setting a local user account or service account may cause the connection to fail as a local user account or service account may not have access to active directory (LDAP).
- If you exceed the maximum allowed number of attempts while providing the password for a Specific account, a message informs you that the Specific accounts user account is locked.
- If you close the SMC after saving the values for the Specific accounts and re-launch it, the SMC does not retain the password and you must provide it again, for example, while creating a new project.
HDB Service Account Settings
Before creating the HDB, it is recommended to check and, if required, configure the HDB Service Account, by changing the default. However, you may edit them after creating the HDB. It is also recommended to have the HDB Service Account different than the System Account.
The HDB Service Account Settings allow you to specify the user that internally runs the Siemens GMS HDB Service and is the HDB service user, see Configure the HDB Service Account in System Settings Procedures. Using this user, the HDB is accessed for maintenance operations.
HDB Service Account contains the following two options:
- Local system account (default selection): The local system account option sets the default, read-only value [Machine name\SYSTEM].

- Specific account: Using the Specific account option, you can change the default value (user). If you change the default, you must provide the valid password and confirm it. Changing the default (SYSTEM) internally changes the history database’s HDB service user. This displays in red when you select the HDB. You must edit the HDB, which internally syncs the HDB service user.
- The Siemens GMS HDB Service gets configured in Windows to start under this specific account. The changed user is set as the HDB service user.
- Note that the user is set for all the HDBs. If you change the HDB Service Account user after creating the HDB, it displays in red in the Security expander of the Historic Databases tab, after you select the HDB node in the SMC tree. This indicates that it must be adapted by stopping and editing the history database.

Closed Mode Settings
The Closed mode settings are required to run the system in Closed mode.
The first time you start SMC, the Closed mode settings allow you to create a default Desigo CC user account, which also creates a corresponding Windows user account in the Windows User Group. This account is required to run a Windows service that runs the Desigo CC Closed mode. You must type a password according to the domain policy and confirm it. The password is validated on save.

If you change the Closed mode user (GmsDefaultUser) password from Windows or if the Closed mode user password has expired, you must change the password of the Closed mode user and configure the Closed mode settings. You can do this in the Closed Mode section of the Settings expander that displays when you select the System node in the SMC tree.

If the Closed mode user password is not the same as the Windows user password, the SMC indicates this in red in the Closed Mode section in the Settings expander, see Configure Closed Mode User Settings.

1) GMSDefaultUser is Windows user that must have read/write access rights to the [Installation Drive:]\[Installation Folder]\[ Project Name] folder on the server (for example, C:\GMSProjects\MyProject).
Using Windows Explorer, you can enable such access in the security properties of the project folder.
For more information about folder security, refer to Windows documentation.
2) If you use a secure client/server connection, GMSDefaultUser must be included in the list of host certificate users of the project.
Service Port Settings (Only on Server SMC)
You can configure the Service port only on server installations. It helps in aligning the projects on client or FEP stations with the projects on server.

The Service port is used by the client and FEP to obtain the project information from the server.
This communication happens using GMS SMC ProjectData Service, which runs on the Service port. This service provides server project information (such as name, language and configured ports) to the clients. It does not provide information about the outdated projects.
The configuration range is 1 through 65535; 8888 is the default value.
Tips
- To edit the Service port number, you must first stop the GMS SMC Project Data Service listed in the Services expander.
- The Service port number displays in grey if the GMS SMC Project Data Service is stopped and in red when started, indicating that the port is in use, but unsecured.
- While creating a project on the client/FEP, if the Service port does not match the Service port number on the server, a message displays and you will not get the project information for server projects.
- In distributed environment, if sync does not work:
Binding/security mismatch between sender and receiver: To troubleshoot this error message, first check if GMS SMC Project Data Service is started in the Services expander and you are able to access the URL
http://localhost:8888/SiemensGmsSmcProjectDataService for this Server using browser. (on local machine)
If not, then check if machine and port of GMS SMC Project Data Service are accessible from the machine you want to access it from.
When the GMS SMC Project Data Service is not working on Server 2 you can try to access the URL
http://<Server1Name>:8888/SiemensGmsSmcProjectDataService
Additionally, you can also check if this machine and Service port is opened in firewall.
Select User Dialog Box
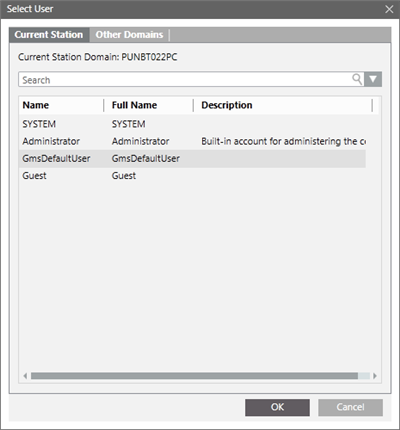
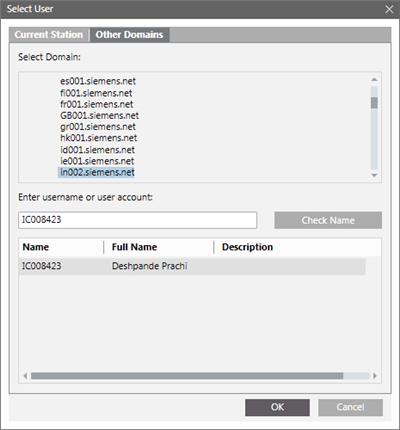
The Select User dialog box allows you to select a Windows user account either from local computer (from the Current Station tab) or from accessible networks (from the Other Domains tab).
The Select User dialog box can be launched when you click Browse for selecting a user.

The Current Station tab consists in the following elements.
Current Station Tab Fields | |
Name | Description |
Current Station Domain | Select from the list of available local users. |
Search | Enter the name of a user to look for. |

The Other Domains tab consists of the following elements.
Other Domains Tab Fields | |
Name | Description |
Domains Tree View | Displays the tree of the available network domains. You can select the domain where the user is located. The domain can also be specified using the Check Name textbox, that is, domainname\username. If you want to select a user from a sub-domain of a domain, and as the sub-domain in not visible in the domain tree currently, you must specify the user name or user account as follows: |
Check Name | If a domain is selected (in the domains tree or using the Check Name textbox), clicking this button displays the list of matching users in the Filtered Users list view. |
Filtered Users | This list contains all the users matching the search on the selected domain. |
The Service Admin expander displays only when you edit the StartSmc.bat file by adding the /support switch to it and then starting the SMC.
This expander is available only on server installations.
The Service Admin expander allows you to enable and configure the Service Admin user account. This account applies to all the projects of the SMC. Once enabled, the SMC operator, who is the currently logged-in user, is automatically assigned as Service Admin.
Using the Service Admin account, you can log onto the Desigo CC client application and work with a restored project, which was backed up by a different user for which user name and/or password are not known.

The Service Admin expander has the following two options:
Enable Service Admin
This option allows you to configure the local/domain user as the Service Admin. By default, the currently logged-in Windows user is set as the Service Admin.
Disable Service Admin
This is the default selection. If you do not enable the Service Admin and start a project, you cannot use the Service Admin user to log into Desigo CC .

NOTE 1:
The projects take over the changed System Admin user only when you restart the project.
NOTE 2:
For security reasons, when configuring the Service Admin, it is recommended that you do not use a local Windows user in a project working with multiple installed clients and FEPs. Local Windows accounts are less secure. Instead, you should use a Windows domain user.
When you first start-up SMC, SMC automatically creates the system key (containing the key pair, that has the private and the public key) in the Windows Key store on the server. For working with multiple computers supporting various deployment types and securing the sensitive data, you might use the same system key (private key). You can do this using the Security expander for Server and FEP deployments.
For server and FEP deployments, the Security expander displays in SMC, when you select the Systems node in the SMC tree.

Security Expander on Server SMC
On the SMC server, the Security expander allows you to do the following:
- Export and import the Windows key file (containing the key pair, that is, the private and the public key).
- Protect System key by securing it with password.
Security Expander Details | |
Item | Description |
Import key | Select this option to import the same key file (.key) which is available on the disk of the server, FEP or any other system from which you want to restore, secure and sensitive data. For example, if you are restoring a project backup of System A to System B, then you must import the same key from System A to System B so that you can use the same credentials set for System A. You must import the key before starting the project. |
Export key | Only on the SMC server. |
Key file name | Type in the Key file name, for example Server1KeyFile. |
Key path | Browse for the location to store the key file on the server. |
Password | Enter the password of the key file adhering to the Windows local password policy and confirm. |
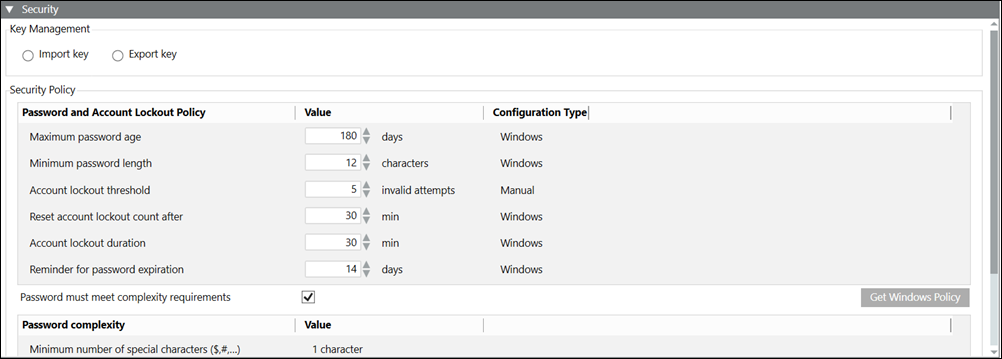
The Security Policy section displays the password and account lockout policies and allows you to do the following:
- Modify values of password and account lockout policies and save the new values.
- Revert back to the existing password and account lockout policy values. You can do this by using the Get Windows Policy button.
Security Policy | |
Item | Description |
Maximum password age | Time period (in days) during which a password can be used before the system requires you to change it. |
Minimum password length | Minimum number of characters required for a password. |
Account lockout threshold | Number of failed sign-in attempts that will cause the user account to be locked. |
Reset account lockout count after | The number of minutes that must elapse from the time you fail to log on before the failed logon attempt counter is reset to 0. |
Account lockout duration | Time duration (in minutes) that a locked-out account remains locked out before it is automatically unlocked. |
Reminder for password expiration | Time duration (in days) that warns you that your passwords are about to expire. |
Configuration Type | |
Type Name | Description |
Windows | Security policies with values as per the Windows registry |
Default | Security policies without any corresponding Windows values. These policies either have negative values, values with a zero, or NA as values. Such policies have default values assigned to them |
Manual | Security policies that are defined by the user. |
You can ensure that the password meets the complexity requirements provided by Windows by selecting the Password must meet complexity requirements check box. For more information on password and account policies, refer to the Microsoft help.
On selecting the Password must meet complexity requirements check box, the following fields related to password complexity display. The password must have one of each of the following:
- Minimum number of special characters ($,#,…) – . Any one of the following special characters ~!@#$%^&*_-+=`|\(){}[]:;"'<>,.?/
- Minimum number of digits (0-9) – 1 digit in the range of 0 to 9
- Minimum number of upper-case letters (A-Z) – 1 upper case letter
- Minimum number of lower case letters (a-z) – 1 lower case letter
In addition to these fields, the password must have the number of characters specified in the Minimum password length security policy when the Password must meet complexity requirements check box is selected.

NOTE:
In case of Client and FEP installations, the password and account lockout policies defined on the Server are considered.
In case of distributed systems, for global user the password and account lockout policies defined on the master system are considered.
Security Expander on FEP SMC
When starting up SMC on FEP, no system key is automatically created. This is indicated by the Import Key displaying in red. If the FEP is connected to a server, you must import the key pair available on the server, into the Windows key store of the FEP. The same key is needed on the FEP so that it can decrypt the passwords which it has to use for authentication of the subsystem devices. This way a network can get reassigned to a driver on a different machine without having to reconfigure the password.
You can do this using the Security expander. You must import the same Windows key file by providing the correct password so that the key file gets decrypted and the key is imported into the Windows key store. For importing the same key that was created on the server, you must make it available on the disk of the FEP.
Once it is imported, the Pmon user gets the Read access to the key. By default, the SYSTEM and Administrator users have full access to the Windows key file.
When you change the Pmon user, for example as Domain user, SMC automatically provides Read permission to the system key.
The key stays in the Windows Key store even when you uninstall Desigo CC . Therefore, you do not need to export and re-import the key while upgrading Desigo CC .
This key is used to secure sensitive data in all deployments supported by Desigo CC (including Stand-alone, server with remote FEP, remote clients), as well as securing sensitive data on distributed systems.
In addition to importing the Windows key, you can also view and modify the password and account lockout policies in the Security Policy section of the Security expander.
The Services expander displays a list of Desigo CC and extension module supported services, along with their current users and the status.
A service is visible in the Services expander only when it is present in the Windows services or in the WinServicesList.xml file located at the path …\GMSMainProject\bin.
The Services list does not contain other third-party software services installed by Desigo CC .
You can start or stop a service, and refresh the list to get the latest service status; Running, Stopped, or Paused.

Services Expander | |
Item | Description |
Service | Displays a list of services including the project's Pmon services. It also displays Desigo CC and extension module supported services that are available in the WinServicesList.xml file. |
User | Displays the current logged-in user of a service. |
Status | Displays the current status ( |
Refresh | Provides the updated status of the service. |
Start/Stop | This toggle button allows you to start and stop the service. |
Restart | This button gets enabled only when you select a service having the status |
Tips
- It is not recommended to start, stop, or change a user for the project's Pmon service, GMS_WCCILpmon_[Project Name], using the Services expander in the SMC or from the Windows Services applet.
- From the Services expander, you can change the Service account user of a listed service except the project's Pmon service, GMS_WCCILpmon_[Project Name]. When needed, the Pmon service GMS_WCCILpmon_[Project Name], Service account user can be changed using System Accounts of the Settings expander.
- The SMC does not necessarily reflect the changes done in a project's Pmon service using Windows. For example, if the Pmon service user’s password is changed externally from the Windows Services applet (not using SMC), then to synch the changed password with password of the Pmon user in SMC, you must do the following steps. Otherwise you cannot start the project.
1. From SMC tree, select System and open the Services expander.
2. Select the GMS_WCCILpmon_[Project Name].
3. Change the password of the user to the correct one.
4. Click Apply.
5. Save.
Service Account Expander
The Service Account expander allows you to configure the Service account for the selected service from the list of services in the Services expander.
This expander is enabled only when you select a service from the list of services in the Services expander.
Service Account Expander | |
Item | Description |
Local system account | Default selection. Displays the local system account user of the selected service from the Services expander. |
Specific account | Allows you to set a specific account from current station or other domains. |
Browse | Allows you to browse for the user in the current station or another domain. |
Password | Allows you to enter the password. The System user does not require a password. |
Apply | Sets the selected user as Service account user for the selected service. |
