BIM Viewer
The following requirements or recommendations apply to working with the Desigo CC BIM Viewer:
- IFC files must be available on BIM models for import. The files can be exported from a BIM tool (for example Autodesk Revit).
- Rooms must be defined in the BIM tool. Otherwise, recursive associations between Desigo CC objects and BIM objects. (Manual associations are always possible.) Moreover, a number of room-oriented functions (for example, room values by windows, etc.) are not possible without rooms.
NOTE: Since multiple BIM models can be combined (see Combine Multiple BIM Graphics), the rooms are extracted from the basic BIM graphic (the graphic dragged to the additional BIM graphics). Ignore all rooms in the additional files. - Room units must be defined in the BIM tool and exported to the BIM models to display/edit them. Units cannot be added later to Desigo CC.
- Automation station export files (for example SiB-X files) must be available to integrate the building.
- Orient the names (or descriptions) of the Desigo CC objects (floor, rooms) on the corresponding BIM object names to allow recursive association for the “architectural” hierarchy.
- The mapping table may also have to be modified to adapt the process for device detection/association (see Product Mapping Table). Special property values for BIM objects may also be required in the BIM tool (Revit).
| Description |
| Common part (the symbols for display is based on the configuration) |
| Opens the project-specific filter dialog box. The filter can be define in edit mode. Various filters can be combined and used in edit mode. |
| Clear the filter settings if the filter dialog box is already closed. |
| The available functions are displayed, for example, temperature, humidity, when selecting the Building automation and control icon. The visibility of the discipline is defined in the Configuration expander. |
| The available functions are displayed when selecting the Fire icon. The visibility of the discipline is defined in the Configuration expander. |
| The available functions are displayed, when selecting the Access control icon. The visibility of the discipline is defined in the Configuration expander. |
| The available functions are displayed, when selecting the Intrusion icon. The visibility of the discipline is defined in the Configuration expander. |
| The available functions are displayed, when selecting the Video icon. The visibility of the discipline is defined in the Configuration expander. |
| Engineering part (unlisted icons are described in operation) |
| Import from BIM data in format: ifc, xbim, ifcml, ifcc |
| Deletes the opened BIM graphic. |
| Deletes the related time from the present BIM object with Desigo CC object data (and, if selected, the underlaying objects as well). |
| The initial view can be set when opening an individual graphic overview or individual rooms. You can do this for each room. |
| BIM data retains the data that is not mandatory for operation, for example, building supports or base plate required for the stability of the building. All this information can be hidden using a hide filter. |
| BIM data can be provided at various levels of granularity. No merge is needed if all the data is provided in one BIM file. BIM data must be merged if it is subdivided into building data and electrical and mechanical installation data. |
| Saves the opened BIM graphic. |
| Displays the BIM object tree. BIM objects can be linked to or removed from project data. |
| Updates the links for all the project data. This function overwrites any unsaved associations. |
| Opens and closes the Configuration expander. |
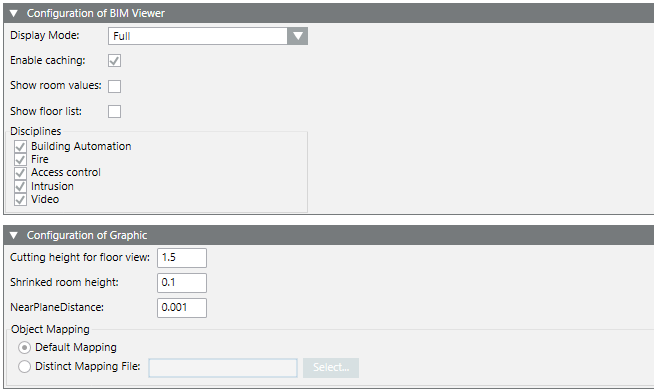
BIM Viewer Configuration | |
NOTE: The properties apply to the entire BIM project. | |
Display mode | Full: Recalculates all the graphic objects as soon as the cursor is moved. Requires a lot of RAM. Optimized: Graphic objects are not calculated within a building in the overview. In the floor view, only those graphic objects are calculated that are located on this floor. This procedure significantly reduces computer power. |
Enable caching | The BIM data is saved temporary if the check box is selected to quickly form the image. The cache is updated with <Alt> + <Home>. |
Display room values | If enabled, the room value box is displayed when opening the floor overview. Room value display |
Show floor list | If enabled, the floor list is displayed when opening the floor overview. Floor list window |
Disciplines | If enabled, the disciplines Building automation and control, Fire, Access control, Intrusion, Video can be individually enabled. |
Graphic configuration | |
NOTE: The properties apply to just a single graphic page. | |
Reduce cutting height for floor view | This value indicates the height (in meters) above the level of the lower floor that has a cut out of a floor in the floor view. All rooms are cut to the same height. |
Reduced room height | The system adds "shrinked room" objects when selecting the room colors. Depending on the concept of the BIM model, some rooms include floors while other do not. A selected / color room is not visible if a room does include the floor and the floor is thicker than the "shrunken room height". You must increase this number, for example, if no shaded pattern can be seen when selecting a room. |
Level distance | This is a special value that normally is not changed. Changing the value can be helpful if the surface of some BIM elements "flicker" when moving/turning the model. |
Object association | Default association As 1st default, the ProductMapping_HQ.csv file is used to associate BIM models and Desigo CC objects. As the second default, the ProductMapping.csv file, if available Project association file: A specific ProductMapping_Graphic_page.csv file used only for this site. |
Apply the following rules to link data point to BIM objects:
- Building, floor, room are linked by comparing the data point description (in the current engineering language) with BIM objects on the same hierarchy level. NOTE: BIM object names can only be supplied in one language.
- The data point description and the BIM object name must be identical to link them. An algorithm performs the best possible link.
- The link with the BIM data can occur from any Desigo CC view. The Technical View is the best view since it is nearly identical to the view created from the BIM modules.
- Room units (objects below the room level) are controlled with the help of an assignment table. For more information, see the Assignment table.
- You can also use drag-and-drop to manually link data points to BIM objects.
- More than one data point can be linked to a BIM object.
The step-by-step instruction is described in Workflow.
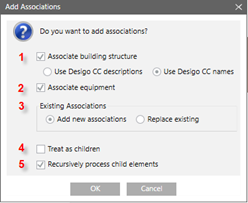
Add options to the associations dialog box | ||
| Section | Description |
1 | Associated building structure | If selected, the association process attempts to associate Desigo CC data points for floors / rooms with the corresponding floor / rooms in the BIM data. The following options determine whether Desigo CC names or descriptions are used to an associated BIM element. NOTE: Desigo CC names are used by default. |
2 | Setup associations | If selected, the association process attempts to association room units from Desigo CC with devices in the BIM data. This action uses the ProductMapping.csv file that defines the various rules to define units and association rules. Additional information on this file is available in the Product association table section. |
3 | Existing associations | Select whether to add or replace existing associations. |
4 | Treat as children | If selected, the highlighted Desigo CC data points are not assigned directly to the target BIM object, but rather are treated as a child element of the target BIM object. Example: In the technical view, multiple rooms can be selected and dragged to one BIM floor object. The rooms are associated to rooms on the same floor if Treat as children is selected. If cleared, all Desigo CC rooms are assigned the BIM floor object. |
5 | Recursively process child objects | If selected, all child elements are associated recursively with the selected child objects. If cleared, only select nodes are associated with the target BIM object. |
Example of possible automatically associations | ||
BIM data | System data | Association |
1st floor | 1st floor | Yes |
1st floor | 1st floor | Yes |
1st floor | 1st floor | No |
1st floor | Floor 1 | No |
1st floor | First floor | No |
Example of applied rules:
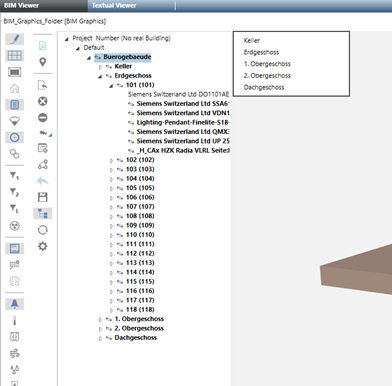
- If Associate building structure is selected:
- Building, floors, and rooms are associated by comparing the Desigo CC data point names / descriptions (based on the selected option in the current language) against the BIM object names on the same hierarchy level (Note: BIM names are not language neutral).
- Object names / descriptions do not need to be an exact match. Approximation algorithms are applied.
- Drag source node(s) are always associated with the drag target, unless Treat as children is selected.
- In this example, the Technical View is used as the target source. This is practical since this view has a hierarchical building structure similar to BIM. Any view may be used in however to configure associations.
- If Setup Associations is selected:
- Room equipment (in other words, objects below the room level) is associated using an association table. Additional information on the association algorithm is available in Product Association Table.
- The recursive association is not limited in a view to the existing room / device hierarchy. A property string mapping can also control it (see Product Association Table).
- In principle, each data point can be associated by dragging it without using the integrated recursive association algorithm.
- More than one data point can be associated to the same BIM object. In other words, a target node (BIM) may have multiple associations.
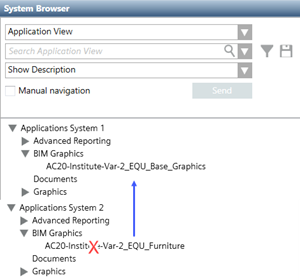
The BIM Viewer can used in a distributed system. One limitation applies to combining multiple BIM models. In this case, all BIM models are located in the same system. Data point can, however, be associated from various systems.
Filters  limit the view to an object or object group. Objects can also be associated with a data point. Associated objects are highlighted in color (
  or
or  ).
).
When designing individual filters take note of what is also hidden by the filter. This may occur using an individual filter (device filter includes walls doors, and furniture) or feature a combination of multiple filters (walls + doors + furniture). It is easy to design by identifying the BIM object classes in use and the true table; it can be discussed with the customer and approved.
In addition, it is recommended to select a naming convention that emphasizes the function of the applicable filter, for example A_ for hide, , HL_ for highlight, C_ for combination so that the filters would be named A_walls, A_chairs or HL_walls, HL_chairs or C_A_walls_chairs (hide walls AND chairs). This simplifies selection, since the filter is sorted alphabetically by default.
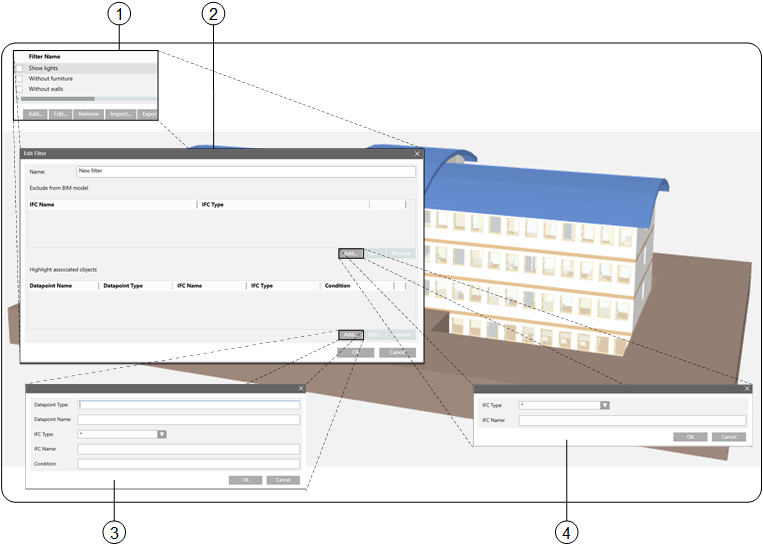
Filter overview | ||
| Dialog box | Description |
1 | Filter Name | Displays individual hidden, highlighted, or combined project filters. Objects can be hidden or highlighted by selecting/clearing the check boxes. The list is displayed alphabetically. |
2 | Edit filter | Displays all detailed information on a defined filter for hidden or highlighted objects. |
3 | Highlighted objects | Defines the objects highlighted in color when the filter is applied. |
4 | Hidden objects | Defines the IFC objects hidden when the filter is applied. |
Filter Name (1) | |
Button | Description |
Add | Opens the Edit filter dialog box. A new filter is created. |
Edit | Opens the Edit filter dialog box. An existing filter can be edited. |
Remove | Deletes a filter. |
Import | Imports a filter configuration. They can be derived from the same project or from a national norm. |
Export | Exports all defined filters saved as a backup file (individual filters cannot be selected). Default filters can be reused on another project. |
Edit filter (2) | |
Section | Description |
Name | Defines the filter name. Displayed alphabetically in the Filter name dialog box. |
Exempted from BIM model | Displays the created IFC filter. The filter can apply to an individual object (Wall-010) or to an entire object class (*). The created filters act as AND filters. |
Display associated objects | Displays the filters associated with a data point. |
Highlighted objects (3) | |
Field | Description |
Object model | Entry of the applied object model |
Data point name | Entry of the last part of the data point name. |
IFC type | Displays all available IFC model types (e.g. furniture). Different object types (e.g. Tables, chairs) can be managed within an IFC model type. |
IFC name | Entry of a specific object type (e.g. only one table in a room) or a selection of all types with (*). |
Condition | Value entry with condition < = or > permits additional filtering of the objects. The syntax is not checked. |
Hidden objects (4) | |
Field | Description |
IFC type | Displays all available IFC model types (e.g. furniture). Different object types (e.g. Tables, chairs) can be managed within an IFC model type. |
IFC name | Entry of a specific object type (e.g. only one table in a room) or a selection of all types with (*). |


 can show or hide the box at any time.
 can show or hide the list at any time.