Setup Checklist for Flex Client
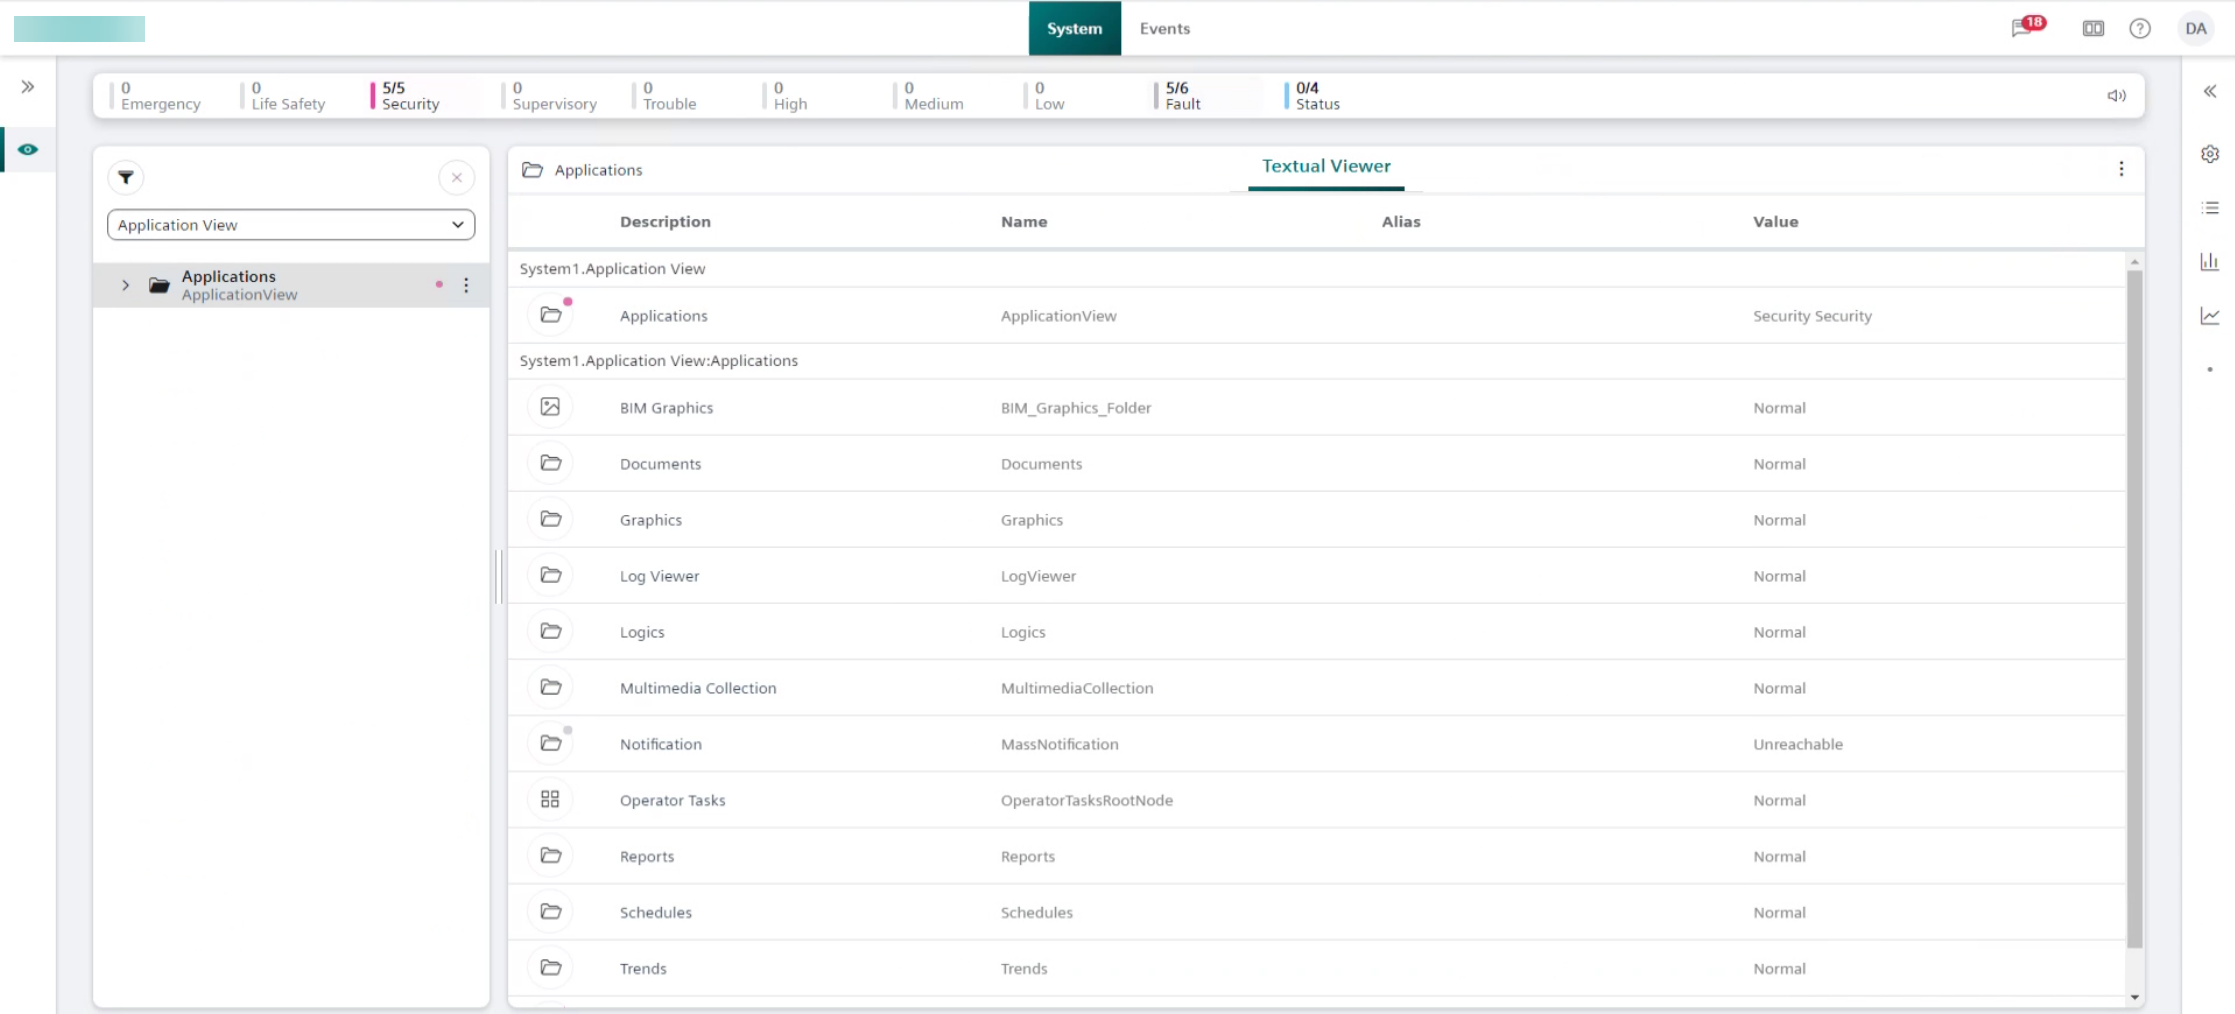
Flex Client is a browser-based client for Desigo CC operators. This checklist summarizes all the steps necessary to get Flex Client up and running on an existing Desigo CC project.
The required extensions that need to be installed and added to the project are Flex Client and Web Services. Both of these are mandatory extensions, now included by default in Desigo CC projects.
Web applications such as Web Services, Flex Client, and Advanced Reporting are hosted on an IIS web server, which can run on the same computer as the Desigo CC server (local IIS) or on a separate computer (remote IIS) dedicated to that purpose.
The latter solution allows for enhanced security and segregation.
- For a local IIS setup you only require the Desigo CC server station, with IIS enabled on it.
- For a remote IIS setup, in addition to the Desigo CC server station you must configure a separate Installed Client or FEP station, and enable IIS on that machine.
The IIS web server is a Windows component that is required to be able to configure websites, web services and web applications in SMC. IIS is typically enabled by default when you install Desigo CC.
On an existing Desigo CC installation, you can go through the steps below to verify if IIS installed, and enable it manually if necessary.
Enable IIS
Perform this check on the computer (Desigo CC server, or separate Client/FEP station) that hosts the IIS web server:
- To check the IIS web server and enable it if needed, refer to the help page Additional Installer Procedures, section Manually Install and Configure IIS on Different OS Types.
The screenshot below provides an example of enabling IIS web server on the Windows 11 operating system.
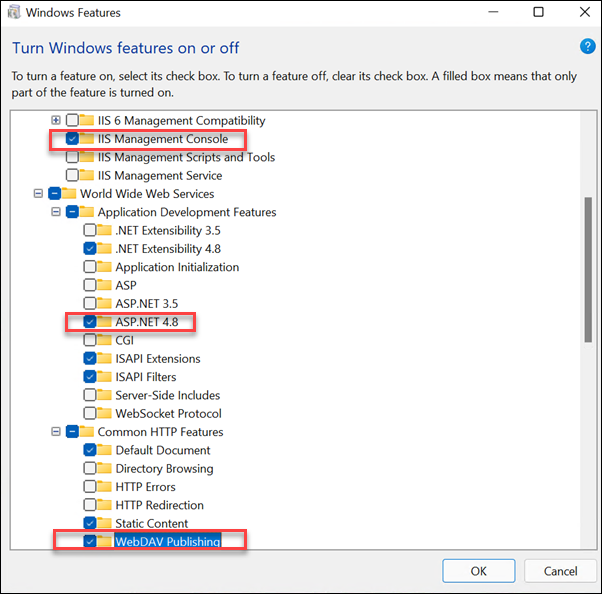
NOTE: If the IIS web server was enabled after installing Desigo CC, it may be necessary to re-run the Gms.InstallerSetup.exe installer to make the Websites node available in SMC.
Application Request Routing
If you manually installed IIS web server you may need to also manually install Application Request Routing (ARR) on the same computer.
- To verify the existing ARR installation and install it if necessary, refer to the help page Website Procedures, section Install Application Request Routing (ARR).
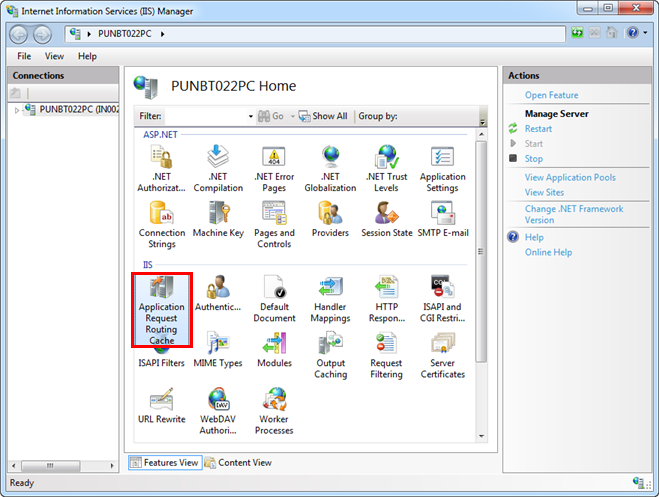
- When ARR is installed, the IIS Manager application in Windows will show the Application Request Routing Cache icon.
- Additionally, it is necessary to double-click this icon to enable proxy settings. For specific instructions, refer to the help page Website Procedures, section refer to Enable Proxy for the Application Request Routing (ARR) Cache in IIS.
.
Websites are hosted on the computer where the IIS web server is running. You must have a website configured in SMC in order to create web services and web applications, such as those used for Flex Client or Advanced Reporting.
- For a local IIS deployment, do these steps on the Desigo CC server station.
- For a remote IIS deployment, do these steps on the separate Client/FEP station that hosts the IIS server.
- IIS is enabled on the computer that will host the website.
- In SMC select the Websites node, and on the toolbar click Create website.
(or, to modify an existing website, select it and click Edit)
- In the Host name field, enter the computer running the IIS web server. This field is prefilled to the machine on which you are running SMC.
- Click Browse... to select the website User, and enter that user's Password.
If that user is not already a member of the IIS Users group, you will later be prompted to add it.
NOTE: In case of a remote IIS deployment, the website user must exist on the Desigo CC server as well as on the Desigo CC Client/FEP station that hosts the IIS server.
- A Certificate is always required, because websites are https only. Client browsers that connect to web applications under this website will need to be able to recognize the certificate.
- If a self-signed certificate was previously created and set as default, the field is prefilled with that certificate.
- Otherwise you can click Create to generate and set a self-signed certificate.
- Alternatively you can Browse.. and select a host certificate.
- When finished click Save, and click OK to start creating the website.
- The website is automatically started.

For more information about website configuration refer to the help page Websites and Web Applications, section Websites.
For more information about certificate configuration refer to the help page Setting the Certificates as Default Certificates.
Web Services certificates are required if you have a deployment configuration with a remote IIS web server, in order to secure communication between the IIS web server computer and the Desigo CC server computer.
Do these steps to configure the Host certificate that you will select for Secured communication in the Web Services Communication expander of SMC.
NOTE: If you have a local IIS web server, you can skip these steps.
1 – On the Desigo CC Server Computer, Create a Root Certificate, Import it into the TRCA Store and Set it as Default
- On the Desigo CC server computer, start SMC.
- In the SMC tree, select the Certificate node.
- The Certificates tab displays. This shows the currently configured default certificates (if any) for this Desigo CC installation.
- In the Certificates toolbar, click Create Certificate
 and select Create Root Certificate (.pfx).
- GMS Root Certificate automatically displays in the Subject Name field.
- Change the subject name to a descriptive name, for example RootCertificate_WebServices.
- Complete the remaining fields to specify the root certificate (.pfx) and (.cer) file names, password, and path on disk.
- Click Save
 .
.
- The root certificate files are created and saved at the specified path.
NOTE: Keep a copy of these root certificate files and write down the password for use in the next steps.
- In the Certificates toolbar, click Import
 , select the Root certificate certificate type, browse to the (.cer) root certificate file created above, and select Set as default.
- Click Save
 .
.
- The root certificate is imported into the TRCA store of the Desigo CC server computer, and set as the default.
You will later need to import this root certificate into the TRCA store of the remote IIS web server computer. See Step 3 below.
2 – On the Desigo CC Server Computer, Create a Host Certificate for the Server, Import it into the Personal Store, and set it as Default
- In the Certificates toolbar, click Create Certificate
 and select Create Host Certificate (.pfx).
- In the Root certificate field, browse to the (.pfx) root certificate file created above and enter its password.
- The full computer name of the server is automatically entered in the subject name field.
- Specify the (.pfx) and (.cer) host certificate file names, password, and path on disk.
- Click Save
 .
.
- The server host certificate files are created and saved at the specified path.
- In the Certificates toolbar, click Import
 select the Host certificate certificate type.
- Browse for the (.pfx) host certificate file created above and enter its password.
- Select Set as default and Key is exportable.
- Click Save
 .
.
- The server host certificate is imported into the Personal store of the Desigo CC server computer.
3 – On the Remote IIS Web Server Computer, Import the Previously-Created Root Certificate into the TRCA Store, and Set it as Default
- On the IIS web server computer, start SMC.
- In the SMC tree, select the Certificate node.
- In the Certificates toolbar, click Import
 .
.
- Select the Root certificate certificate type.
- Browse to the (.cer) root certificate file created in Step 1 above, and select Set as default.
- Click Save
 .
.
- The root certificate is imported into the TRCA store of the IIS web server computer, and set as default.
NOTE: This must be the same root certificate that you imported into the TRCA store of the Desigo CC server computer.
Importing this certificate is necessary for the remote IIS web server to recognize the private CA host certificate of the Desigo CC server, which secures the communication between it and the IIS web server.
A Web Service application, linked to the Web Service Communication of your project, is required to support web applications such as Flex Client or Advanced Reporting, as well as the mobile app client.
Web Service Communication in SMC Project
This setting in SMC configures the communication between the web service interface on the Desigo CC server and the IIS web server. When you create the web service app in SMC, you will be able to select the communication channel created here.
- For all deployments (remote IIS or local IIS), do these steps on the Desigo CC server computer.
- In SMC, stop and edit the project.
- Click Next to reach the page with the Web Services Communication expander.
NOTE: Do not confuse this with the Communication Security expander on the first page. The Web Server Communication section there is not required for Web Services and can be left Disabled.
- In the expander, locate the communication instance you want to use (each one is on a separate row), or click Add to create a new one.
- Set the Communication field of the instance as follows:
- If the IIS web server is on the same computer as the Desigo CC server, set Local. (You do not need a certificate for this.)
- Otherwise you must set the communication Secured, and select the host certificate to use. See Certificates for Web Services.
- Enter a distinct instance name and adjust the port if required.
- Click Next to reach the final page, and Save
 the project.

For more detailed instructions, refer to the help page Setting up the Web Service Interface, section Configure the Web Service Settings.
Web Service Application
Web services are created under websites in SMC. The URL of the website determines the URL of the web service.
- For a local IIS deployment, do these steps on the Desigo CC server station.
- For a remote IIS deployment, do these steps on the separate Client/FEP station that hosts the IIS server.
- A website is configured in SMC.
- In SMC, select Websites > [website], and in the toolbar select Create Web Services Application.
(or, to modify an existing web service app, select it and click Edit.)
- If you are working on the Desigo CC server station (local IIS deployment):
- The Server name is a read-only field, showing the name of this computer.
- Select the Project name, and underneath it shows the configuration done previously in the Web Services Communication expander of the project.
- Select the Instance to use, if more than one was configured in the project.
- If you are working on the Client/FEP station (remote IIS deployment):
- Next to the Server name field, enter the host name of the Desigo CC server computer, or use the Browse... button.
- Click Projects... and, from the dialog that opens, select the project for which you configured Web Services Communication (see above), and click OK.
- The Project information: Web Services Communication expander is populated with the information pertaining to the selected project.
- Select the communication Instance to use, if more than one was configured in the project.
- In the Web Application Details expander:
- Assign a Name to the web service.
- The user/password fields are prepopulated with those of the website user.
- Click Save
 .
.
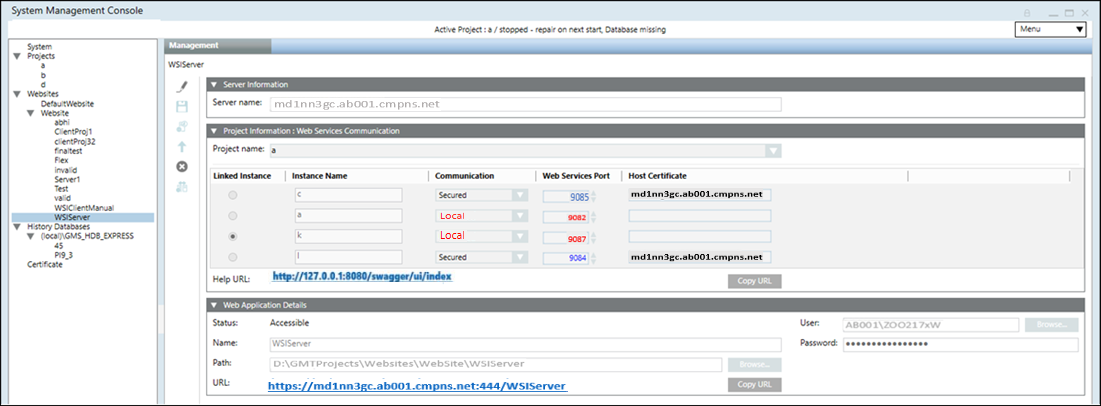
You can test the web service using the links:
- The Help URL link will show a "Welcome to the Web Service Interface" page.
- The URL link will show a message "URL not supposed to be displayed in a browser but entry point for API access".
Web applications are created under websites in SMC.
- For a local IIS deployment, do these steps on the Desigo CC server station.
- For a remote IIS deployment, do these steps on the separate Client/FEP station that hosts the IIS server.
- A website and a web service have been configured for Flex Client.
- (Recommended if the web service is under different website) The web service URL is copied to the clipboard. To do this, select Websites > [website] > [web service] and, in the Web Application Details expander, click Copy URL.
- In SMC, select Websites > [website].
This can be the same website under which you created the web service, or a different one. The URL of the website will determine the URL of the Flex Client application that users must enter in their browsers (highlighted in yellow in the image below).
- Click
 and select Create Flex Client Application.
- In the Server Information expander:
- If you are working on the Desigo CC server station (local IIS), the Server name field is read-only.
- If you are working on an Installed Client / FEP (remote IIS), in the Server name field enter the host name of the Desigo CC station.
- In the Flex Client Information expander, next to Web Services URL, select the previously configured web service from the drop-down list, or paste its URL into the field.
- In the Web Application Details expander:
- Enter a Name for the Flex Client application.
- The User and Password fields are pre-filled to those of the website user.
- Click Save
 , and click OK to start creating the application.
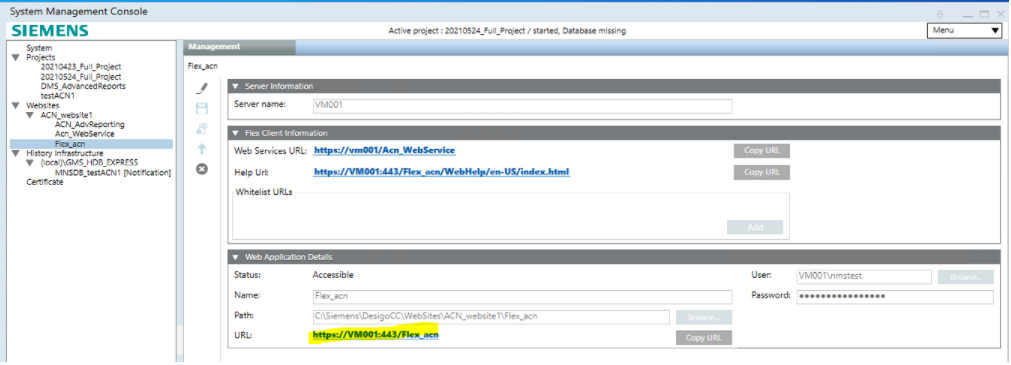
You can test the web application using the URL link:
- If you click the link, the Flex Client login page will display.
- This URL must also be reachable from the networked client stations where you want to run Flex Client (see next section).
The final step is to try accessing the configured Flex client web application from the networked device or computer that you want to use as a Flex station.
- Browser requirements: Flex Client runs on the latest versions of Chrome, Edge, Firefox and Safari. It is tested on Microsoft Windows, MacOS, iOS and Android operating systems. For more details, see the tables below.
When using Firefox web browser, disable the setting Use hardware acceleration when available for proper visualization of graphics.
Browser Compatibility with Operating System | |
|---|---|
Operating System | Compatible Browsers |
Microsoft Windows |
|
macOS |
|
Mobile Browsers Compatibility with Mobile Operating Systems | |
|---|---|
Mobile Operating System | Compatible Mobile Browsers |
Android |
|
iOS |
|
Obtain the Flex Client URL
On the Desigo CC station where you created the Flex Client web application:
- In SMC, select Websites > [website] > [flex client application].
- In the Web Application Details expander, click the URL link.
- Ensure that the Flex Client login page displays. This confirms that the Flex application is configured and reachable from the same computer where it is hosted.
- Click Copy URL or make a note of the URL, to test it on a separate device.
Import Certificates into the Device Accessing Flex Client
Since the Flex Client URL is https://, the networked computer or device from which you access it must recognize the certificate of the parent website (see Website in SMC, above). This requires installing the appropriate certificate into its Trusted Root Certification Authorities (TRCA) store:
- If a self-signed certificate was used for the website, then install that self-signed certificate into the TRCA store of the device accessing Flex Client.
- If a host certificate was used for the website, then install the root of that host certificate into the TRCA store of the device accessing Flex Client.
NOTE: If the certificate is not present, the browser will show a Not Secure warning when navigating to the Flex Client URL. If this happens, you can still opt to proceed to the Flex Client for test purposes. For example, in the Chrome desktop browser, click Advanced and then click the link proceed to [computer name] (unsafe). However, to make the Flex Client station properly operational you must import the appropriate certificates into the computer or device:
Launch Flex Client
- On the separate computer or device where you want to launch Flex Client, paste or type the Flex Client URL into the browser address bar.
- The Flex Client login page displays.
- Enter your Desigo CC user name and click Next.
- Enter your password and click Login.
- If the Select a Certificate dialog displays, click Cancel.
Note: The certificate selection at this point would be necessary to run an identified Flex client. However, for the present test purposes it is sufficient to log in as an anonymous Flex client.
- The Flex Client web application displays in the browser.
