Configuring an Identified Flex Client
The Desigo CC Flex Client is a browser-based web application that allows an operator to interact with the system from a device or computer on which the Desigo CC application is not installed.
Flex Client stations can be anonymous or identified, depending on whether they authenticate themselves to the Desigo CC server with a host certificate.
For each identified Flex client station, you can configure distinct settings, such as client profile, enable/disable logon, and scope/event/application rights.
Prerequisites:
- The Flex Client web application is configured in Desigo CC, and the device or computer that you want to connect to Desigo CC as an identified Flex Client is able to access the [Flex Client application URL] as an anonymous Flex client.
To meet this prerequisite, you must have completed all the steps in Setup Checklist for Flex Client.
Configure Certificates for Identified Flex Client
NOTE: This section covers the certificates that allow the Desigo CC server to recognize the host certificate of the Flex station, so that it can operate as an identified client.
Do not confuse these with the other certificates that may be used for a Flex client deployment (web services and website certificates), which are instead configured during the preceding step (see Setup Checklist for Flex Client).
The root and host certificates can be created using SMC or acquired from a commercial CA.
- A root certificate (.cer + .pfx files), that identifies the source of certificates used for communication between the Desigo CC server and the identified Flex client.
- A host certificate (.cer + .pfx files) along with its private key, generated from the above root certificate. This host certificate must be:
- issued to the computer where you want to run identified Flex client.
- specific for each logged-on user of the computer who wants to run the identified Flex client. The user must also have the password for the private key of the host certificate.
NOTE: Even if the logged-on user on the Identified Flex Client computer is included in the Administrators group and the Administrator group has rights on the private key of the host certificate, explicitly you have assigned rights to the user of the host certificate’s private key.
The logged-on user on the Identified Flex Client computer has Read rights on the host certificate.
On each computer, the root certificate must be imported into the Trusted Root Certification Authorities store, for both Local Computer and Current User.
Perform the following steps on both the Desigo CC server and the Flex station:
- In Windows, start the Microsoft Management Console (MMC).
- Select File > Add/Remove snap-ins.
- Select Certificates and click Add, select My user account and click Finish.
- Select Certificates, click Add, select Computer account and click Finish.
- Click OK.
- The Certificates (local computer) and Certificates (current user) items are added under the Console Root.
- Select Console Root > Certificates (Local Computer) > Trusted Root Certification Authorities.
- Right-click the Certificates folder and select All Tasks > Import.
- The Certificate Import Wizard starts.
- Click Next.
- In the File to Import dialog box, click Browse and select the .cer root certificate file.
- Click Open, then click Next.
- Select the Trusted Root Certification Authorities store as the location for the certificate and click Finish.
- Now select Console Root > Certificates (Current User) > Trusted Root Certification Authorities and repeat steps 7-11 to similarly import the root certificate into this store.
On the Desigo CC server, the .pfx host certificate must be imported into the Personal store, for both Local Computer and Current User.
On the Flex station, the .pfx host certificate must be imported into the Personal store only for Current User.
Perform the following steps on both the Desigo CC server and the Flex station:
- In MMC, select Console Root > Certificates (Current User) > Personal.
- Right-click the Certificates folder and select All Tasks > Import.
- The Certificate Import Wizard starts.
- In the File to Import dialog box, click Browse and select the .pfx host certificate file.
- Click Open, then click Next.
- Enter the password for the private key.
- Select the Personal store as the location for the certificate and click Finish.
Perform the following steps only on the Desigo CC server station:
- Select Console Root > Certificates (Local Computer) > Personal.
- Repeat steps 2-6 above to also import the PFX host certificate into the Personal store for Local Computer.
NOTE: Only importing into Current User will not be sufficient. If you omit this step, you must set the Pmon user as the current logged-in user for the server computer in the SMC > System snap-in.
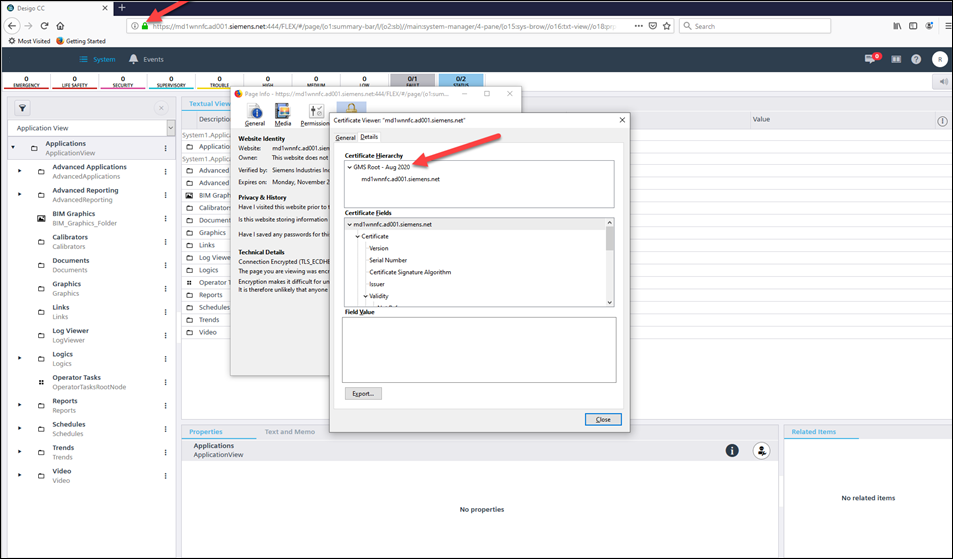
Once the root certificate is imported into the remote Flex Client station, in order for Firefox to recognize the issuer of the certificate for securing the communication, you must import the root certificate of the host certificate used for securing the website/web application in the Firefox certificate store.
This is because the Mozilla Firefox browser maintains its own certificate store from which the certificate must be selected.
IIS does the certificate chain validation to identify a Trusted CA. Without importing the Root certificate that chain validation fails.
For more information on how to import the certificate into the Firefox store, see Install Client Digital Certificate - Firefox for Windows.
Settings for importing the certificate might be different based on the version of Mozilla Firefox browser you are running!

Configure the Identified Flex Station in System Manager
In System Manager, you need to create a station object to represent the identified Flex station. Then you can apply other settings, such as client profiles or scope/event/application right, to this station.
Prerequisites:
- System Manager is in Engineering mode.
- System Browser is in Management View.
In System Manager you must configure a station object of type Web Client, specifying the host name and host certificate of the identified Flex client station.
- In System Browser, select Project > Management System > Clients.
- In the Object Configurator, click New
 and select New Station.
- In the New Object dialog box, enter a name and description and click OK.
- The new station object is added to System Browser.
- Select the System Management tab.

- Specify the Host name in one of the following ways:
- Manually enter the computer host name.
- Search for a computer on the network: Click Browse, in the Browse for computer network dialog box, select a host name, and click OK.
- Click Current Station to obtain the host name of the current computer.
NOTE: Host name without a domain suffix is needed.
- From the Type drop-down list, select Web Client.
- Specify the host certificate as follows:
a. Click Select Certificate.
b. In Select Certificate dialog box that shows the certificate store, locate and select the host certificate for the identified Flex client that you previously imported into the server station. See Import Host Certificate into Personal Store, above.
Select the host certificate from the Certificates (Current User) > Personal Certificates store.
NOTE: To allow OIDC authentication, you must create a new local OpenID user for Flex Client, and then select a certificate for an OpenID user.
- The selected certificate appears in the Certificate field.
- Click Save
 .
.
- In the Extended Operation tab, the Operational Status property indicates
Enabled.
This means that logging onto the Flex Client application from the identified station is allowed.
In the System Management tab, you can optionally configure other aspects of the behavior of the identified Flex station.
- In System Browser select Project > Management System > Clients > [identified flex station].
- Select the System Management tab.
- Specify one or more of the following settings:
- Flex client profile: For details, see Set the Client Profile for a Flex Station.
- Control station: For details, see Enabling Control Station in Danger Management Profiles.
- Personally used: For details, see Setting the Personal Use of Flex Client.
- Click Save
 .
.
For security purposes, the scope, application and event rights for the flex client should be limited to only what is appropriate for a web-based station.
- In System Browser select Project > System Settings > Security.
- Select the Security tab.
- If one does not already exist, create a Management station type group named, for example, Identified Flex Clients and add the current [identified flex station] to that group.
- Define the required Scope rights, Event rights, and Application rights for the station group.
These will apply to all stations that are members of this group. For detailed instructions, see New Station Group for Identified Web Clients.
- You can also define scope, event and application rights on the basis of user groups (for example, a Flex Client user group). For instructions, see Configuring Event Rights.
- If not already done, specify the project settings to work with Flex Client reports as follows: :
- In SMC, define the directory access. For instructions, see Setting up the Flex Client.
- In Desigo CC, create at least one report definition. For instructions, see Create a New Report Definition.
Check the Outcome from the Identified Flex Station
To verify the results of the above configuration, the final step is to log on to Desigo CC from the identified Flex Client station and check that client identification is successful, and the client profile and scope/event/application rights correspond to those configured.
Perform this procedure to start the Flex Client application.
- The certificates for identified Flex client have been configured as specified above.
- On the identified Flex station, open a compatible browser. See Supported Browser for Identified Flex Client.
- In the address bar of the browser, enter the [Flex Client application URL].
NOTE: The URL is the one that was configured for the Flex client web application in SMC.
- The Flex Client login page displays in the browser.
- Enter your Desigo CC user name and click Next.
- Enter your password and click Login.
- In the Select a Certificate dialog box, select the host certificate of the identified Flex client and click OK.
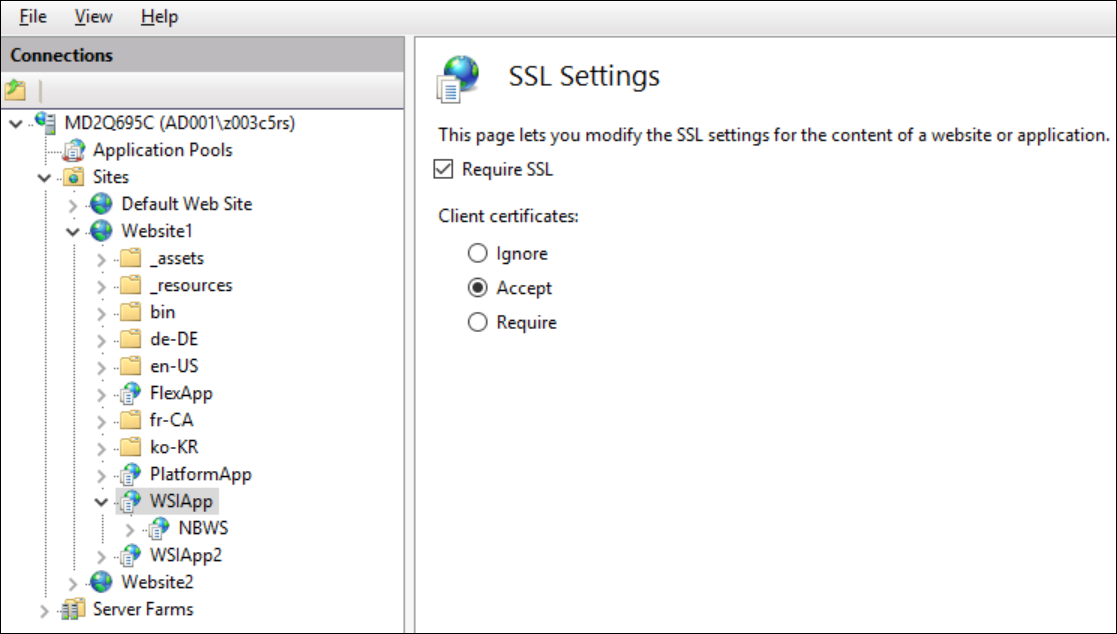
NOTE: This dialog box displays when the settings for IIS (website and web application) are set to Accept. See SSL Settings and Certificate Selection Popup.
If the dialog does not display, or if you click Cancel, you can still proceed to log into Flex client without client identification. In this case, the Flex client will operate as an anonymous Flex client.

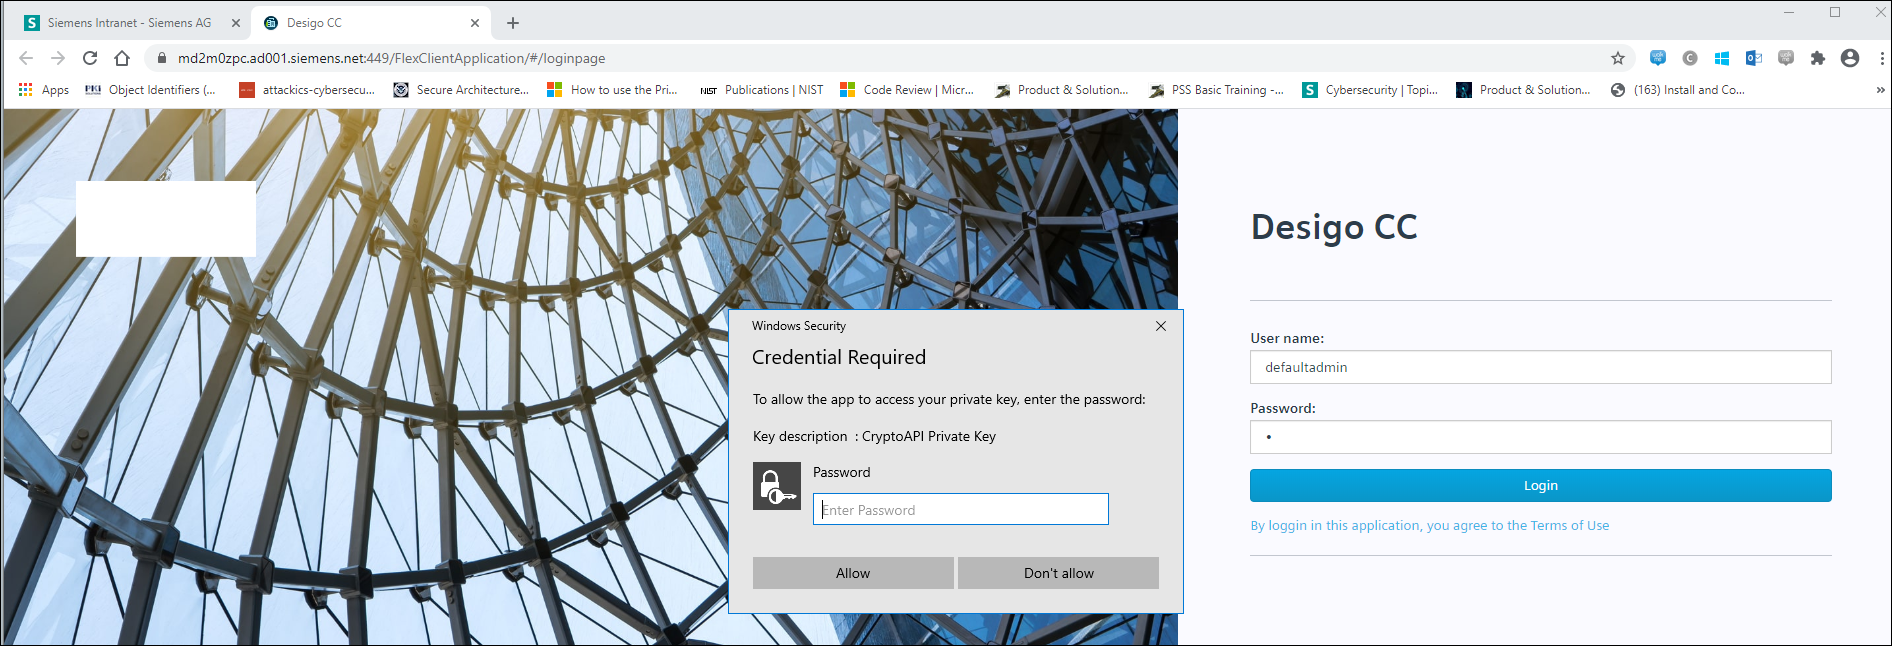
- In the Credential Required dialog box, enter the Password for the Flex client host certificate and click Allow.
NOTE: This is the same password that you have provided when importing the host certificate using MMC.
If you do not know the correct password, you can click Don’t allow and skip client identification. In this case, the Flex client will operate as an anonymous client.

- If you selected the host certificate and entered its password, you are logged into the identified Flex client.
Note that the browsers which support identified Flex client are a subset of those which support the anonymous Flex client. Specifically client identification is supported on:
- Desktop operating systems:
- Windows: Chrome, Firefox and Edge
- MacOS: Safari, Chrome and Edge
- Mobile operating systems:
- Android: Chrome and Edge
- iOS: Safari
See the table below for more details.
Operating System | Browser | Flex client | Certificate selection popup / password | Remarks |
|---|---|---|---|---|
Windows 10 | Chrome | Yes
| Yes, with password. |
|
Edge | ||||
Firefox | Yes | Yes, without password. | Need to install client certificate explicitly in the Firefox browser. | |
MacOS | Safari | Yes | Yes, without password. | Need to provide the user credentials (fingerprints) of the Apple logged in user. |
Chrome | ||||
Edge | ||||
Firefox | No | n/a | n/a | |
Android 10
| Chrome | Yes | Yes, without password. | Need to install client certificate on Android device first. |
Edge | ||||
Firefox | No | n/a | n/a | |
iOS | Safari | Yes | Yes. Without password. | Need to install certificates on IOS and enable trust for Root. |
Chrome | No | n/a | Authentication will be successful, but only anonymous client will work. | |
Edge | ||||
Firefox |
The following table demonstrates behaviors of SSL settings (Require SSL and combination of Client Certificate settings) for Chrome. This is mainly for TLS/SSL settings of WSI app and not for Client Identification.

SSL Settings | No Certificates with Private Key Installed on PC | One or more Certificates with Private Key Installed on PC | Deployment Scenario |
|---|---|---|---|
Require SSL- Not Selected | No pop up displays and no client identification necessary as the host is same as server. | No pop up displays and can be ignored as no client identification necessary as the host is same as server. | Standalone Server |
Require SSL + Ignore Client Certificate | No certificate popup will display and no client identification possible. WSI communication will remain secure. | No certificate popup will display and no client identification possible. WSI communication will remain secure. | Server and a Remote Web Server (IIS) |
Require SSL + Accept Client Certificate | No certificate popup displays and no client identification possible. WSI communication will remain secure. | Certificate pop-up displays with all certificates installed and having the private key. In this case, certificate should be selected and a private key is necessary for Client Identification otherwise client will be treated as anonymous. WSI communication will remain secure. | Server and a Remote Web Server (IIS) |
Require SSL + Require Client Certificate | No certificate popup displays and no client identification possible. WSI communication will remain secure. | Certificate pop-up displays with all certificates installed and having the private key. In this case, a certificate should be selected and a private key is necessary for Client Identification. Working with anonymous client is not possible. Here if no certificate selected, you cannot logon. WSI communication will be secure in case of successful logon to the system. | Server and a Remote Web Server (IIS) |
