Performing OPC UA Client Adapter Online Configuration
Scenario: You want to prepare the OPC UA configuration in online mode by retrieving the OPC UA online data to be then discovered in Desigo CC through the OPC UA adapter.

Online engineering is recommended if you want to work with OPC UA online data.
Performing an offline configuration is recommended instead if you want to import data into Desigo CC through a CSV file that addresses special configuration requirements.
Furthermore, to set functions and alarms, see Setting OPC UA Client Advanced Configuration; to customize an alarm table, see Customizing Alarm Classes.

If you already connected to an OPC UA third-party server and imported its points, but a point is associated with text groups that were changed on the OPC UA side after the import, you must force the configuration update, as follows:
1. Locate the point that is associated with a changed text group.
2. Simulate a change in the configuration. For example, deselect the point, and then select it again.
3. Click Save. (The configuration file is saved again, including the text group updated configuration.)

In each configuration section of the OPC UA Client Adapter web client, an asterisk (*) indicates unsaved changes.
Since Desigo CC will not inform you of any OPC UA client unsaved data, before changing node selection in System Browser, make sure that you have saved the changes in the OPC UA Client Adapter web client, or your changes will be lost.
Reference: For background information, see the reference section.
Workflow diagram:
Prerequisites:

For security reasons, the OPC UA Client Adapter web client must run on the same computer where the adapter software was installed. For instructions, see Installing and Starting the OPC UA Client Adapter.
- The OPC UA Client extension is installed and included in the active project. The following dependent extension is also included automatically:
- SORIS Driver
- System Manager is in Engineering mode.
- System Browser is in Management View.
- The OPC UA Client Adapter web client displays on the screen. For instructions, see Access the OPC UA Web Client.
- Security in OPC UA requires the use of X509 certificates for all the applications (Application Authentication).
- When an OPC UA client connects to an OPC UA third-party server, the server and the client will check each other's certificates to make sure that they trust each other.
Both applications must trust each other for a connection to be established. - The Desigo CC OPC UA client already provides a self-signed Application Instance Certificate on installation, and it automatically accepts the servers certificates when connecting for the first time.
In case of issues, see Troubleshooting Application Certificates. - The Desigo CC OPC UA client certificate must be imported into the OPC UA third-party server’s trusted client certificate list.
NOTE: The Desigo CC OPC UA client certificate (Opc UA Adapter [xxxxx].der) can be found here: C:\Program Files (x86)\Siemens\SORIS OPC UA Adapter.
Steps to import the certificate into an OPC UA third-party server using a tool or manually will vary based on the server in use. For instructions, see the documentation of your OPC UA third-party server. - OPC UA applications support user authentication. This authorization of access implies that the user has been identified and authenticated.
The OPC UA client must provide credentials to the OPC UA third-party server identifying the user that is executing the application. The selection of which manner of identifying user is application-specific.
The Desigo CC OPC UA client can manage the following user authentication policy: anonymous, username/password, or X.509 Certificate. - If you want OPC UA client to authenticate using username and password, you must have already configured the username and password for the OPC UA third-party server as indicated in the documentation of your OPC UA third-party server.
- If you want OPC UA client to authenticate using certificates, you must have already:
- Created a client certificate.
NOTE: You can use the OpenSSL tool to create a self-signed user certificate and convert its format.
- Copied the user certificate files (.pfx or .pem file) to C:\Program Files (x86)\Siemens\OPC UA Adapter\Certificates on the machine where the adapter is running.
- Imported the user certificate files (.der or .cer file) into the trusted user certificates folder or server store.
NOTE: Steps to import manually the user certificate into an OPC UA third-party server machine will vary based on the server in use. For instructions, see the documentation of your OPC UA third-party server. - To establish a valid connection to the specified OPC UA third-party server, the server must be up and running.
Steps:
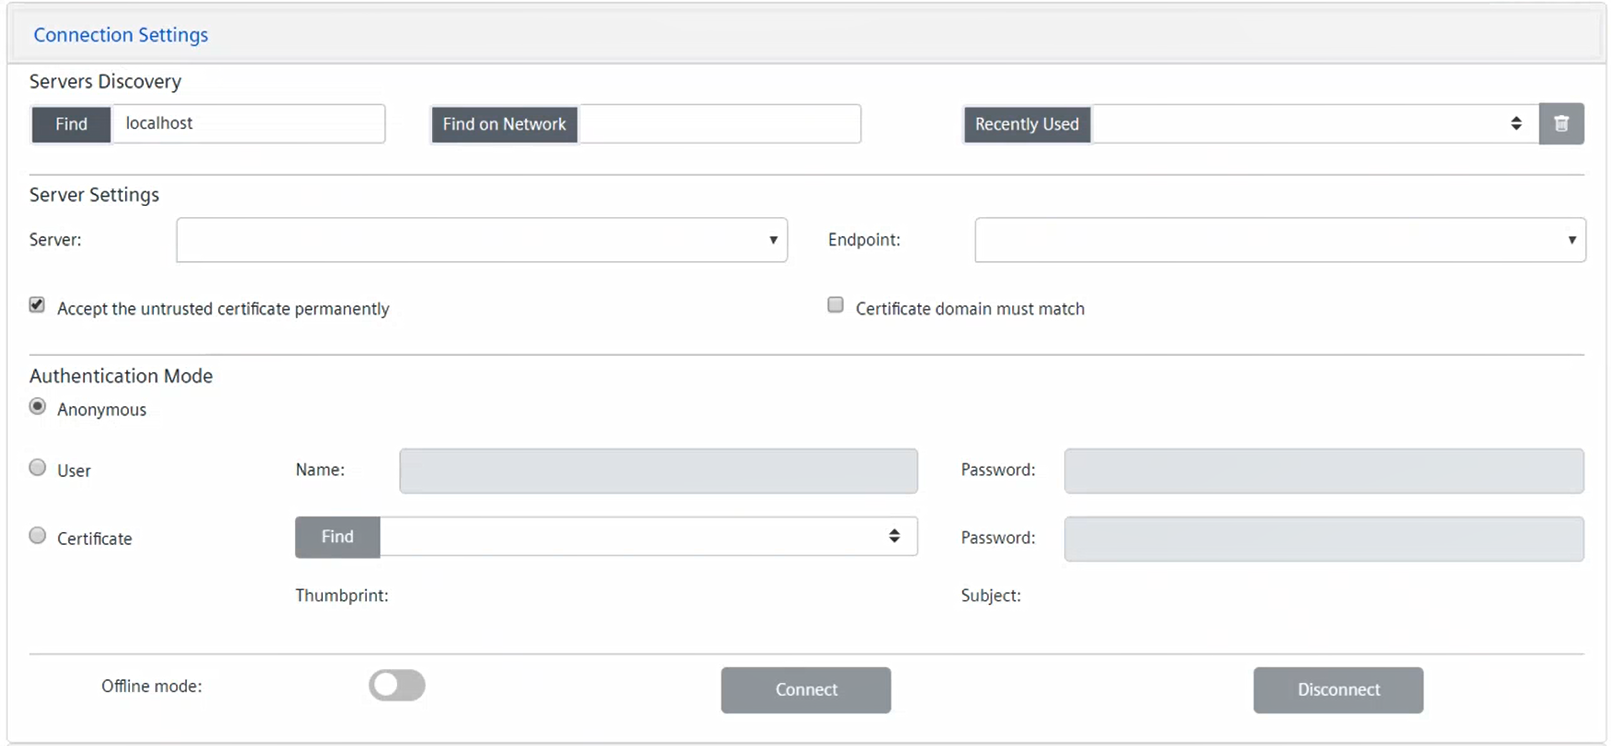
- In the OPC UA Client Configuration section, click Connection Settings.
- In the Servers Discovery area, do one of the following:
- To discover OPC UA third-party servers locally, enter the name or address of the remote machine, and click Find.
NOTE: By default, in the Hostname field, localhost is set.
- To discover OPC UA third-party servers over the network on a specific station, in the field, the URL of the machine where the discovery service is running, and click Find on network.
- To select a recently used OPC UA third-party server, click Recently Used and select it from the drop-down list that includes the configured servers.
NOTE: To remove the configuration of a server from the list, select it, click Delete server configuration , and then click Yes.
- In the Server Settings area, do the following:
a. From the Server drop-down list, select the OPC UA third-party sever to whom you want to connect.
NOTE: You can also enter the server name manually.
b. From the Endpoint drop-down list, select the appropriate security level endpoint for the selected OPC UA third-party server.
c. By default, the check box Accept the untrusted certificate permanently is selected. This means that the OPC UA client can communicate also with an OPC UA third-party server whose certificate is not in the list of trusted certificates. If you deselect this check box, the communication with that server will be possible only if you previously loaded its certificate locally on your machine.
d. By default, the check box Certificate domain must match is deselected. This means that the client-server connection is accepted also if the server certificate contains domain information different from the server with which the connection is being established. Select this check box if a connection must be established only if the server domain must match the domain information in the certificate.
- Depending on the authentication modes supported by the OPC UA third-party server, in the Authentication Mode area, specify your user’s connection in one of the following ways:
- To connect anonymously, select the Anonymous option.
- To connect through your user's credentials, do the following:
a. Select the User option.
b. Enter your user’s Name and Password.
- To connect through your user’s signed certificate, do the following:
a. Select the Certificate option.
b. Click Find to populate the drop-down list with the PFX or PEM files stored in C:\Program Files (x86)\Siemens\OPC UA Adapter\Certificates.
c. Select the appropriate PFX or PEM file from the drop-down list. (If the file is not protected by password, its Thumbprint and Subject unique information also displays.)
d. If the file selected file is protected by password, enter Password. (In this case, the file Thumbprint and Subject unique information displays only after you enter the password.)

If you selected a server recently used (see step 2, above), its authentication mode settings display automatically.

- In the Connection Settings section, click Connect.
Runningindicates that the connection to the OPC UA third-party server is established.
NOTE: Click Disconnect to terminate the connection with that server. If you are prompted because there are unsaved configuration changes, click No and then save the configuration. If you click Yes, changes will be lost.
In this procedure you will set data one by one. For bulk operations, see Performing Bulk Data Aggregation.
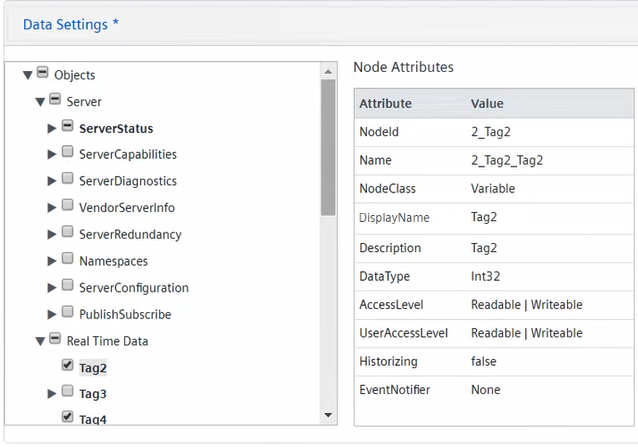
- In the OPC UA Client Configuration section, click Data Settings.
- To select only one or multiple nested nodes under a parent node for the import, do the following:
a. Click next to this parent node to browse the subtree and disclose the nested structure.
b. Select only the check boxes that correspond to the nested nodes you want to export. (A check mark displays on the check boxes, and indicates that those nodes are now selected for the export.)
- Plain text indicates nested nodes with
Attribute = NodeClassandValue = Object. This identifies aggregators of other aggregators or variables.
- Bold type indicates nested nodes with
Attribute = NodeClassandValue = Variable, which identifies variables associated with values.
- Bold italic type indicates nested nodes with
Attribute = NodeClassandValue = Variable, which are OPC UA standard types not supported in the standard object models provided by Desigo CC for OPC UA. Those variables are not imported. For a complete list of supported data types, see OPC UA Supported Standard Data Types.
- Bold type highlighted in blue indicates variable nested nodes with
HistoryReadaccess, which means they can generate trend data.
- Bold italic type highlighted in blue indicates variable nested nodes with
HistoryReadaccess, which are OPC UA standard types not supported by Desigo CC trend data. For a complete list of supported data types, see OPC UA Supported Standard Data Types.
- To select a parent node for the import, and propagate this selection to its nested nodes do the following:
a. Select the check box that correspond to the parent node you want to export. (A minus mark displays on this check box to indicate a partial selection only considering that its hidden nested nodes are still unknown, and might not be selected for the import.)
b. Click next to this parent node to browse the subtree and disclose its nested structure.
NOTE: If a parent node has no nested nodes, when expanded the horizontal line is automatically turned to a check mark, which indicates that this item is now selected for the export.
c. (Optional) Deselect any check box that correspond to nested nodes you do not want to export.

All nodes with check mark  or minus mark
  will be imported.
- To view attributes in the Node Attributes grid on the right, select a node (aggregator or variable) in the tree on the left.

- To set data aggregation, do the following:
a. Expand the desired parent node to disclose its nested structure.
b. Select the check boxes that correspond to the nested nodes you want to aggregate (each selected item is added to the Data Aggregation grid on the right).
NOTE: By default, nodes in bold highlighted in blue (these are nodes withHistoryReadaccess, which can generate trend data) appear in the Data Aggregation grid, but only if they have readable and writable access rights and the option Subscribe source value is set. If the Collect history trend option is also selected, a trend is created as child of the aggregated node.
c. Select the required Object Model from the drop-down list.
The Property field in the grid below populates with the properties of the selected object model.
NOTE 1: To reset the Object Model field, in the drop-down list, select the empty row.
NOTE 2: To enable the alarm functionality, the custom object models to be set must include the following properties:IdentifierandAlarm.AlarmDPE. To enable event notifications, the custom object models to be set must include the following properties:AlarmMessage,AlarmStatus, andAlarmTimestamp. For more details, see Setting a Custom Object Model for Data Aggregation.
d. If required, for each Node, adjust the Property setting by selecting from the drop-down list the appropriate value.
e. Click Apply.
NOTE 1: If you selected the same property for more than one Node, an error message displays, and you cannot save the changes.
NOTE 2: If do not apply those changes, you will be prompted to confirm saving those change after you click Save.

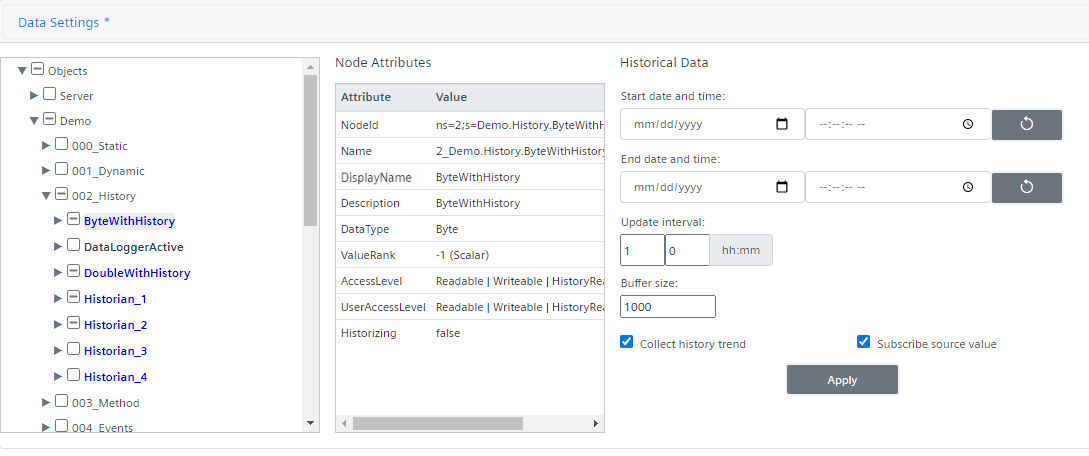
- To set historical data, do the following:
NOTE: The SORIS trends created under the adapter are replicated in Application View, under Trends > Offline Log Objects.
a. Select a variable in bold type highlighted in blue.
b. In the Historical Data section, configure the following:
- Start date and time
NOTE: If this is not initialized, history data is retrieved from 1st January 1970. Consequently, it is strongly recommended to set start date and time according to the historical series stored in the specific variable and depending on the project needs.
- End date and time (if this is not initialized, history data is read and updated periodically, depending on the value of Update interval.)
- Update interval (this is the frequency used to retrieve historical data from the OPC UA third-party servers.)
- Buffer size (this is the size of the trend created to keep historical data. For reference, see Trends.)
- If the variable has history access only (meaning that it does not expose source data with read/write access rights), an ad hoc trended object will be created as parent of the SORIS trend which keeps the variable’s historical data. The trended object contains properties with the values of the configured settings for the trend (Trend Start Time, Trend End Time, Trend Update Interval, Trend Size) and the Trend Last Update time.
c. If the variable has history access and also provides source data with read/write access rights, you can also collect history values and/or subscribe to source value.
NOTE 1: If the Subscribe source value option is selected, a node representing the variable value is created in Desigo CC, and the related SORIS trend (containing historical data) is created under this node (if the Collect history trend option is selected).
NOTE 2: If the Subscribe source value option is not selected, the SORIS trend is created under an ad hoc trended object, as described above.
NOTE 3: If the Subscribe source value option is read only, this means that this node is included in aggregated data, and consequently it is a property of the parent node.
d. Click Apply.

- To save the changes in the configuration file, in the OPC UA Client Configuration section, click Save.
NOTE: If the configuration is invalid, the OPC UA Client Configuration dialog box informs you of the errors. In particular, the severity of the errors is graphically indicated, including a brief description of the error.
If there are critical errors , the current configuration will not be saved.
If there are less severe errors or
or  the current configuration will be saved, but any points with errors will not be imported.
You may want to click Export Logs to export the errors to the Logs.txt file, and then revise the configuration.
- If prompted to confirm the changes, click Yes.
- An event is generated to indicate that the adapter is loading the latest configuration.
- Proceed to step 5 – Discover the Adapter Configuration.
- In the Extended Operation tab, next to the URL property, click Discover.
- System Browser refreshes and displays the OPC UA Client configuration.
