Complete the Installation Planning Requirements
Once you completed the task Obtain and Verify the Software Distribution, next you should procced with Complete the Installation Planning Requirements task.
Before going to a job site to install Desigo CC , you must verify the installation environment, gather the necessary information and prepare for the installation.

NOTE
Perform the following planning and preparation steps in the same order as listed.
The Windows user performing the installation (using custom, semi-automatic or silent mode) has local administrative rights on the system where the Desigo CC Server, Client or FEP is installed.
If you do not have administrative rights to the system, you can still launch Installer Wizard. However, you must first provide the user credentials of a Windows user account with administrative rights.
For this, you must add a user account to the Administrators group. (see https://technet.microsoft.com/en-us/library/cc772524(v=ws.11).aspx ).
Contact your local IS department to configure a Windows user account with administrative rights.
Read this topic to help you prepare the installation environment.
Supported Operating Systems
Confirm that the computer on which you installing Desigo CC meets all the required software requirements. This includes:
- Supported Operating System on the Setup type - Server, FEP, and Client:
- Microsoft Windows 10 64-bit (Professional, Ultimate, Enterprise – Classic UI)
- Microsoft Windows 2011 64-bit
- Microsoft Windows Server 2019 64-bit
- Microsoft Windows Server 2022 64-bit

NOTE:
Make sure that you keep your Windows OS version to the latest updated version. Otherwise, during installation error may appear when installing SQL Server. In that case you need to update Windows version to the latest and then manually install the required SQL version.
Virtualization and VM Software
Desigo CC supports several server virtualization environments and their redundancy options including transparent Network Virtualization. Terminal Server applications, Desktop-, Service- and Application Virtualization are not supported. The following key components of Desigo CC can be virtualized:
- Server
- Video Management Service
- Microsoft SQL Server
- Microsoft IIS Server
- FEP
Customer Support can provide information about additional VM environments that work with Desigo CC. Please contact your local distributor for specific VM environment application notes available to customers. For licensing, see Licensing in Virtual Environment.
Confirm that the Desigo CC management station has a supported VM software package installed. For installation see manufacturers' documentation.
WinCC OA running on VMWare, should follow certain hints to ensure the integrity and operation of Desigo CC .
- Desigo CC and WinCC OA must be properly shutdown before a Virtual Machine is stopped.
- An online backup (snapshot) of a Virtual Machine is not supported with running project and trusted licenses.
- A snapshot of a virtual machine cannot be restored with running project and trusted licenses.
- The clock of the virtual machine shall never make an unexpected jump (forward or backward) while WinCC OA is running.
- Workstation virtualization (that is, Windows-hosted VMs such as VMware workstation or player) is not supported.
Virtual Machine Software
The following VM software packages support a Desigo CC installation:
- VMware ESXi
- Stratus EverRun Enterprise
- Microsoft Hyper-V

NOTE:
For UL/ULC-compliant systems, search for the specific Virtual Machine requirements in:
- Hardware Requirements for UL Norms Compliance
- Hardware Requirements for ULC Norms Compliance
PDF Viewer
An embedded PDF viewer is used inside the Desigo CC client application to display the reports or documents. However, to view the documents outside Desigo CC client, you must install any of the following tested compatible PDF viewers.
- PDF-XChange
- Adobe Reader
- Foxit
- CoolPDF
For instructions on installing and configuring Adobe Reader, see Adobe help or visit https://helpx.adobe.com/acrobat/kb/install-reader-dc-windows.html.
AutoCAD Files
Desigo CC imports AutoCAD files, to be used as floor plans or background drawings in Graphics. The AutoCAD import formats up to version 2017 are supported:
- DWG
- DXF
Microsoft Office
Desigo CC uses Excel formats (xls, csv) for various purposes in the system. For example, to import data point configuration, export values from Trends and Reports application, export OPC Server configuration, display Office documents in Document Viewer or as Link in Related Item, etc.
Desigo CC will still function without Microsoft Office. If you decide you want it, you can install it later.
Desigo CC was tested with the following MS Office versions along with the office editions, including Standard Editions, Small Business Editions, Professional Editions, and Enterprise Editions:
MS Office 365
MS Office 2016
MS Office 2013
MS Office 2010
MS Office 2007
- Free office version, openoffice/libraoffice
For instructions on installing and configuring Microsoft Office 2007 or later, see Microsoft Windows help or visit http://support.microsoft.com.
Supported Web Browser
For accessing and working with Windows App and Flex clients, you must have a web browser installed. You can then browse and work with Windows App and Flex clients by browsing the website or web application URL in one of the following supported browsers:
- Internet Explorer 11 onwards (only Windows App Client)
- Chrome (Flex Client, Windows App Client)
- Firefox (Flex Client, Windows App Client)
- Microsoft Edge (Flex Client, Windows App Client)
- Safari (only Flex Client)
Flex Client is tested on Microsoft Windows, macOS, iOS and Android operating systems.
For instructions on installing Microsoft Internet Explorer 11, visit the Microsoft Web site (http://www.microsoft.com).

NOTE:
It is recommended upgrading and staying up-to-date on the latest browser versions.
Microsoft Windows Security Updates
It is recommended to install security updates and critical updates to ensure secure and stable operation of Desigo CC .
Microsoft divides the updates into different classifications. (See https://support.microsoft.com/en-us/help/824684/description-of-the-standard-terminology-that-is-used-to-describe-microsoft-software-updates).
This product supports a Microsoft Windows operating system. Microsoft is responsible for operating system updates. Therefore, please stay informed about operating system updates directly at the following pages:
Use an offline Windows update tool if no Internet access is available.

NOTE:
Execute the Windows updates before and after the installation.
Trying to install the server without Windows updates will most likely fail! Windows updates after the installation are very import for security reasons because with the installation process, Windows software and components are being installed (for example, SQL Server) and must be up to date with the latest patches!
Execute Windows Update Before Installation
Before installing, follow the recommendations listed below to avoid uncontrolled or unanticipated downtime caused by Windows updates on the server.
- Keep the Windows patches up-to-date.
- Do not set Windows updates to automatic mode. This allows for an orderly backup and shutdown.
- Make regular backups of the operating system and project, particularly before a change in the system or upgrades.
You must secure project backups. If you are saving a project backup to a network location, ensure that the network is protected.
Execute Windows Update After Installation
Execute the Windows updates after the installation. This is very important for security reasons because with the installation process, Windows software and components are being installed (for example, SQL server) and must be up to date with the latest patches.
Use an offline Windows update tool if no internet access is available.
Hardware Requirements
Make sure the Desigo CC Server and FEP/Client computer meet the hardware requirements.
Hardware requirements for Desigo CC Server depend primarily on the number of system objects it shall manage (system size). Additionally, it also depends on the number and type of clients.
For more information, see 2 Part B: System Dimensioning Guidelines in the System Description document (A6V10415500 ).

UL/ULC Restrictions
Refer to Notice for Fire Norms Compliance in Management Platform for information about UL/ULC restrictions in the installation environment. More detailed information about the hardware requirement for UL/ULC-compliant fire systems is provided in the Norms Compliance pages of the specific fire subsystems.
Installation Folder
During the installation you must specify the location for the installation directory.
The default installation directory location [Installation Drive]:\[Installation Folder] for the installation. However, you can change it.
The installation path must not contain illegal characters or sequences, for example, #&, ~^, ~&, ~(, ~=, `^, `&, `(, !^, !&, ! These characters are not detected by the Installer and you will not be able to launch the SMC.
Disk Space
The Desigo CC Installer assists you in ensuring that there is enough disk space for the installation.
It calculates and displays the disk space required for the selected setup type installation on the selected drive and the temporary disk space required only for the time of installation (always calculated only for the system drive). The disk space information is calculated for the following three factors:
- Space on the system drive: This space is required by the software component on the system drive.
- Space for the TempDir: This is a temporary space required by the software component on the system drive during installation.
- Space for the InstallationDir: This space is required for the Installation directory to store the files and other resources related to installing Desigo CC on the server system, including the Brand, GMS and the Languages folder.
During installation of a selected setup type, the total disk space required by a software component is the sum of all values of these three fields.
The Installer calculates and displays the disk space (in MB) required for each selected language pack or extension along with its prerequisite. It also calculates the total disk space required for all selected language packs or extensions. The total disk space for all selected language packs or all selected extensions is added to the total disk space for the installation directory.

NOTE:
Disk Space for Project Restore/Create Project from Template:
Ensure that there is enough free disk space available (at least double the size of the project to be upgraded) on the server for the project that you are about to create or restore from template on the selected drive.
For example, if a project requires 2 GB disk space, there should be a minimum 4 GB space available on the same drive. This is needed because, when you restore and upgrade a project, a temporary copy of the project is created on the same drive. If there is not enough free space, the restore/upgrade process fails and logs several error messages in the SMC.log file available at [Installation Drive]:\[Installation Folder]\GMSMainProject\log.
Tips to Free Up Disk Space
Desigo CC Installer does not allow you to proceed if the remaining space is negative on any of the drives. However, you can do one the following:
- Turn off System Protection to reduce disk space volume
- Use Clean Up to reduce data volume on the hard drive
If you change the installation drive, the disk space is re-calculated and displayed for the selected drive.
The disk space for an already installed prerequisite(s) is not considered while calculating the required disk space.
To increase the performance of the computer where you have installed Desigo CC , see Turn Off the Windows Features to Increase Performance.
Confirm that the computer on which you installing Desigo CC has the .NET 4.7.2 and 5.0.13 compatibility.
You must install .NET 4.7.2 and 5.0.13 before proceeding with the installation. However, if you have an earlier compatible version of .NET installed, for example, .NET 4.7.1, even though a warning displays, you can still proceed with the installation. However, some Desigo CC features may not work.

NOTE:
Make sure that you have configured IIS before installing .Net 4.7.2 and 5.0.13. However, if .Net 4.7.2 is already installed on your system, you must configure .NET 4.7.2 ManageEngine in the IIS Manager. Otherwise, you cannot save objects on the Windows App Clients. See Unable to Import/Export Libraries, Save an Object in the Windows App Client.
- Do one of the following to install .NET 4.7.2 and .NET 5.0.13:
- From the distribution media, select InstallFiles > GMS > Prerequisites > Microsoft .NET > 4.7.2 or 5.0.13.
- Select the InstallFiles > GMS > Prerequisites > Microsoft .NET > 4.7.2 or 5.0.13 from your local drive.
NOTE: Do not install directly from a USB drive as this will dramatically increase the installation time.
- Double-click the executable file in the 4.7.2 or 5.0.13 directory.
- Follow the instructions in the Installer Wizard.
- Reboot the machine, when prompted.
Because the Desigo CC server and its clients typically operate in an administered network environment, an installation can require some level of involvement with the facility’s Information Services (IS) department. Before beginning the installation, contact IS and discuss the installation with the key individuals if IS tightly controls the network environment.

NOTE:
If your system will be installed on a network with a Domain Name Server (DNS), you must work with your IS department to configure the network properly. Ensure that DNS has reverse DNS lookup (or reverse IP lookup) configured.
You must obtain the following network settings before installing your Desigo CC server and clients, and record them on your installation planning worksheet:
- Desigo CC server name and network settings if the system will not receive its address through DHCP.
- Desigo CC client computer names and network settings.
Firewalls restrict the execution of processes that open ports for the communication.
Correctly configured firewall settings allow access between the server and clients, between distribution participant servers and also between drivers and subsystems.
To achieve communication between these elements, specific TCP and UDP ports must be added as exceptions to the server firewall and any network firewalls.
Work with the IT department to make sure the required ports are open in the Windows firewall and any network firewalls are installed between the Desigo CC server and clients.
For a complete list of TCP and UDP ports that you should add to the server firewall and any network firewalls between the server and clients, distribution participants and the server and field panels for a safe system operation, see Cybersecurity Guidelines () document.

NOTE:
Do not open a port for a program you do not recognize!
Ports that are not required for system operation must be closed for security purposes
Configuring the Windows Defender Firewall Settings
You must complete these steps twice, once to add the TCP ports and again to add the UDP ports.
- Click the Windows Start button.
- In the Search field, enter Windows Defender Firewall.
- In the Windows Defender Firewall with Advanced Security dialog box, click Inbound Rules.
- From the Actions pane, click New Rule.

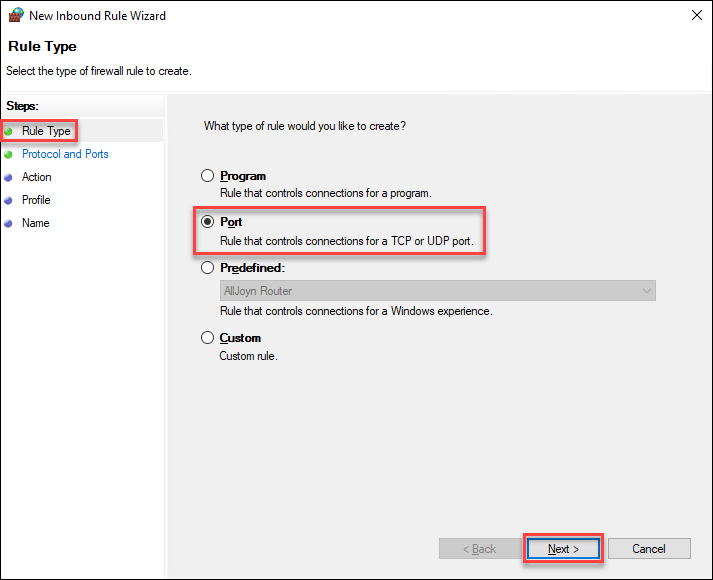
- The New Inbound Rule Wizard displays.
- From Rule Type, select Port, and then click Next.
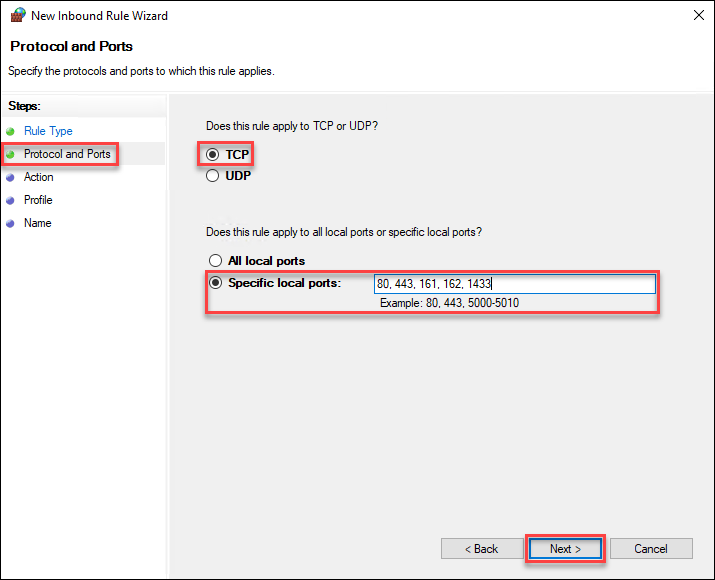
- From Protocol and Ports, select TCP.
- In the Specific local ports field, type all the TCP ports required for the server, and then click Next.
- You can specify multiple port numbers, separated by commas (for example, 80, 443, 161, 162, 1433, 1434, 1454, 4777, 8888, 8000, etc.), or you can include a range of port numbers by separating the two values with a hyphen (-).
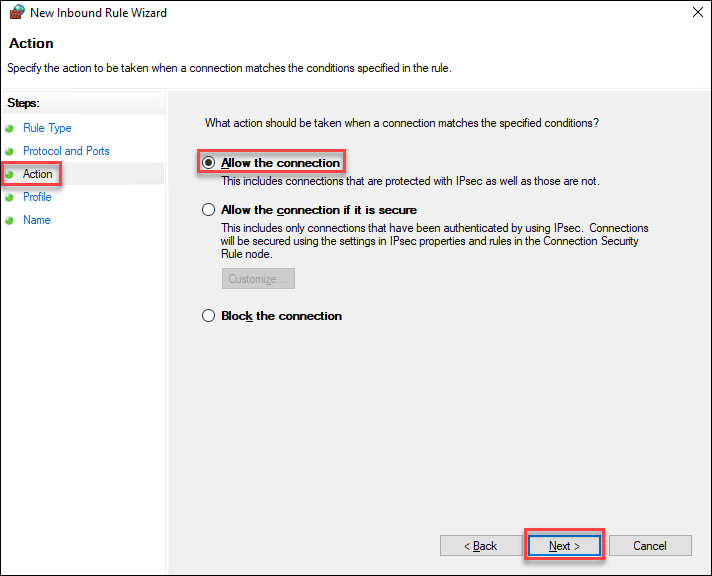
- From Action, select Allow the connection, and then click Next.
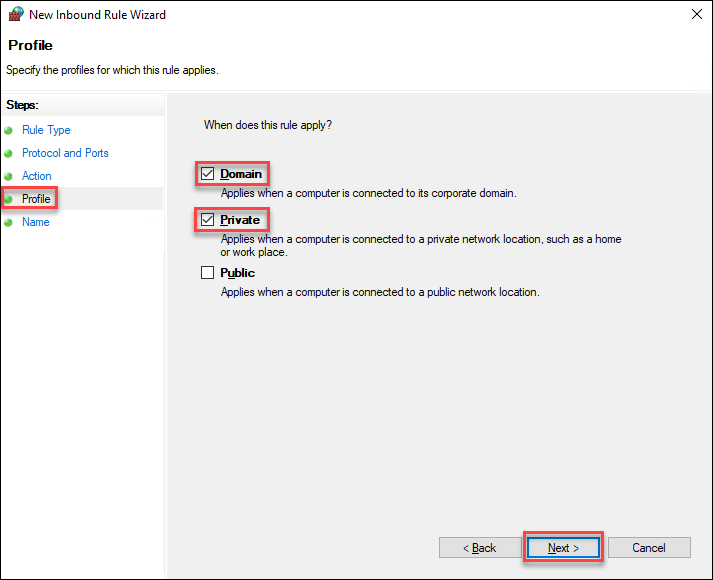
- From Profile, select Domain and Private, and then click Next.
- In the Name field, type the name for this rule. (For example, GMS TCP Ports.)
- (Optional) Type additional information in the Description field.
- Click Finish.
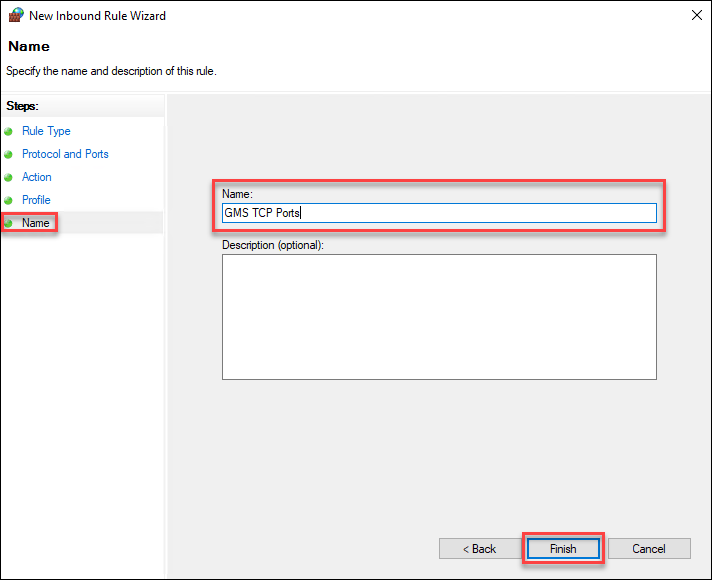
- Repeat steps 7 to 13 for all UDP ports, replacing TCP with UDP.

NOTE:
You do not need to read this topic if you have a UL Listed Comark management station, as the firewall settings are a part of the default configuration.
Firewall Software
Desigo CC Server, FEP, and Installed Clients are compatible with the following firewalls:
Professional Firewalls (HW)
- Norton™ Security (©1995-2015 Symantec Corporation)
- Dell SonicWALL security (© 2015 SonicWALL L.L.C.)
- Check Point Next Generation Firewalls (©2015 Check Point Software Technologies Ltd.)
- Cisco PIX Firewall Software
Workstation Firewalls (Personal Firewalls)
- Comodo Firewall (© 2015. Comodo Group, Inc.)
- Kaspersky TOTAL Security (© 1997-2017Kaspersky Lab)
- Bitdefender® Total Security (Copyright © 1997-2017 Bitdefender)
- McAfee End Point Security (© 2017 McAfee, Inc.)
- ZoneAlarm (ZoneAlarm® 2015 Extreme Security)
Desigo CC was tested with the following virus scanners:
- Windows Defender
- Avira
(© 2018 Avira Operations GmbH & Co. KG.) - McAfee
(© Copyright 2018 McAfee, LLC.) - BitDefender
(Copyright © 1997-2018 Bitdefender) - Trend Micro Office Scan
(Copyright 1998-2018TrendMicro Inc.) - AVG (Copyright © 2017 Avast Software)

NOTE 1:
Always keep the software version and the virus pattern definitions of the used virus scanner and firewall up to date.
NOTE 2:
Desigo CC is intended to work with any scanner. Tests did not indicate any general problems.
Configuring Virus Scanners
Perform these steps if the system where Desigo CC is installed uses virus protection software. Virus scanners can dramatically decrease system performance.
To prevent this from occurring on your Desigo CC work station, make sure you complete this procedure.
- Configure your virus scanner to skip the following database directories:
- [proj_path]/db
- [proj_path]/log
- Configure the following executables as low-risk:
- WCCOActrl.exe
- WCCILpmon.exe
- WCCILdata.exe
- WCCILdist.exe
- WCCILevent.exe
- WCCOAsnmp.exe
- WCCOAsnmpa.exe
- WCCOAopc.exe
- WCCOAReportMan.exe
- WCCOAGmsCoHoMngr.exe
- WCCOAHDBWriter.exe
- WCCOAHDBReader.exe
- WCcOAEvPrint.exe
- WCCOAGmsBACnet.exe
- WCCOAStatPropMgr.exe
- WCCOACComMgr.exe
- WCCOAtoolLogViewer.exe
- WCCOAILProxy.exe
- eowp.exe
- GMS_WCCILpmon_<project name>_smcBkp.exe
- Siemens.Gms.Libraries.Import.exe
