Navigate to [Installation Drive]:\[Installation Folder]\GMSMainProject\profiles\IEC61850DataTemplate.
The IEC61850_template_3.1_Instances.csv file is provided by default.
Create a copy of this file at any location on your hard drive and thereafter modify the information present in the [CONNECTIONS] and [DEVICES] sections as per the device configuration.
Select Project > Management System > Servers > Main Server > Drivers.
Object Configurator displays.
Click New Object and select New IEC61850 Driver.
In the Create New Object dialog box, the Child type is pre-defined as IEC61850 Driver, and the name and description are pre-defined as IEC61850Driver_n and IEC61850 Driver n respectively, where 'n' represents the count of the number of drivers in the system.
Click OK.
The new IEC61850 driver object displays in the System Browser below the Drivers node and is selected.
Select IEC61850 Driver, if not already selected.
In the Extended Operation tab navigate to the Manager Status property.
Click Start to start the driver. Enlarge the pane, if needed, to access the buttons that are located on the right side of the pane.
The Manager Status property changes to Started indicating that the driver has started.
No background processes, such as project backup or BACnet discovery, are in progress.
[To add IEC61850 power meters below a logical or user defined view] You have mapped the hierarchies of the logical or user defined view in the Hierarchies Mapping section (See IEC61850 Device Importer Workspace in Device Integration Workspace.).
In System Browser, select Management View.
Select Project > Field Networks > [IEC61850 Network].
Select the Import tab.
Click Browse.
The File Open dialog box displays.
Select the CSV file and click OK.
The CSV file is pre-processed and validated. If the file is valid and has all the required parameters, the entries in the file are listed in the Source Items list. In case of any discrepancies, an error message displays in the Preimport File Log dialog box. You can access this dialog box by clicking Analysis Log.
Select the items to import from the list of items displayed in the Source Items list. If the list of items is long, you can filter the items by using the Search field. Once you have your list of filtered items, you can remove the applied filter by deleting the text. NOTE: If after selecting a file to import, you decide to change your selection, a message box displays and informs you that selecting another file will clear all items that are displayed in the Source Items list and confirms if you want to proceed. Click Yes if you want to continue. The Source Items list is cleared.
Click No to abort the change of selection. The Source Items list is not cleared.
Click to import.
The selected items are transferred to the Items to Import list. NOTE: To return the items from the Items to Import list to the Source Items list, click .
(Optional) Select the Delete unselected items from the views option only if, during the import, you want to remove from the views any items that are not present in the file to import. For example, you can use this option when there is some pre-existing data in the system for that view, but you do not want to retain it.
Click Import.
A confirmation message displays asking if you want to import the selected items.
Click Yes.
The import procedure begins and a progress bar displays.
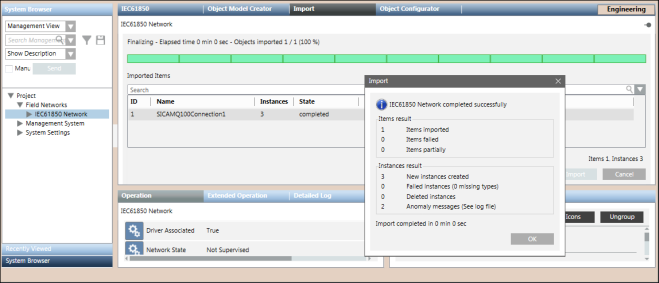
When the import completes successfully, the Import dialog box displays a summary of the import information.
Click OK.
(Optional) Click the Import Log button to view a log of the import process.
 .
.
 to import.
 .
.