(Optional) Configuring SORIS Manually
Scenario: You want to integrate proprietary subsystem devices into Desigo CC.
Reference: For background information, see the reference section.
Workflow Diagram:
Prerequisite:
- System Manager is in Engineering mode.
Steps:
1 – Add a SORIS Driver
- In System Browser, select Management View.
- Depending on where the SORIS driver is required (Desigo CC server or FEP station), select one of the following:
- Project > Management System > Servers > Main Server > Drivers
- Project > Management System > FEPs > [FEP station] > Drivers
- Object Configurator displays.
- In the Object Configurator tab, click New
 and select New SORIS Driver.
- In the New object dialog box, enter a description.
- Click OK.
- The SORIS Driver object appears in System Browser but is not running.
- Click the Extended Operation tab.
- In the State property row, click Start.
- The SORIS driver starts and is now ready to use.
2 – Add a SORIS Network
- In System Browser, select Management View.
- Select Project > Field Networks.
- Click the Object Configurator tab.
- Click New
 and select New SORIS Network.
- In the New object dialog box, enter the name and the description.
- Click OK.
3 – Assign the SORIS Driver to the SORIS Network
- A SORIS network has been created.
- In System Browser, select Management View.
- Select Project > Field Networks > [network name].
- Click the SORIS tab.
- In the Monitored by driver field, click the drop-down list, and then select the name of driver.
- Click Save
 .
.
4 – Add a SORIS Adapter
- In System Browser, select Management View.
- Select Project > Field Networks > [network name].
- Click the Object Configurator tab.
- Click New
 and select New SORIS Adapter.
- In the New object dialog box, enter the desired name and description of the adapter.
- Click OK.
- Select the SORIS tab.
- In Windows Explorer, navigate to and open SORIS_Adapter_Settings.txt, which is installed in one of three locations:
NOTE: Depending on how the adapter was installed, the path may or may not contain a Bin directory.
- [drive:]\Siemens\[adapter name]\Bin\Logs
- [drive:]\Program Files(x86)\Siemens\[adapter name]\Bin\Logs
- [Installation Drive]:\[Installation Folder]\GMSMainProject\Siemens\[adapter name]\Bin\Logs
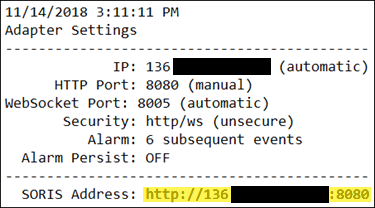
- In the last line of the file, copy the SORIS Address.
Example:
NOTE: To enter a URL other than the default, follow the instructions in the Configure Adapter Windows Service topic that follows.
- Paste the address in the URL field.
- (Optional) If a client certificate is required—that is, the adapter is running on a remote client—expand the Security section, and then do the following:
- If you have a C# Adapter and you are not using a self-signed certificate, select the Validate Server Certificate with CA check box. If you are using a self-signed certificate, do not check the check box.
NOTE: If you have a Java Adapter, do not select the Validate Server Certificate with CA check box. Desigo CC is not able to validate a CA server certificate in this scenario.
- Click Browse, and select the desired certificate from the Select Certificate dialog box.
- Click OK.
- Click Save
 .
.
- Verify that the adapter is connected by viewing the Online property in the Extended Operation tab. If it is not connected, click Discover in the URL property row.
- In System Browser, your subsystem devices appear under Project > Field Networks > [network name] > [adapter name].
5 – (Optional) Configure Adapter Windows Service
Select the adapter procedure needed for your project:
To Install the Adapter as a Service for a C# Adapter
- Start the Task Manager, and select the Processes tab.
- Right-click the ThingSharp [adapter name] process, and click End Task.
- Right-click the Command Prompt, and click Run as Administrator.
- Change to the directory where the adapter is installed—for example [drive:]\ProgramFiles (x86)\Siemens\[adapter name]\Bin.
NOTE: Depending on how the adapter was installed, the path may or may not contain a Bin directory.
- Enter the following command to set the new IP address, port number, and Windows service:
[adapter name].exe -ip:xxx.xxx.xxx.xxx -port:xxxx -wsport:xxxx
-service
To Install the Adapter as a Service for a Java Adapter
- Install the third-party tool called winsw. For more information, see https://www.bhupeshsingh.com/2019/08/how-to-run-any-java-application-as-windows-service.
- Create the winsw.xml file that describes your service:
<service>
<id>MyService</id>
<name>My Service App</name>
<description>Java adapter windows service</description>
<executable>java</executable>
<arguments>-myadapter.jar</arguments>
</service>
- From the command line where you installed winsw, add the service.
- Run
winsw.exe install.
NOTE: For additional configuration options, run the adapter from the Command Prompt and enter the following: [adapter name] -?
