Configuring KNX Import Settings - Buses, Secure Option, Devices, and Objects
For Desigo CC projects 4.2 and higher, you can use the KNX Tool Converter to configure how the KNX project exported from ETS will be imported into Desigo CC.
These settings are saved in a JSON file that will be used for the import.
Prerequisites
- You have a KNX project file exported from ETS.
- In the AdditionalSW/KNX_ConfGeneratorTool folder of the software distribution available locally or on the installation DVD, double-click ToolKNX.exe.
- The KNX Tool Converter displays.
- Click Browse.
- In the Browse for KNXProj file dialog box, locate and select the KNXProj file to convert, and click Open.
- The name of the file to convert displays in the relevant field.
- If the KNX project file is protected by password, enter the password, and click Decrypt.
- If a relevant converter version is found, it displays underneath the name of the file to convert. Otherwise, you must select an appropriate compatible version from the drop-down list.
NOTE: The available converters are contained in the Converters folder located in the same folder as the tool executable file.
- A Merge configuration file check box is displayed if a previous version of the JSON configuration file is also available.
- Select this option if you want to start from the previous import settings, using that as a basis for your further changes.
- Deselect this option if you want to discard the previous import settings and start a new configuration from scratch.
- Click Start.
- The KNX Tool Converter: Settings window displays.
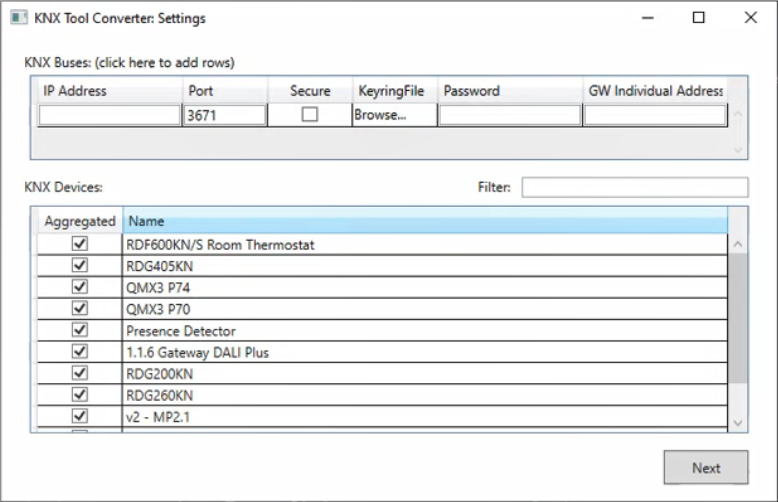
- The KNX Tool Converter: Settings window is open.
- In the KNX Buses section, specify the following parameters:
- IP Address
NOTE: When setting the IP address for the communication through KNXnet/IP routers, if message routing was activated, you must configure one IP address only; if message routing was disabled, you can configure as many IP addresses as required. For more details, see KNXnet/IP Router Communication.
- Port
- GW Individual Address
NOTE: Enter the exact gateway unique address as set in the ETS tool. See the following example.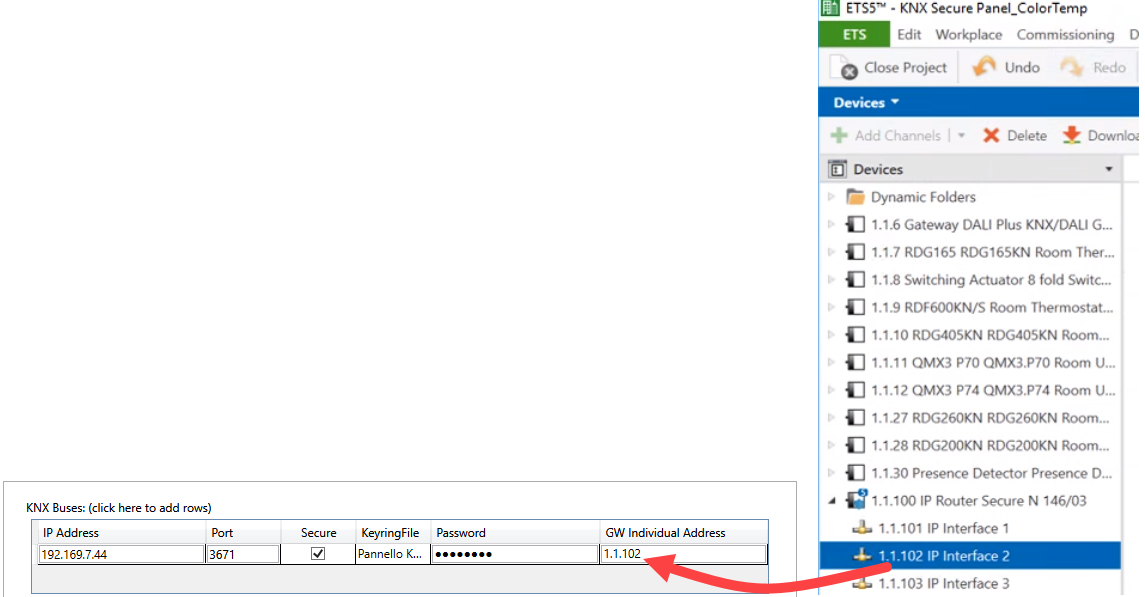
- If the ETS project was configured with the KNX Secure communication option, to establish a secure connection, in the KNX Buses section, do the following:
a. Select the Secure check box.
b. To specify the file that allows for a secure connection with the KNX Secure router, click the KeyringFile field and in the Browse for Keyring file dialog box, select the appropriate KNXKEYS file. In this scenario, the IP Interface Address must correspond to the IP interface for which the keyring file was exported into the ETS tool.
c. Enter Password.

Securing the connection is not supported by old configuration files. To secure the connection you must delete the current configuration.xml file for the old configuration and create the JSON configuration file again.
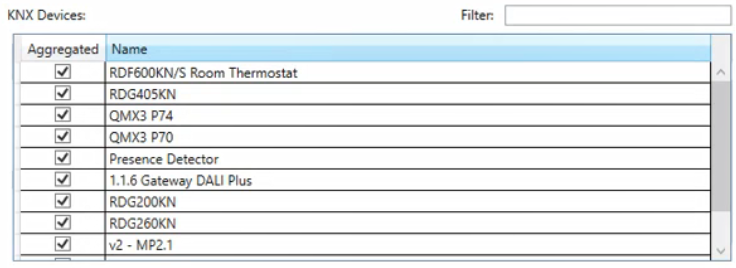
- Under KNX Devices, use the check boxes to change which KNX devices must be Aggregated in Desigo CC:
The group addresses of aggregated devices will be managed as properties, rather than as child nodes of the device.
NOTE: Use the Filter box to narrow your search.
- Click Next.
- In the Configuration page, you can select the appropriate tab for the other configurations. You can also return to the Settings tab to change the preceding configurations.
To get the list of the KNX COM objects, configure the possibility to command more objects, and select the ones you want to import, do the following:
- Select the KNX – COM Objects tab.
- Click the Reference Group Address column to sort the list of objects accordingly, in the ascending or descending order.
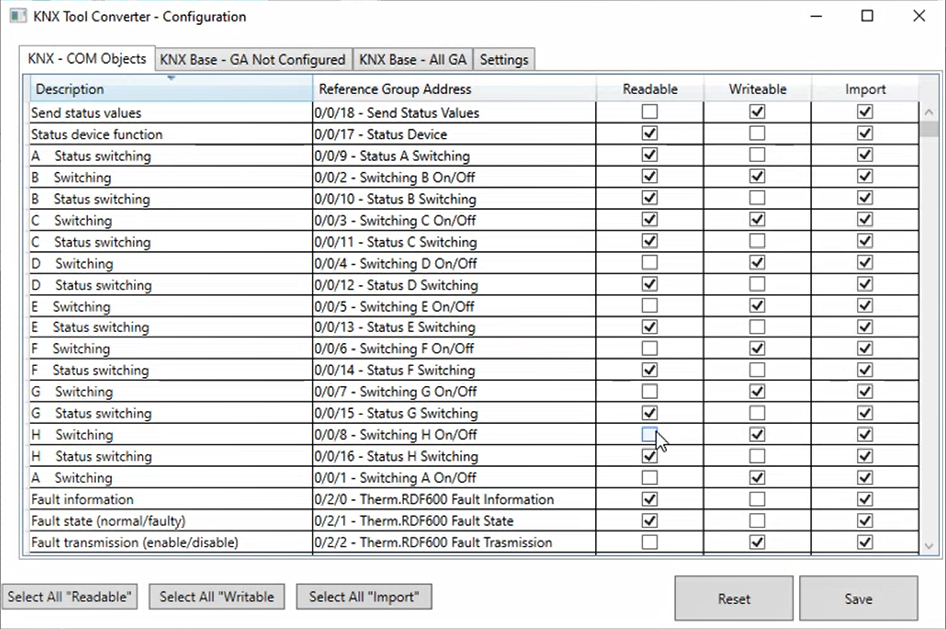
- In the Readable column, select the check box that corresponds to each readable KNX COM object to be read by Desigo CC.
NOTE: To set to readable all the KNX COM objects included in the configuration file, click Select All “Readable”.
- In the Writable column, select the check box that corresponds to each writable KNX COM object to be commanded by Desigo CC.
NOTE: To set to writable all the KNX COM objects included in the configuration file, click Select All “Writable”.
- In the Import column, select the check box that corresponds to each KNX COM object to import into Desigo CC.
NOTE: To select all the KNX COM objects in the list for the import into Desigo CC, click Select All “Import”.
- To copy the configuration of KNX COM objects, select a row and use CTRL+C and CTRL+V to copy and paste its configuration onto another KNX COM object.
- Check the Reference Group Address configuration for all the KNX COM objects.
If one or more KNX COM objects have this value highlighted in red this means that the Type.Subtype (x.xxx) is missing. For each one of those KNX COM objects do the following:
- Double-click the value highlighted in red.
Then, in the KNX Base – GA Not Configured tab, which is open with that specific KNX COM object selected, specify the Type.Subtype (x.xxx) and click Save.
To get the list of the KNX objects with the group address not yet configured, define Type.subtype (x.xxx), and select the ones you want to import or read on startup, do the following:
- Select the KNX Base – GA Not Configured tab.
- Click the Name column to sort the list of objects accordingly, in the ascending or descending order.
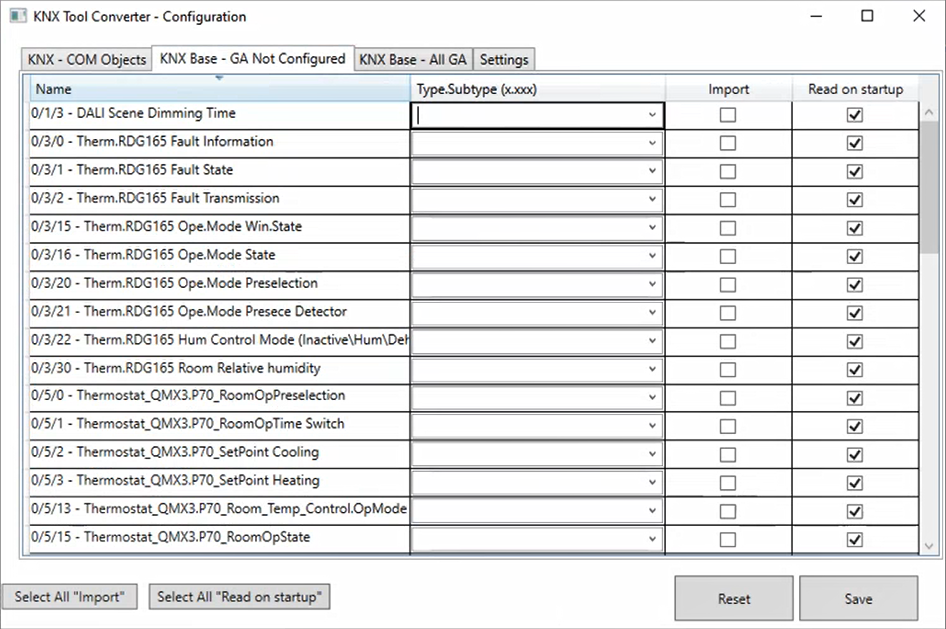
- From the Type.Subtype (x.xxx) drop-down list, select the appropriate value.
NOTE: If you do not set any value, the corresponding object will not be imported.
- In the Import column, select the check box that corresponds to the KNX objects to import into Desigo CC.
NOTE: To select all the KNX objects in the list for the import into Desigo CC, click Select All “Import”.
- In the Read on startup column, select the check box that corresponds to the KNX objects whose data will be retrieved when the adapter is started.
NOTE: To select all the KNX objects in the list whose data will be retrieved when the adapter is started, click Select All “Read on startup”.
- To copy the configuration of KNX objects, select a row and use CTRL+C and CTRL+V to copy and paste its configuration onto another KNX object.
To get the list of all the KNX objects with group address included in the configuration file, and select the ones you want to import, do the following:
- Select the KNX Base – All GA tab.
- Click the Name or Type.Subtype (x.xxx) column to sort the list of objects accordingly, in the ascending or descending order.
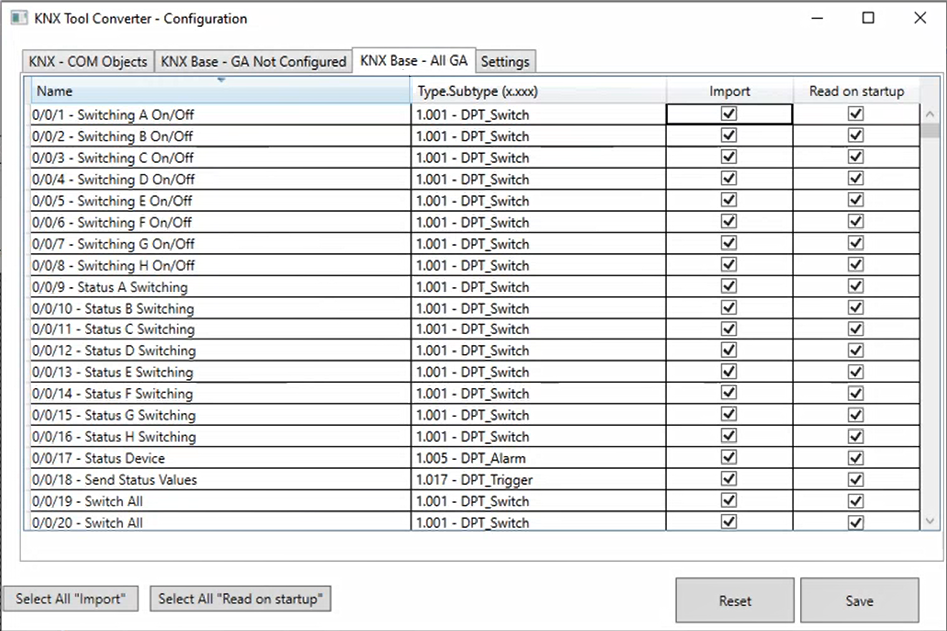
- In the Import column, select the check box that corresponds to the specific KNX objects to import into Desigo CC.
NOTE: To select all the KNX objects in the list for the import into Desigo CC, click Select All “Import”.
- In the Read on startup column, select the check box that corresponds to the KNX objects whose data will be retrieved when the adapter is started.
NOTE: To select all the KNX objects in the list whose data will be retrieved when the adapter is started, click Select All “Read on startup”.
To adjust any additional settings, do the following:
- Select the Settings tab.
- Click Advanced, and adjust one or more of the following settings as required:
- Polling Time (interval of seconds after which the KNX adapter checks whether each KNX device is connected. Default is 0.)
- Polling Retries (number of retries after which the KNX adapter considers not connected a KNX device that stops responding.)
- Polling Timeout (interval of seconds after which each KNX device must reply to the KNX adapter’s request.)
- Locale (en-US is the default language)
- Max outgoing msg (sec) (maximum number of messages that KNX receives from Desigo CC every second.)
- Max incoming msg (sec) (maximum number of messages that Desigo CC receives from KNX every second.)

When you have made all the required changes, you can save the import settings defined here to the JSON file that will be used for the import into Desigo CC.
NOTE: If you instead want to discard the changes made to the current configuration, click Reset.
To save the configured import settings:
- Click Save.
- Click OK.
- A new import settings JSON file is created in the same directory as the original KNXProj source file, having the same name and extension .json. The previous JSON configuration file is backed up to a file with extension .json.orig to allow the reset of the configuration from the conversion tool.
- Copy the new JSON import settings file to the Configuration folder of the KNX Adapter.
NOTE: Delete any older configuration (JSON) files. Only one configuration file can exist in this folder.

- To apply the new JSON import settings in Desigo CC, do the following:
a. In Windows, restart the KNX Adapter service.
b. In Desigo CC, perform a new discovery. See Discovering the Adapter Configuration.
