Integrating Simatic S7 Devices into the Platform
Scenario: You want to integrate Simatic S7 devices into the management platform.
Reference: For background information, see the reference section.
Workflow diagram:

Prerequisites:
For all procedures performed in Desigo CC applies:
- System Manager is in Engineering mode.
- System Browser is in Management View.

To speed configuration, make sure the Desigo CC Transaction Mode is set to Simple or the Automatic Switch of Transaction Mode is set to True.
The automatic switch setting is recommended. Without it, to re-enable the logs, you need to set the Transaction Mode to Logging at the end of the configuration procedure.
Steps:
- Any project already created for Simatic S7 EM must be stopped.
- Click Start > Control Panel and then click PG/PC interface (32bit).
- Assign the network adapter for the S7 TCP/IP communication.
NOTE: <Networkcard>.TCPIP.x <Active> is recommended. (Do not use *ISO* or *Auto* network adapter.)
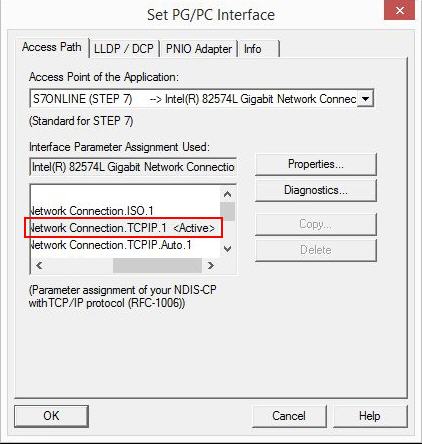
- Click Diagnostics.
- In the SIMATIC NET Diagnostics window, click Test to test the communication.
- Click OK.
- Click OK, to apply the setting of the SIMATIC NET Diagnostics window.
- The PG/PC interface is successfully configured.
- Start Desigo CC.
- Select Project > Management System > Servers > Main Server > Drivers.
- Select the Object Configurator tab.
- Click New
 , and select New S7 Driver.
- In the New object dialog box, enter a description.
- Click OK.
- The S7 driver is available in System Browser.
- In the Operation tab, click the Start button.
- The Status is
Started.
- Select Project > Field Networks.
- Select the Object Configurator tab.
- Click New
 , and select New S7 Network.
- In the New object dialog box, enter a name and description.
- Click OK.
- The S7 network displays in System Browser.

NOTE:
You can create one or more networks depending on your system configuration.
- Select the newly-created S7 network.
- In the Extended Operation tab, configure the following parameters:
a. Polling Activate: The value for the S7 network can be set toPassiveorActive. This property activates/deactivates the network communication.
b. Polling Interval: The Polling Interval can be set for each S7 network in milliseconds.
- In the S7 tab, open the Network Setting expander.
- From Monitored by driver list, select the S7 driver.
- Click Save
 .
.
Supported Polling Intervals | ||||
Seconds | Milliseconds |
| Seconds | Milliseconds |
0,1 | 100 |
| 6 | 6.000 |
0,2 | 200 |
| 7 | 7.000 |
0,3 | 300 |
| 8 | 8.000 |
0,4 | 400 |
| 9 | 9.000 |
0,5 | 500 |
| 10 | 10.000 |
0,6 | 600 |
| 20 | 20.000 |
0,7 | 700 |
| 30 | 30.000 |
0,8 | 800 |
| 40 | 40.000 |
0,9 | 900 |
| 50 | 50.000 |
1 | 1.000 |
| 60 | 60.000 |
2 | 2.000 |
| 70 | 70.000 |
3 | 3.000 |
| 80 | 80.000 |
4 | 4.000 |
| 90 | 90.000 |
5 | 5.000 |
|
|
|
- An S7 device is imported.
- Select Project > Field Networks > [S7 network] > [S7 device].
- In the S7 tab, open the Device Information expander.
This expander displays the S7 device data settings. You can view the Device instance (S7 device numeric ID) and Device Name (name of the S7 device) and modify the following parameters:
- S7 type: (S7 CPU type)
- Device description: (S7 device short description)
- The display varies depending on the connection type.
Connection type: ISOonTCP (IP)
S7 access point: Is always S7ONLINE
IP Address: Displays the IP address of the PLC used to establish a connection to a PLC
Rack: Displays the S7 CPU rack number
Slot: Displays the S7 CPU slot number
- Connection type: Named connection (NC)
Connection name: Name of the PLC redconnect communication configured in Step 7 of section: Configuring S7 REDCONNECT. Colons (:) and slashes (/) are not allowed as they are used as delimiters in a connection entry.
VFD name: VFD name of connection configured in Step 7 of section: Configuring S7 REDCONNECT.
- Open the Time Sync Information expander and set the following parameters:
- Time Sync Mode: This parameter determines if and how the current time on the PLC will be accessed and/or modified. The following values are allowed:
Ignore – The time on the PLC is neither read nor written.
Master – The time on the PLC is changed to the current time of the HMI station.
Slave – The current time is read from the PLC in the configured interval (TimeSyncInterval).
- Time Sync Interval: This interval in seconds determines how often the current time is read from/written to the PLC.

- Click Save
 .
.
- The new node displays in System Browser.
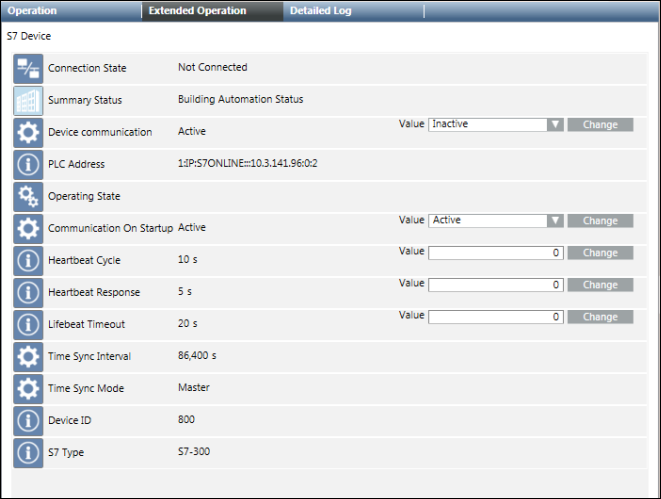
Communication On Startup: To enable or disable device communication on driver. Changes are only applied after restarting the driver.
Device communication: To stop or start device communication online (driver is already started).
Lifebeat Timeout: The timeout in seconds used by the driver to monitor connection errors.
Heartbeat Cycle: The timeout in seconds between heartbeat requests sent to each connection.
Heartbeat Response: The maximum amount of time that is allowed to pass without any response from each connection before a connection failure is assumed.

NOTE:
1. If Communication On Startup = Active: The device will start to communicate upon the start of the driver, even if Device communication is Inactive.
2. If Communication On Startup = Inactive: The device will not start to communicate upon the start of the driver.
In order to connect computers to SIMATIC S7-400H via redundant Industrial Ethernet, it is necessary to configure the S7-RedConnect driver. S7-RedConnect allows for integrating computers into redundant, parallel Ethernet structures based on the Parallel Redundancy Protocol (PRP) functionality.
Configuring a Named Connection (CP1623)
The CP 1623 is a network adapter with a dedicated microcontroller for Industrial Ethernet in PCI Express standard format for applications with high data rates, large quantity structures or high requirements for computer resources.
It is possible to communicate with the fault-tolerant S7-400H system in conjunction with the S7-RedConnect software. The fault-tolerant S7 communication is established via a standard connection and a standby connection. These are monitored during operation and switched in the event of a fault. With S7-RedConnect, these connections are invisible to the PC application. Fault detection, changeover (if required), communication monitoring, and synchronization are all invisible to the application.

NOTE:
Fault-tolerant S7 connections are only available at CP1613 (6GK1161-3AA00), CP1613 A2 (6GK1161-3AA01), and CP1623 (6GK1162-3AA00). If using a CP1613 A2 or CP1623, these modules must be configured as CP1613 in the STEP7 hardware configuration. A regular network card cannot be used.
- SIMATIC NET is installed and licensed on the Desigo CC computer (Hardnet-IE S7, Hardnet-IE S7-RedConnect).
- Hardware is installed on the Desigo CC computer (CP1623).
- SIMATIC Manager is installed and running on the STEP7 engineering computer.
- The SIMATIC S7400H-machine is already configured.
- On the STEP7 engineering computer, insert a SIMATIC PC-Station in the STEP7 project. The SIMATIC PC-Station consists of a user application SW 8.1.2, for example, DESIGOCC, and the CP1623.
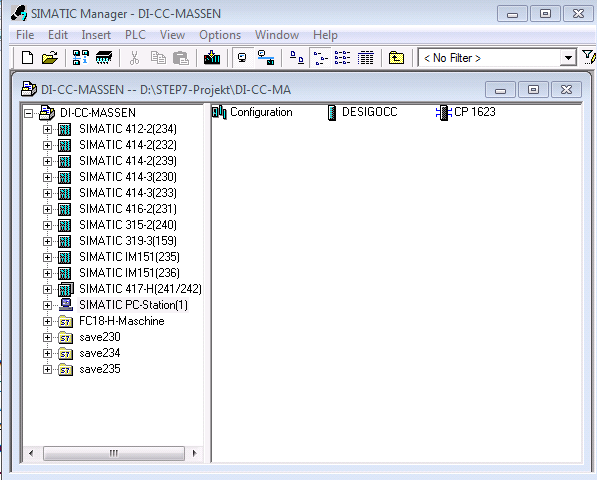
- In the SIMATIC Manager window:
a. Double-click CP1623.
b. Enter the IP address of the SIMATIC PC-Station.
c. Enter the MAC address of the SIMATIC PC-Station.
NOTE: The MAC address is important if you communicate with an old CP443 because the fault-tolerant connection only works with a MAC address. The MAC address must be unique.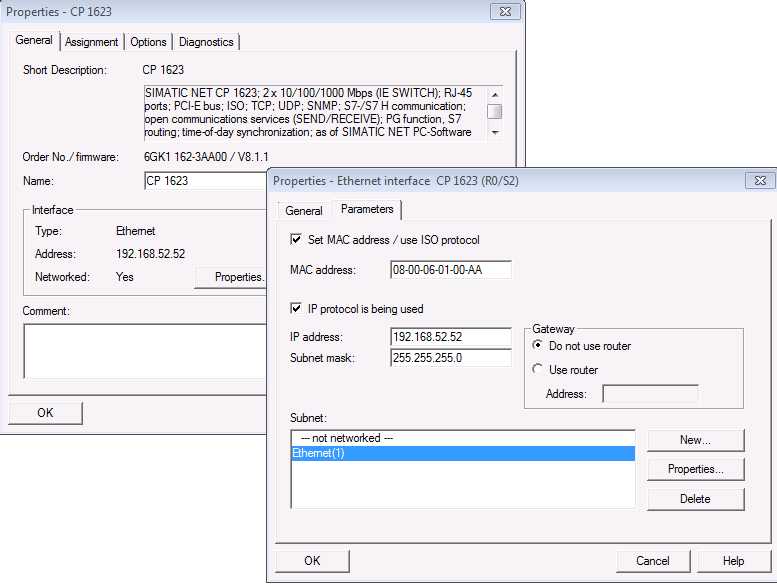
- Configure the fault-tolerant connection between the S7400H-machine and the SIMATIC PC-Station.
- To open NetPro, do the following:
a. In the project, select CPU.
b. Double-click the connections.
- The NetPro windows displays.
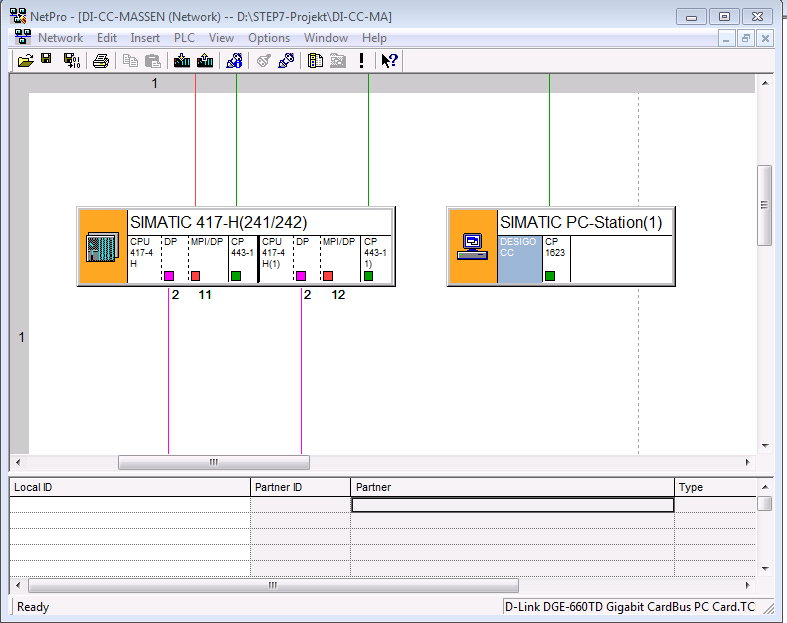
- Select the application Desigo CC and add a new connection.
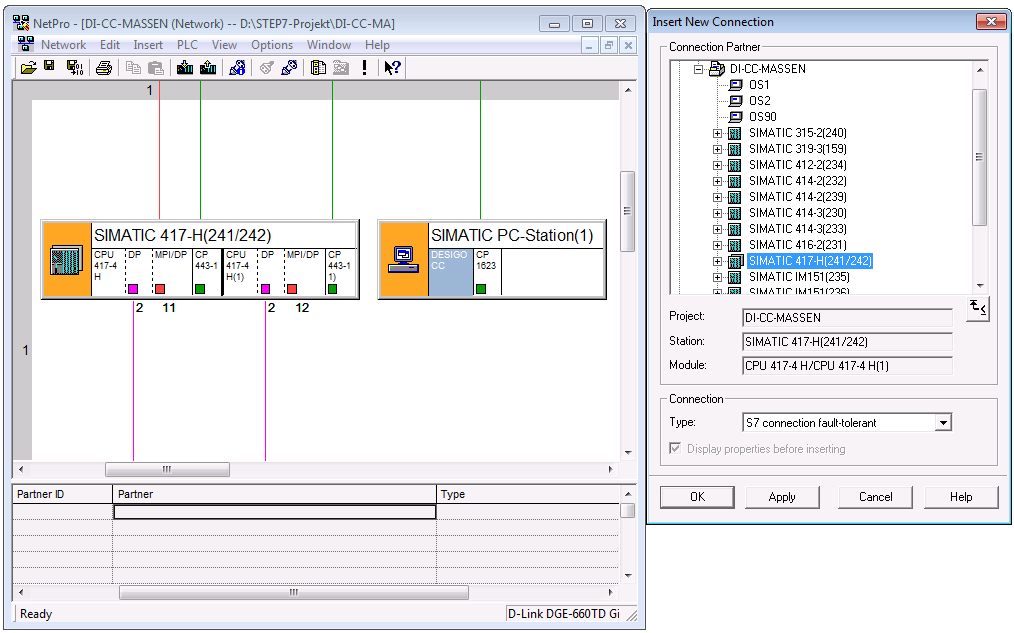
a. In the Connection Partner list, select a partner.
b. In the Type drop-down list, select S7 connection fault-tolerant.
c. Click OK.
- The Properties – fault-tolerant S7 connection window displays.
- Select the General tab.
a. Select the Connection Identification section.
b. Enter a name in the Local ID field, for example, S7CC.
c. Enter a name in the VFD Name field, for example, DESIGOCC.
d. Click OK.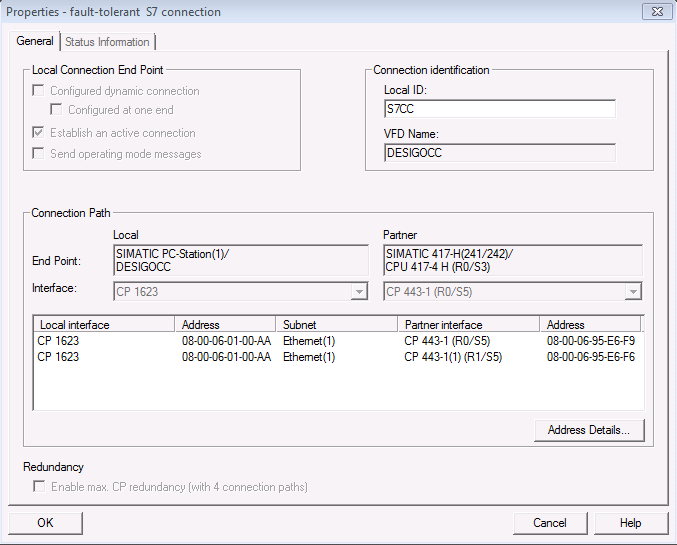
NOTE: From the old CP443 (for example, C443-1EX11), the fault-tolerant connection can only be configured with a MAC address. From CP443-1EX30 and CP443-1GX30 or CPU400H with PN interface, a fault-tolerant connection can be configured with an IP address.
Example with a CP4431EX30: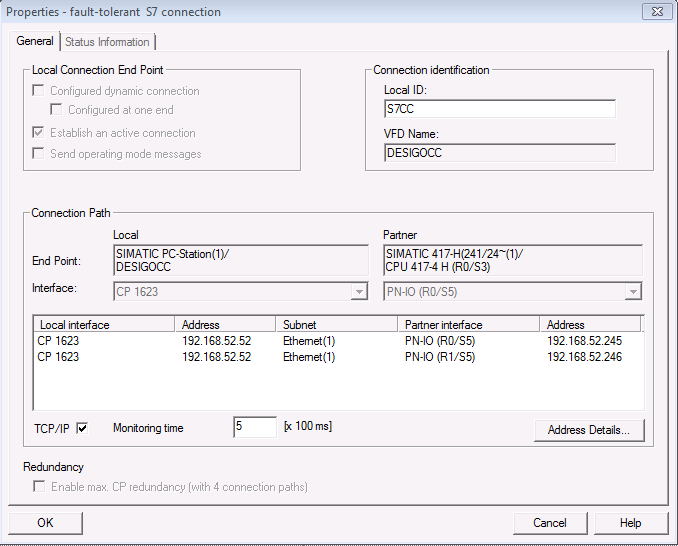
- Open NetPro.
a. Select the menu Network.
b. Click Save and Compile.
- A fault-tolerant S7 connection to the S7400H-machine is created.

- In the STEP7 Manager, select the menu Options > Configure the PG/PC interface and make the changes according to your requirements.
- Open NetPro and do the following:
a. Select the PLC.
b. Select the menu PLC.
c. Download the selected stations.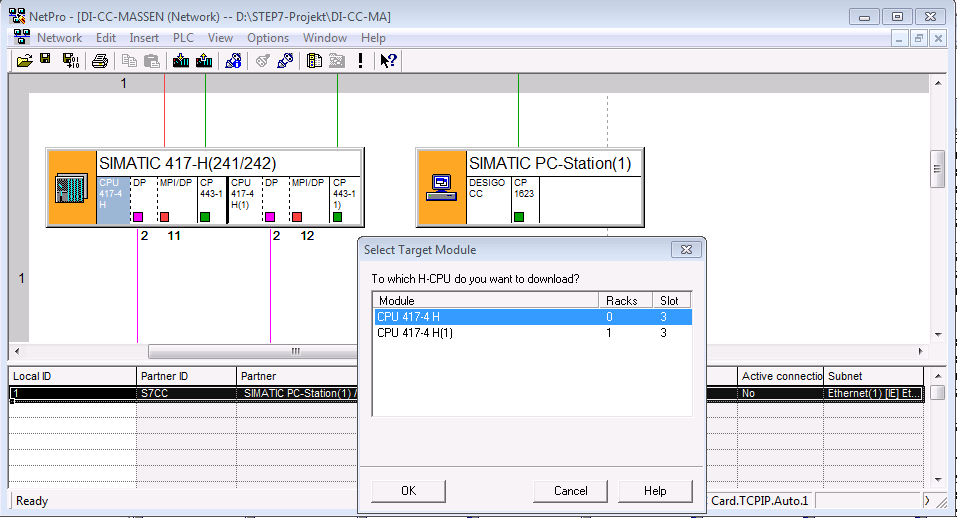
Same procedure as described in the chapter Configuring S7-RedConnect (HardNet-IE) and Import SIMATIC PC-Station in the System Computer with following modifications:
- SIMATIC NET is installed and licensed on the Desigo CC computer (Softnet-IE S7)
- A hardware installation (CP) on the Desigo CC computer is not required.
- On the STEP7 engineering computer, insert a SIMATIC PC-Station in the STEP7 project.
- The SIMATIC PC-Station consists of a user application (SW8.1.2) and a substitute for a CP (IE_General, SW8.2).
Hardware Configuration
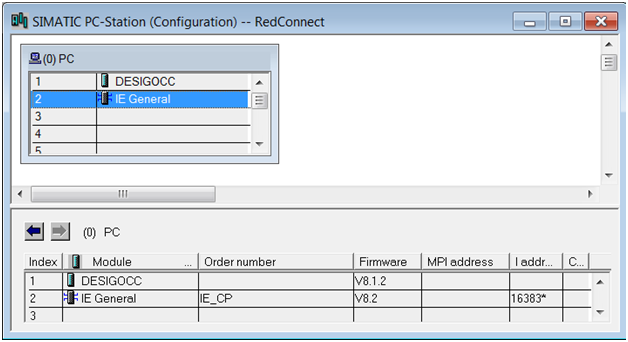
- Double-click IE_General.
- In the SIMATIC Manager window, enter the IP address of the SIMATIC PC-Station.

NOTE:
IE_General can only communicate with CP443 (ISOonTCP) or CPU400H-PN because the fault-tolerant connection only works with an IP address.
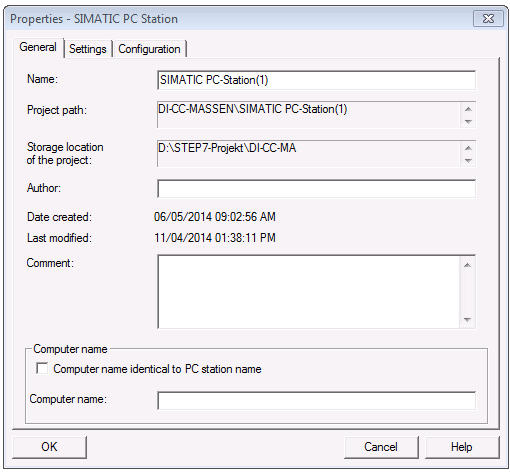
- On the STEP7 engineering computer, select SIMATIC PC-Station and double-click Configuration.

- The Properties window displays.
- In the Configuration tab:
a. Under Compatibility, select the check box.
b. Next to the Storage location of the configuration file field, click Browse and select a destination.
c. Click OK.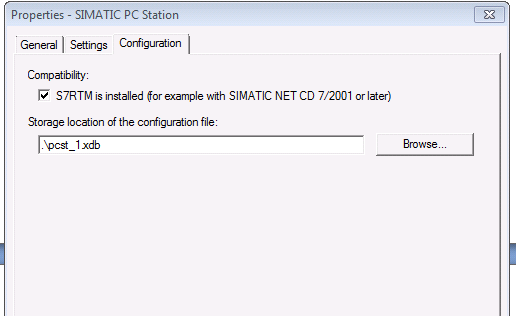
- In the Station menu, click Save and compile to update the configuration file.
- Copy the configuration file to the Desigo CC computer.
- On the Desigo CC computer:
a. Click the Windows Start button.
b. In the Search field, enter Station.
- The Station Configuration Editor displays.

- To import the fault tolerant connections, do one of the following:
- Click Import Station and select the configuration file.
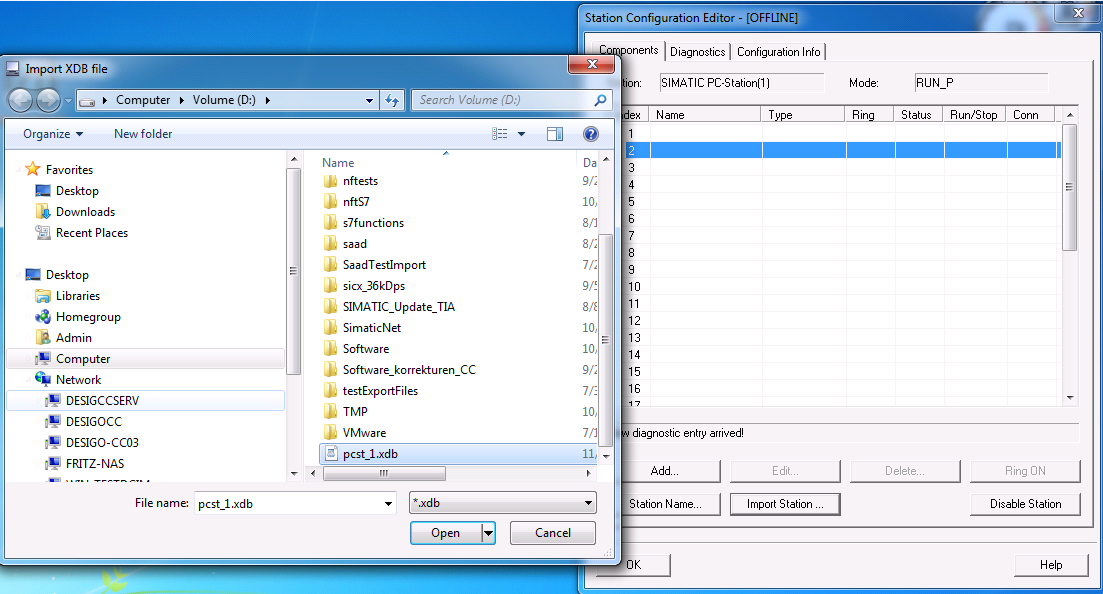
- The HW Config and the fault-tolerant connections are imported into the PC station.
NOTE: The HW-Config and the fault-tolerant connections can also be loaded on the SIMATIC PC-Station without the configuration file. But it is recommended to import the configuration file the first time. However, the HW-Config and the fault-tolerant connection can also be loaded with the STEP7 Manager in SIMATIC PC-Station (see load HW-Config below).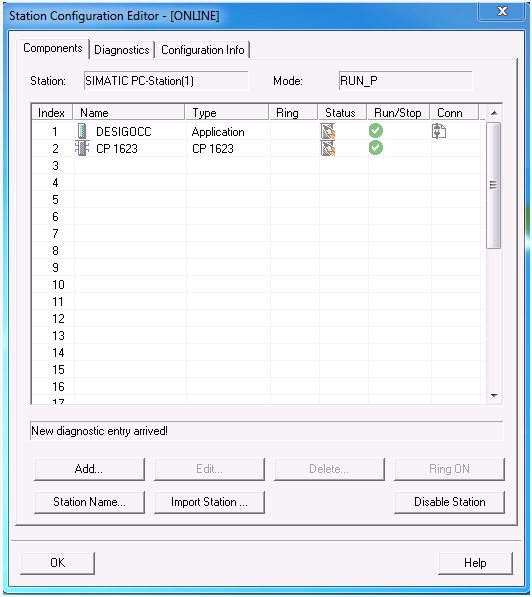
- Load HW-Config and the fault-tolerant connection in the Desigo CC computer. (Load HW-Config + connection and Import the configuration file (see Import Station above) is the same thing. Usually, for first configuration, use the import procedure described above, then the loading procedure).
a. On the STEP7 engineering computer open NetPro.
b. Select the application Desigo CC and load the station by pressing CTRL+L.
c. Click OK to load the fault-tolerant connection and HW-Config on the Desigo CC computer.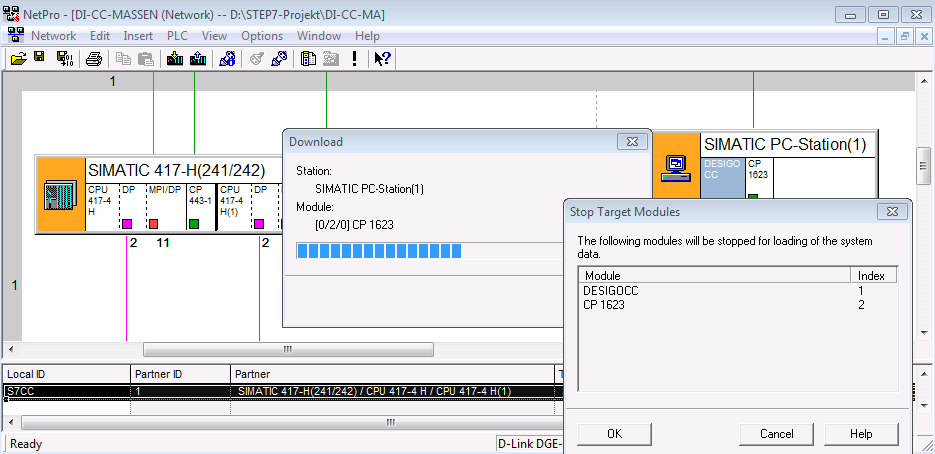
- Configure the PG / PC interface in Desigo CC. In the Access Point of the Application drop-down list, select CP1623.RFC1006 if the fault-tolerant connection is configured via IP address (CP443-1EX30, CP443-1GX30, CPU400H-PN).
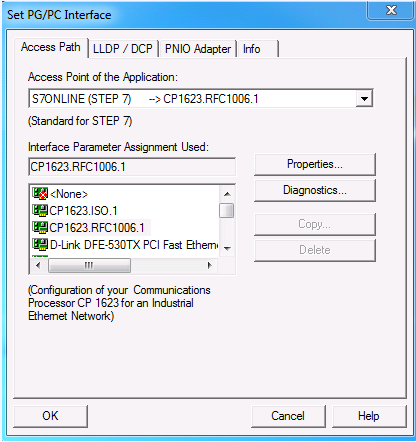
- In the Access Point of the Application drop-down list, select CP1623.ISO if the fault-tolerant connection runs via MAC address (for example, CP443-1EX11).
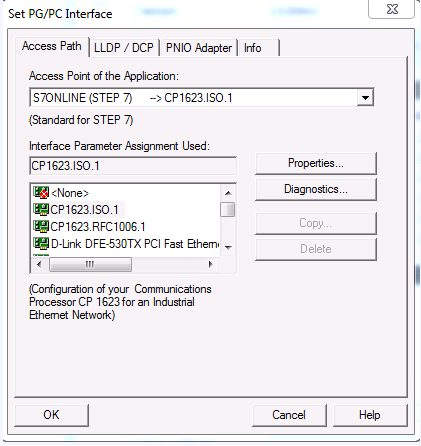
- Configure the settings in the Desigo CC management station.

- Click the Windows Start button.
- In the Search field, enter S7.
NOTE: The state of the fault-tolerant connection can be checked on the SIMATIC PC-Station under S7 Connection Diagnostics.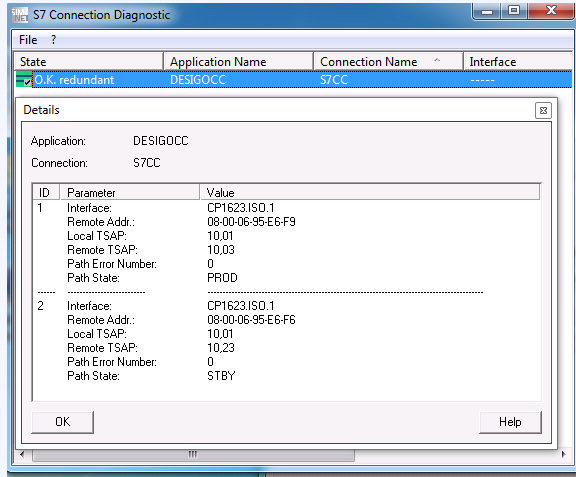
- Click the Hierarchies Mapping expander if you also want to import one or more data structures of the CSV data files into the optional views (Logical View and User View):
- In System Browser, select the appropriate optional view (Logical View or User View).
- From the System Browser tree, drag the node of the optional view you want to link as the root node into an available data structure listed in the Hierarchies Mapping expander.
A warning message displays if one of the optional views is not associated with the Hierarchies Mapping expander, for example, if you have associated only the Logical View with the Hierarchies Mapping expander and not the User View, then the following warning message displays on import, “A user defined hierarchy is not associated with Hierarchies Mapping. Please assign a hierarchy to continue with the import”.
NOTE: You cannot modify the Hierarchies Mapping configuration after the import of the configuration file.
- The network is created.
- The driver is connected to the network and running.
- One or more valid database files are available locally or by browsing for the reachable network file.
- Select Project > Management Station > Servers > Main Server > Drivers.
- In the Extended Operation tab, select the Transaction Mode property.
a. In the drop-down list, select Simple.
b. Click Apply.
NOTE: The Simple option reduces import time, since not all import transactions are written to the project log database. Following engineering, the project must be reset to Logging.
- Select Project > Subsystem Networks > [Network name] and click the Import tab.
- The Import page displays.
- Click Open at the top of the page to go to the database files.
- In the Files of type drop-down list, select the file type .csv.
- Select the desired import files.
- [file name].csv
- Click Open.
- The preprocessor analyzes the selected file. Click Log Analysis for additional information in case of an error.
- In the Source column, select
 .
.
NOTE: If Delete unselected items from the views is selected, all automation stations and the linked objects that are not in the selected import file are deleted. The main nodes must be manually deleted in Views for Logical View and User View.
- Click Import.
- The import procedure starts with the first file in the Items to Import list. The import state displayed on the Status bar.
- At the end of the import procedure, a message displays that summarizes the results and provides access to a detail log. Click Import log.
- NOTE: The import is not executed if the number of data points exceeds system limits. Check the Number of data points entered in project size.
- Select Project > Management Station > Servers > Main Server.
- In the Extended Operation tab, select the Transaction Mode property.
a. In the drop-down list, select Logging.
b. Click Set.

NOTE 1:
The import must be performed again if you change the driver configuration after an import.
NOTE 2:
On importing a Simatic S7 object, the No alarm on driver invalid check box in the Alarm Configuration section of the Object Configurator is selected by default. This ensures that if an alarm is configured on the default value, it is not triggered even if the communication between Desigo CC and the sub-system controller is broken.
