Project and HDB Backup Procedures
You can create a backup of the project and history database from either the System Management Console or from the backup commands available in the Operation/Extended Operation tabs of the Contextual pane in the management platform.
The backup of the project data and history database data must be made independently. Backing up the History Database does not back up the project data and vice versa.
The following procedures provide step-by-step instructions for making project and HDB backups. For background information, see the reference section.
Project Backup
Perform the following procedures to make a back up the project data using manual and automatic ways.
Scenario: You want to make a manual backup of the project data at regular time intervals from the management platform as automatic data backup is not set up.
- In System Browser, select Management View.
- Select Project > Management System > Servers > Main Server.
- The Operation/Extended Operation tab displays the Main Server properties.
- (Optional) Modify one or more of the following:
- In the Backup Destination field, enter a valid destination path and click Apply.
NOTE: If you enter an invalid path, the backup will fail (Backup Status will displayLast Backup Failed).
- In the Backup Timeout field, enter a value (or use the slider on the left) and click Apply.
The default value is 20 min. You can modify the timeout value, to the maximum of 120 min.
- In the Maximum number of stored backups field, enter a value to change the default value of 110 and click Apply.
NOTE: This setting has a critical impact on the required volume of the storage media.
- In the Overwrite Backup Folder field, select True or False and click Apply. By default, this field is set to False. This feature has no impact on the maximum number of stored backups setting.
True: If this value is set to True then, the backup is created in a folder named Backup and will be overwritten with the next backup execution. It means that the folder Backup always contains the newest project backup that can be used in situations where you need to copy the most recent project backup to an external storage medium. If the Backup folder already exists, it will be renamed at the moment of the next backup process with the time stamp (backup_date and backup_time) available in the Backup_info.ini file of the backup itself. Be aware that for backup_time, UTC time is used.
False: If this value is set to False, then the backup is created in a new folder having the YYMMDD-hhmm format. The time used is the local time.
- Click Start.
- The backup status displays
In Progress;Componentfor the component currently backed up;Progressdisplays the backup completion percentage. When the backup completes and it is successful, the backup status changes toLast Backup Succeeded, and indicates the backup date. The project is available on the server at the given destination path.
- During the backup process the Backup Activity shows the status of Starting, followed by Internal Backup to Data Base Backup along with a progress indication with dotted lines. After the backup the Backup Activity remains empty without indications.
- Once the backup starts, click Cancel if you want to abort the operation. The backup status changes to
Cancelling. When the abort operation completes, the backup status changes toLast Backup Cancelled. The directory created is removed from the Main Server.
Tips
- If the backup timeout is exceeded, the backup is aborted and its status displays the error
Last Backup Failed for Timeout Expiration. - If the system crashes during the backup operation, the backup status displays
Last Backup Failed, but the directory containing the interrupted backup is not removed. You should remove any failed backup files. See the System Administrator for details.
Scenario: You want to make a backup of the project database using the predefined system macro.
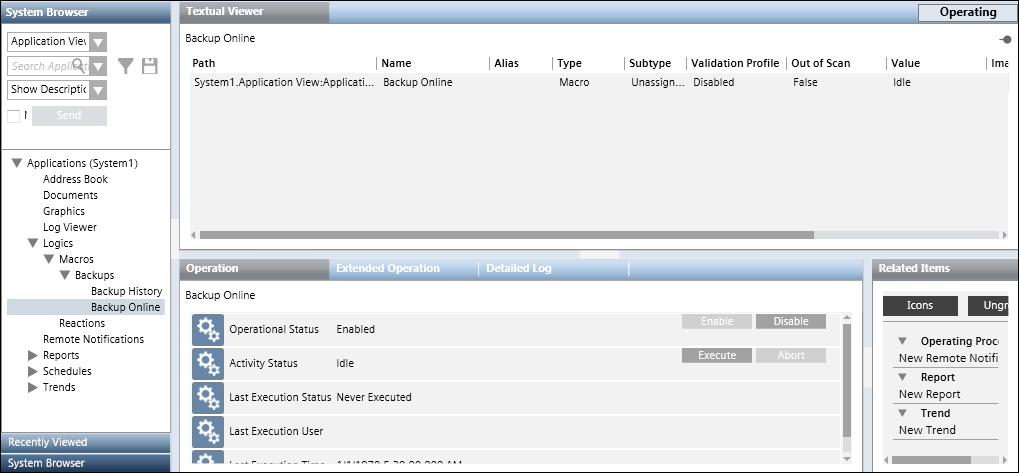
- In System Browser, select Application View.
- Select Applications > Logics > Macros > Backups > Backup Online.
- In the Operation tab, click Execute.
- The system begins backing up the project database. The default backup location is [installation drive:]\GMSBackups Although the Last Execution Status indicates
Succeeded, it only means that the macro started successfully, it is not a confirmation that a backup was created successfully.
To ensure if the backup is created successfully, check the backup destination folder to verify the created [Project Name].bak file.

Scenario: You want to make an automated backup of historical data using the using the Macro and Reaction Editor functions.
For specific example, see Creating a Reaction to Automatically Back Up the Project and History Database on Sunday Nights.
- A backup folder is available.
- You have enabled the Operational Status from Macro Backup History to run automatic backups. For more information, see Manual HDB Backup Using a Macro.
- System Browser is in Application View.
- Select Applications > Logics > Reactions.
- The Reactions Editor tab displays.
- Select Triggers > Time & Organization Mode expander and click New.
- Click anywhere on the row.
- Additional fields to set the execution time display.
- Set the dates, days and time to execute the macro.
- From Output expander, open the Action expander.
- In System Browser, select the Manual navigation check box.
- Select Applications > Logics > Macros > Backups.
- Drag the Backup History macro to the Action expander.
- Click Save As
 .
.
- Type the name and description in their respective fields.
- Click OK.

NOTE 1:
Since the older version is overwritten when creating the backup file, you must rename the backup file after creating it in order to retain multiple backup versions.
NOTE 2:
It is recommended to save history data on a daily basis.
NOTE 3:
Deleting data backup and history data must be coordinated. For example, if a deletion interval of one day is defined, data must be backed up each day prior to deleting history data (see Deletion After Custom Retention Period).
Scenario: You want to automate a backup of historical data using the using the Macro and Reaction Editor functions.
For specific example, see Creating a Reaction to Automatically Back Up the Project and History Database on Sunday Nights.
- A backup folder is available.
- You have enabled the Operational Status from Macro Backup History to run automatic backups. For more information, see Manual HDB Backup Using a Macro.
- System Browser is in Application View.
- Select Applications > Logics > Reactions.
- The Reactions Editor tab displays.
- Select Triggers > Time & Organization Mode expander and click Add.
- Click anywhere on the row.
- Additional fields to set the execution time display.
- Set the dates, days and time to execute the macro.
- From Output expander, open the Action expander.
- In System Browser, select the Manual navigation check box.
- Select Applications > Logics > Macros > Backups.
- Drag the Backup Online macro to the Action expander.
- Click Save As
 .
.
- Type the name and description in their respective fields.
- Click OK.

NOTE:
Since the older version is overwritten when creating the backup file, you must rename the backup file after creating it in order to retain multiple backup versions.
Select any of the procedures for additional information on project backup.
Decrypting the Project Backup
Scenario: You have a project backup which is compressed in zip format, encrypted with the password stored at a known path on Server or Client\FEP. You want to decrypt the project backup using SMC. Encrypted project backup zip files can also be manually (out side SMC) decrypted using any decompression tool such as 7-Zip, WinZip etc.
- SMC is launched.
- Select Projects in the SMC tree.
- In the toolbar, click Decrypt project backup
 .
.
- In the Decrypt Project Backup expander that displays, do the following:
- Click Browse to select the compressed and encrypted project backup from the path where you stored it.
You can also paste the encrypted project backup path in the Source file path field.
- Click Browse to select the Destination folder path for storing the project backup folder.
In the Source file path field you can paste the path where you want to decrypt the encrypted project backup zip file.
NOTE: If you do not have Write permission on the selected destination folder or if there is no sufficient disk space on the selected drive, or if the backup destination folder path is invalid then an error message displays and the project backup is not decrypted at the selected destination folder.
For more information see, SMC.log file located at the path
[installation drive:]/[installation folder]\GMSMainProject\log.
- Enter the password that you entered during encryption.
- Click Save
 .
.
- A confirmation message displays. The selected compressed, encrypted project backup is decrypted and is stored at the specified destination folder. You can now restore this project backup using Restore Project
 icon. See 1 – Restore a Project or Create a Project from a Template.
Encrypting the Project Backup
Scenario: You have a project backup stored at a known path on Server or Client\FEP. You want to secure project data during transport from any unauthorized access.
- SMC is launched.
- Select Projects in the SMC tree.
- In the toolbar, click Encrypt project backup
 .
.
- In the Encrypt Project Backup expander that displays, do the following:
- Click Browse to select the project backup from the default backup folder [installation drive]:\GMSBackups or from any other location.
You can also paste the project backup path in the Backup folder path field.
- Click Browse to select the destination folder or paste the path where you want to keep the encrypted project backup.
NOTE: If you do not have Write permission on the selected destination folder or if there is not sufficient disk space on the selected drive, or the backup destination folder path is invalid then an error message displays and the project backup is not encrypted at the selected destination folder.
For more information see, SMC.log file located at the path
[installation drive:]/[installation folder]\GMSMainProject\log.
- Type the password and confirm it.
NOTE: The password must be between 8 and 20 characters. The password must contain at least one uppercase character, one lowercase character, one number and one special character.
- Click Save
 .
.
- A confirmation message displays. The selected project backup is compressed in zip format, encrypted with the password that you have given and is stored at the specified destination folder. You must decrypt this encrypted project backup before restoring it. See, Decrypting the Project Backup.
HDB Backup
Perform the following procedures to create a backup of the HDB data using manual and automated methods.
Scenario: You want to make a manual backup of the HDB data at regular time intervals from the management platform as automatic data backup is not set up.
- Ensure that sufficient storage capacity is available on the backup media. Insufficient storage capacity results in faulty data backup. Prior to starting a backup, check that there is at least 150 GB of available storage.
- System Manager is in Engineering mode.
- In System Browser, select Management View.
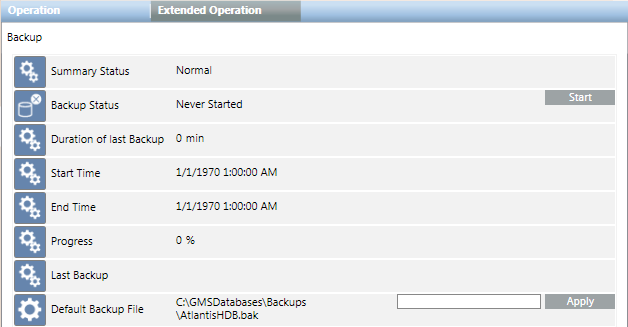
- Select Project > Management System > Servers > Main Server > History Database > Backup.
- Click the Extended Operation tab.
- The backup function properties display.

- (Optional): In the Default Backup File field, enter a new backup file name, including its complete path, and click Apply. Type the path in one of the following two ways:
- To save locally: [drive]:\[myproject]\Backups\HDB.bak
- To save on the network: \\[mycomputer]\Backups\HDB.bak
- NOTE: This also changes the entry Backup file in the Historic Data tab of the System Management Console that is available in the SMC tree under System > Database Infrastructure > [SQL Server Name] > [your HDB].
- Click Start.
- The process state goes to
Plannedduring backup. After successful completion of the backup, the display changes toSuccessfully Completedand also displays the backup date. The Last Backup information displays the backup folder and file name HDB.bak.

NOTE:
After successfully backing up the historical data, copy the HDB.bak file to an external storage medium, such as a server or a DVD. The data can be restored in the event of an error. It is recommended to always retain the last three backups.
Scenario: You want to make a backup of the HDB database using the predefined system macro.
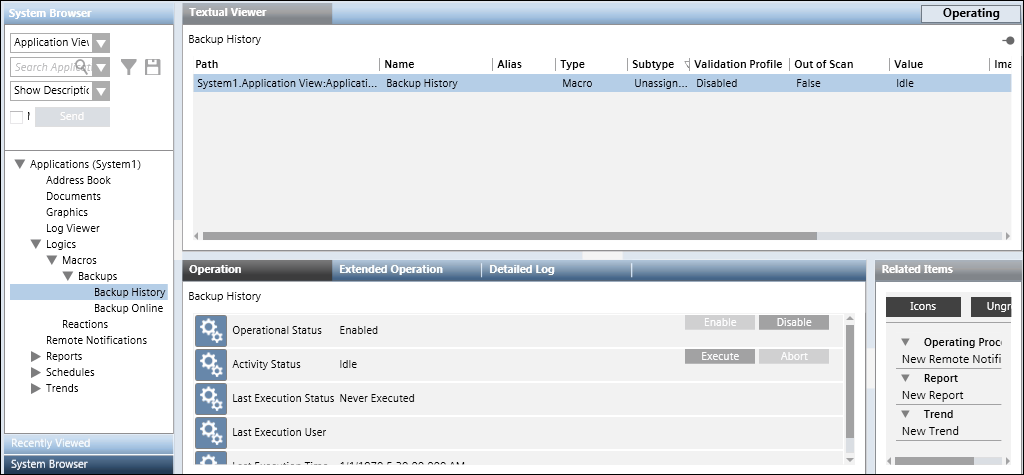
- In System Browser, select Application View.
- Select Applications > Logics > Macros > Backups > Backup History.
- Ensure that the macro is Enabled. If not, then enable the macro by clicking the Enable button.
- In the Operation tab, click Execute.
- The system begins backing up the HDB database. The default backup location is [installation drive:]\GMSBackups. Although the Last Execution Status indicates
Succeeded, it only means that the macro started successfully, it is not a confirmation that a backup was created successfully.
To ensure if the backup is created successfully, check the backup destination folder to verify the created [Project Name].bak file.

Scenario: You want to make a backup of the HDB data using SMC.
- Ensure that your target directory has enough space. Be aware that a History Database may require several tons of gigabytes. The maximum supported database size is 250 GB.
- It is recommended that you store a copy of the backup on a different storage medium if you back up your data on your local computer. This prevents overflow of your local hard disk.
The backup can be incomplete or faulty if insufficient storage space is available during the backup. Therefore, it is recommended that you repeat the backup.
- Ensure that a history database is available and linked.
- In the SMC tree, select Database Infrastructure > [SQL Server Name] > [History Database name].
- Click Backup
 .
.
- Select the Files and Paths expander.
- Click Browse at Manual Backup File and select the backup folder and file name.
- Click Save
 .
.
- Click Yes to create the backup file.
- The Task Info expander shows the backup status.

NOTE:
To ensure data backup also works in an emergency, check the entire emergency workflow and document specific to your project. Copy the backup to another medium in order to access the data in case of an emergency.
