Customizing Events for CS11 Digital Zones
Scenario: You want to customize the events of AlgoRex digital zones. In the CS11 Device library, you can customize the Digital Zone object model and associate a dedicated alarm table to it.

System malfunction
Incorrect modifications to system libraries will cause the product to malfunction.
Do not modify system libraries unless you have enough knowledge and experience to change them without destroying or corrupting crucial data.
Reference:
Workflow diagram:
Prerequisites:
- Desigo CC is configured to integrate a CS1140 fire system.
- You are authorized and trained to customize the system libraries.
- System Manager is in Engineering mode.
- System Browser is in Management View.
Steps:
Skip this section if the customized CS11 Device library structure already exists.
- Select System Settings > Libraries > L1-Headquarter > Fire > Device > CS11.
- Select the Library Configurator tab.
- Click Customize the entire library to a lower level
 .
.
- A confirmation message box displays.
- Click OK.
- The Digital Zone library is duplicated under the allowed customization level. For example, System Settings > Libraries > L4-Project > Fire > Device > CS11.
You can create multiple customized alarm tables.
- Select […] > Libraries > L1 Headquarter > Fire > Device > CS11 > Alarm Tables > [BACnet Fire Device].
- Click Save As
 .
.
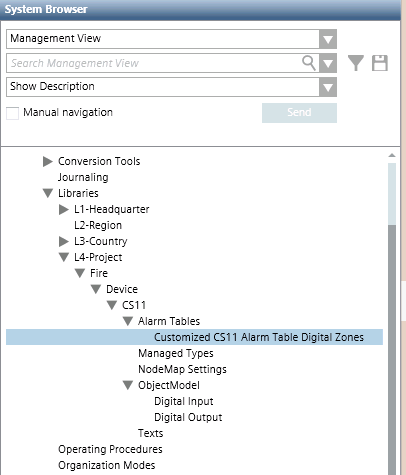
- In the Save Object As dialog box, as the destination location, select the Alarm Tables block of the customized CS11 Device library. For example L4-Project > Fire > Device > CS11 > Alarm Tables.
- Enter a name and description for the customized alarm table. For example, Customized CS11 Alarm Table Digital Zones.
- Click OK.
- A copy of the Headquarters CS11 alarm table is added under the Alarm Tables block of the customized library.

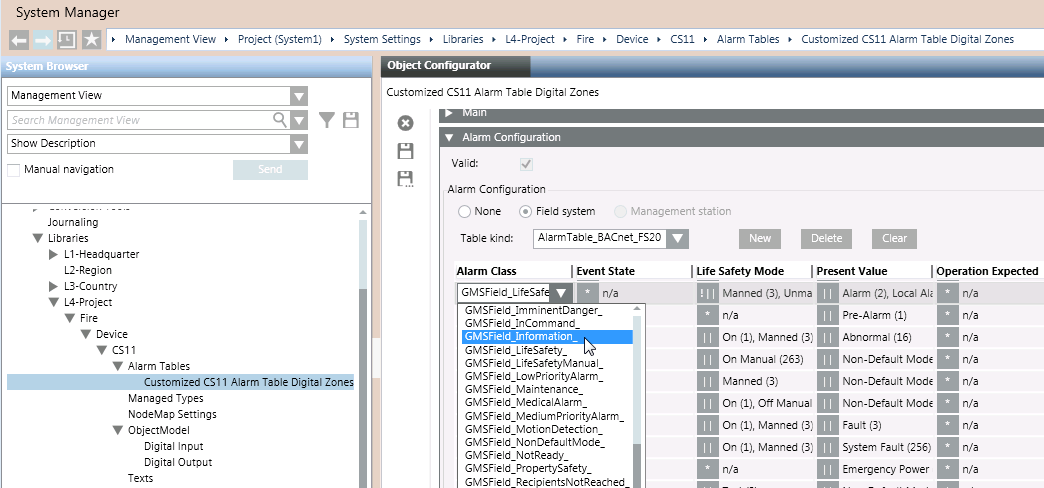
- Select the alarm table in the customized CS11 Device library. For example, […] > Libraries > L4-Project > Fire > Device > CS11 > Alarm Tables > [customized CS11 alarm table digital zones].
- In the Object Configurator tab, open the Alarm Configuration expander.
- The content of the alarm table displays.
- In the alarm table, use the Present Value column to help you select the row you want to modify.
- In the selected alarm table row, you can, for example, change the Alarm Class from
GMSField_LifeSafetytoGMSField_Information.
- Click Save
 .
.
- The customized alarm table is available. You can now apply it to either a single CS11 point, or to a customized CS11 object model.

Use this method to modify the alarm table for all digital zones.
- In the Headquarter CS11 device library, select the CS11 object model to customize. For example:
- […] > Libraries > L1 Headquarter > Fire > Device > CS11 > Object Model > Digital Zone
- In the Models & Functions tab, click Customize
 .
.
NOTE: If the icon is dimmed it means that the selected object model is already customized. Skip to step 4.
- A confirmation message box displays.
- Click OK.
- The customized object model is added to the customized library.
- Select the customized object model. For example [...] > Libraries > L4-Project > Fire > Device > CS11 > Object Model > Digital Zone.
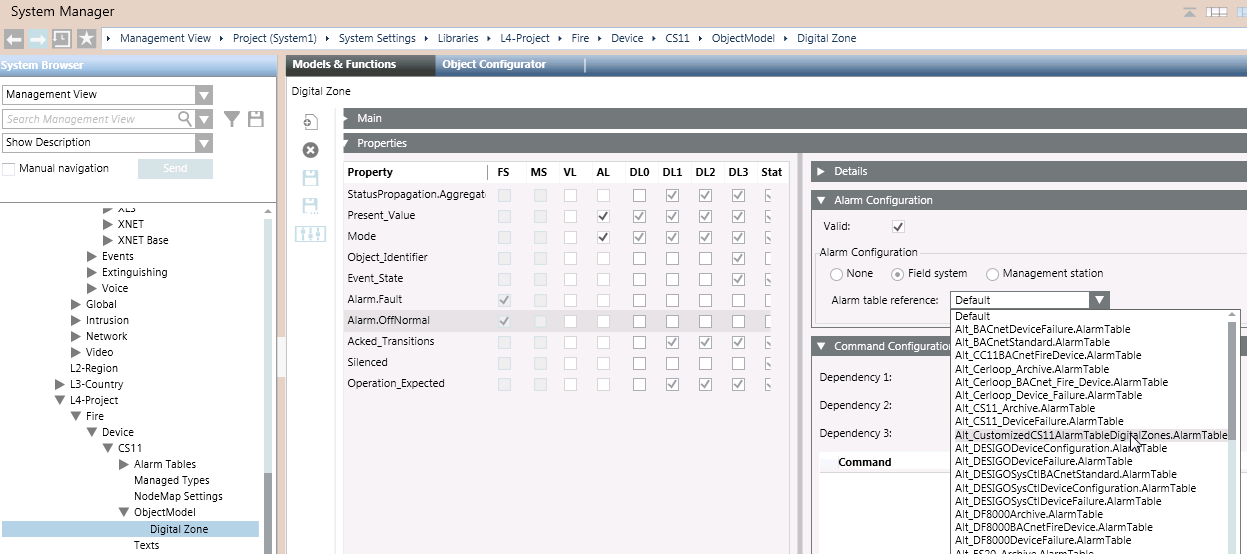
- In the Models & Functions tab, open the Properties expander.
- In the list on the left, select the Property of this object model to which you want to associate the modified alarm table. This must be one for which the FS column is checked. For example, Alarm.OffNormal.
- The Details, Alarm Configuration and other expanders on the right update to show the settings of the selected property.
- In the Alarm Configuration expander, from the Alarm table reference drop-down list, select the customized alarm table that you want to use for this customized object model.
- Click Save
 .
.
- Stop and then re-start the BACnet driver to enable the new table.
- The modified alarm table will apply to all the CS11 points that are based on the selected object model.

Use this method, for example, to modify the alarm table only for a specific digital zone, rather than for all digital zones.
- Select the CS11 point for which you want to use the modified alarm table. For example Project > Field Network > [Fire BACnet] > [CS11] > [CC11] > [Logical] > […] > [digital zone].
NOTE: You can also use CTRL or SHIFT to make a multiple selection, for example of two or more digital zones to which you want to apply the same modified alarm table.
- In the Object Configurator tab, open the Properties expander.
- In the list on the left, select the Property of this object to which you want to associate the modified alarm table. This must be one corresponding to the selected object, for which the FS column is checked. For example, Alarm.OffNormal.
- Customized CS11 alarm table digital zones.
- The Details, Alarm Configuration and other expanders on the right update to show the settings of the selected property.
- In the Alarm Configuration expander:
a. Set the Valid field so it displays a gray (not blue) checkmark.
b. Leave the Alarm Configuration field to Field system.
c. From the Alarm table reference drop-down list, select the customized alarm table that you want to use for this object.
- Click Save
 .
.
- Stop and then re-start the BACnet driver to enable the new table.
- The modified alarm table will apply to the selected CS11 points.
