Integrating an SPC Intrusion System
Scenario: This section provides a workflow for configuring a Desigo CC management platform to connect to SPC intrusion panels.
Reference: For background information, see the reference section.
Workflow diagram:
Prerequisites:
- The Desigo CC Intrunet SPC extension is installed and included in the active project.
- The SPC panels are already installed and configured. For more information about the SPC configuration tools, see the separate SPC panel documentation.
- You prepared the SPC configuration files for the panels and noted the values of RCT ID and RCT Port (for FlexC protocol).
- System Manager is in Engineering mode.
- System Browser is in Management View.
Steps:
Skip this section if you want to use an existing SPC driver.
- Depending on where the driver will run, select one of the following:
- Project > Management System > Servers > Main Server > Drivers
- Project > Management System > FEPs > [FEP] > [drivers folder]
NOTE: If the [drivers folder] is not available you can create it using using New .
.
- Click New
 , and select New SPC Driver.
- In the New Object dialog box, enter a description.
NOTE: The description must be different from that of any other driver on the Desigo CC server or FEP stations.
- Click OK.
- The new driver is added to System Browser but not started.

- Depending on where the driver was created, select one of the following:
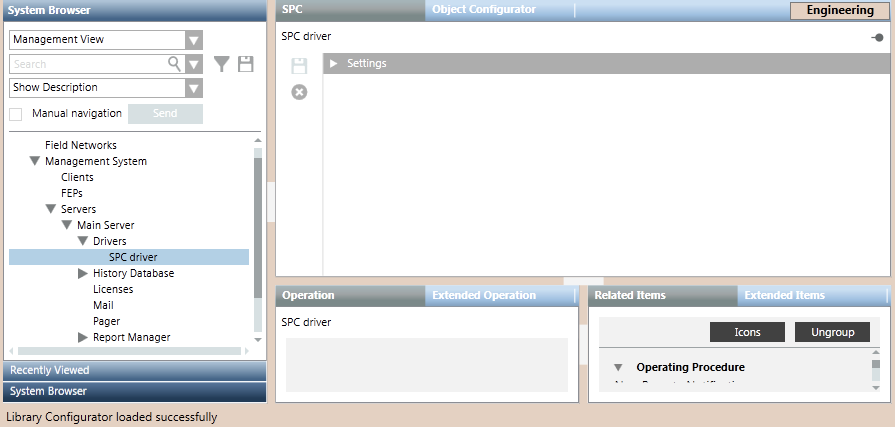
- Project > Management System > Servers > Main Server > Drivers > [SPC driver]
- Project > Management System > FEPs > [FEP] > [drivers folder] > [SPC driver]
- Select the SPC tab.
- Open the Settings expander and set the following parameters:
- Receiver ID: must match the RCT ID in the SPC configuration file
- Port: must match the RCT Port in the SPC configuration file.
NOTE: For how to obtain these values see Preparing the SPC Configuration File.
- Click Save
 .
.

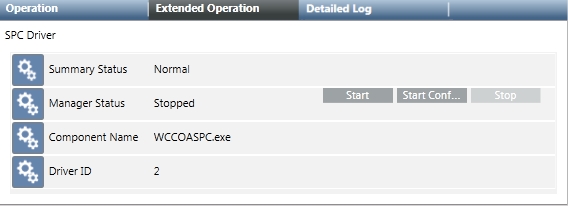
The status of a newly created driver is Stopped. To be able to import the SPC panel configuration files, the driver must be started with either Start or Start Conf...
- Select the [SPC driver].
- In the Extended Operation tab, select the Manager Status property.
- Click Start.
NOTE: Only for configuration purposes, you can also click Start Conf… to activate the driver without establishing any real connection to the field.

Skip this section if you want to configure panels under an existing SPC network.
- Select Project > Field Networks.
- Click New
 , and select SPC Network.
- In the New Object dialog box, enter a name and description.
- Click OK.
- The newly created network is added to System Browser.

Skip this section if you want to configure an existing SPC panel.
- Select Project > Field Networks > [SPC network].
- Click New
 , and select SPC Panel.
- In the New Object dialog box, enter a name and description.
- Click OK.
- The newly created panel is added to System Browser.
- Repeat steps 1 to 4 to add any other SPC panels to the network.
- Select Project > Field Networks > [SPC network] > [SPC panel].
- In the SPC tab, open the Network Setting expander.
- In the Monitored by driver drop-down list, select the SPC driver.
NOTE: You can associate more than one panel to the same driver. The Receiver Id and Receiver Port values of the driver (set in Configure the SPC Driver Settings, above) must match those of the panel configuration files (set in Preparing the SPC Configuration File). The Monitored by driver field becomes read-only after you import the configuration file.
- If your network connection uses a Network Address Translation (NAT) device, open the NAT expander, and enter the NAT address of the device.
- Click Save
 .
.
- Repeat steps 1 to 5 to associate a driver to any other SPC panels.

- To speed configuration, make sure the Desigo CC Transaction Mode is set to
Simpleor the Automatic Switch of Transaction Mode is set toTrue.
The automatic switch setting is recommended. Without it, to re-enable the logs, you need to set the Transaction Mode toLoggingat the end of the configuration procedure.
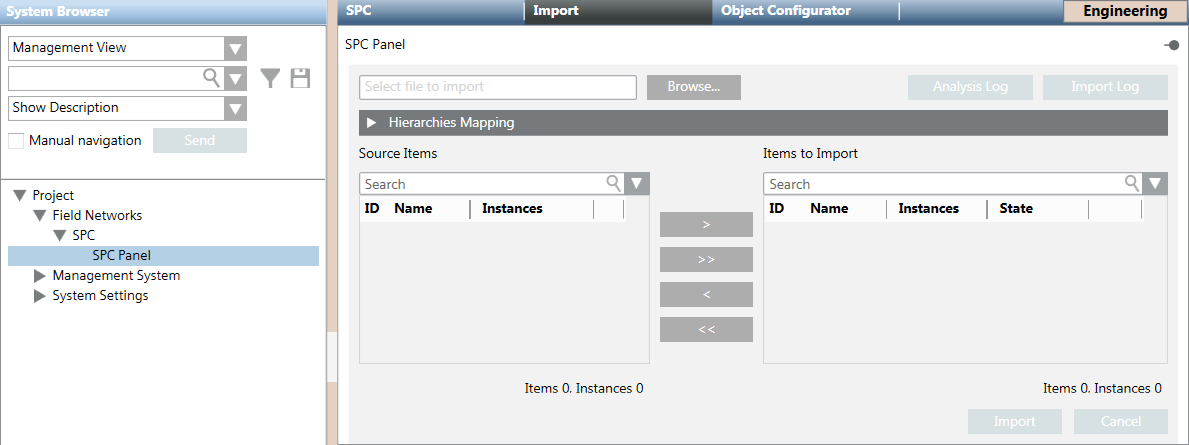
- Select Project > Field Networks > [SPC Network] > [SPC panel].
- Select the Import tab.
- Click Browse to locate and select the configuration file for this panel.
- The Source Items list populates with the items you can import.
- (Optional) Open the Hierarchies Mapping expander if you want to link one or more data structures of the configuration file to the optional views:
a. In System Browser, select the optional view (for example, the logical view or physical view).
b. Drag the node of the optional view you want to link as root node into an available data structure listed in the Hierarchies Mapping expander.
NOTE: The Hierarchies Mapping configuration cannot be modified after the import.
- In the Source Items list, select the item, click
 and then click Import.
- The configuration data is available in System Browser.
- The Import Log button becomes available to show the import log.
NOTE: In case of problems, see Handling SPC Import Error Conditions.
- A backup copy of the imported file is saved in the project folder, in the shared\Imported_Config_Files\[subsystem name]\ subfolder.
The file is compressed into a ZIP file named after the current date and time. For example: 2021-10-22_13-52-07.zip.
NOTE: See also the configuration procedure of the backup folder, which allows you to control the disk space occupancy, and also to disable the backup copy altogether.
- Repeat the previous steps to import the configuration file of more SPC panels as necessary.

- Select Project > Field Networks > [SPC Network] > [SPC panel].
- Select the SPC tab.
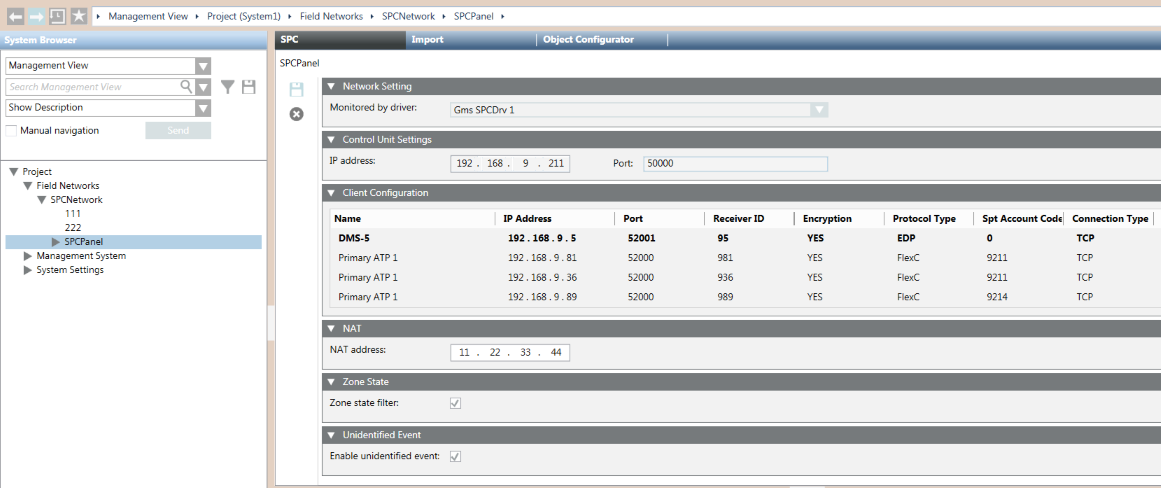
- Open the Control Unit Settings expander. Here you can check the following:
- IP address: the IP address assigned to the SPC panel (must be accessible from the server/FEP of the SPC driver).
- Port: the port assigned to the SPC panel.
- Open the Client Configuration expander. Here you can check the management stations visible from this SPC panel. For each one, the following information is provided:
- Name: the client name.
- IP Address: the IP address assigned to the client (one must match the server/FEP IP address of the SCP driver).
- Port: the port assigned to the client (one must match the SPC driver setting).
- Receiver ID: the receiver ID assigned to the client (one must match the SPC driver setting).
- Encryption: whether encryption is used or not.
- Protocol: the protocol type: EDP or FlexC.
- SPT Account Code: the panel identification used in FlexC.
- Connection Type: the connection type: select TCP (UDP is no longer supported).
- Repeat steps 1 to 4 above for any other SPC panels.

- When the intrusion system is not set, changes of state of intrusion zones can create unnecessary data traffic. If the zone state filter cannot be applied at panel level (see Configure Protocol Settings), make sure to filter unnecessary notifications at the management platform level (see Setting the Zone State Filter).
- To prevent generation of unidentified events when an SPC point is taken out of scan, such events need to be disabled. See Disabling Unidentified Events for Out of Scan.
- When finished with all the imports, make sure the Transaction Mode is set back to
Logging.
- If the SPC driver was running in
Configuration Modefor the import, stop it and restart it in full mode for normal operation. See Stopping and Starting the SPC Driver.

After first import, if the panel configuration is modified, you will need to import the configuration file again to align Desigo CC. Failing to import the latest configuration file may result in an incorrect interpretation of field messages. An Unidentified event is generated in all cases when a message is received with no corresponding data point.
