SPC
This section provides operator instructions relating to SPC intrusion panels.
Prerequisites:
- Desigo CC is configured to integrate an SPC intrusion system.
- System Browser is in Management View.
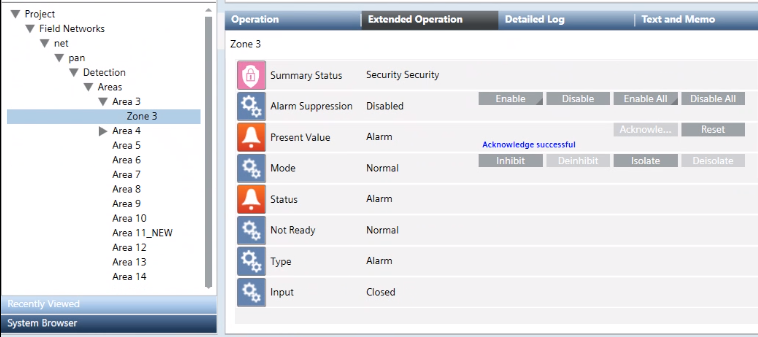
You can issue commands to acknowledge or reset active events on an intrusion zone.
- Select Project > Field Networks > [SPC Network] > [SPC panel] > […] > [area] > [zone].
- In the Operation or Extended Operation tab, next to the Present Value property, click on the required command:
- Acknowledge. Available when there is an active event on the zone that requires ack to silence the SPC central buzzer.
- Reset. Available after the event is acknowledged.

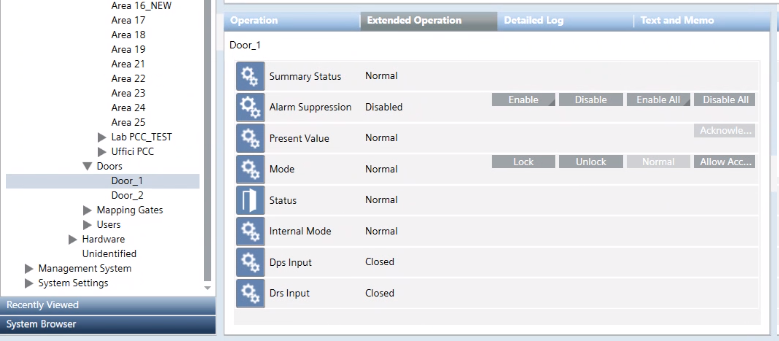
You can issue commands to acknowledge active events on SPC doors.
- Select Project > Field Networks > [SPC Network] > [SPC panel] > […] > [Doors] > [door].
- In the Operation or Extended Operation tab, next to the Present Value property, click on the required command:
- Acknowledge. Available when there is an active event on the door that requires acknowledge.

From the Extended Operation you can issue an acknowledge or reset command to an SPC panel. The command will be applied to all the intrusion zones and doors under that panel.
- Select Project > Field Networks > [SPC Network] > [SPC panel].
- In the Extended Operation tab, next to the Mode property, click on the required command:
- Acknowledge.
- Reset.
NOTE: These command buttons always appear undimmed, even if there are no currently active events on the panel.
The following procedure presents the typical steps for handling an intrusion event (red color). You can suspend/resume the procedure at any step.
- In Event List, select the event (one at a time).
- Click Acknowledge
 .
.
- This informs the local panels that alarm handling has started from Desigo CC.
- If Desigo CC presents you with an operating procedure to follow, complete the required steps.
- Ensure that the event has terminated.
- Click Reset
 to reset the event.
- In Assisted Treatment only, click Close
 to close the event.
- Click the event button.
- The event is cleared from Event List.
Alarm handling differs depending on the event category:
- Danger: same steps as Life Safety, except for that some specific events that may not require Reset.
- Fault: Reset is generally not required.
- Exclusion: no Acknowledge or Reset is required.
- Anomaly or Information: no Acknowledge or Reset is required, except for a few specific event types.

In case of a Life Safety event, the Acknowledge command automatically silences the alarming devices.
A Vanderbilt wireless device (WRMT remote control or WPAN personal alarm button) allows a user to press a panic button to issue an alarm in case of danger.
Panic Alarm in Event List
When the panic button is pressed, Desigo CC reports the following in Event List:
- A persistent System Panic Alarm event.
- A transient User Panic Alarm event with the details of the user. This event does not persist if Desigo CC loses communication with the panel.
Both events are removed when the panic alarm is reset.
Panic Alarm in System Manager
In System Manager, an active alarm is indicated by the following statuses:
- RfFobPanic property of System node:
- Select Projects > Field Networks > [spc network] > [spc panel] > Hardware > System.
- In the Extended Operation tab, the RfFobPanic property value is
Panic Alarm.
- Status property of user node:
- In System Browser select Projects > Field Networks > [spc network] > [spc panel] > Detection > Users > [user].
- In the Extended Operation tab, the Status property value is
Panic Alarm.
Before arming an area, make sure it does not have any active inputs. If an alarm condition is active or a detection device is not ready (for instance, a door was left open), arming will fail with any active inputs reported as Not Ready. To check for active inputs see Get Status or Ready to Arm, below.
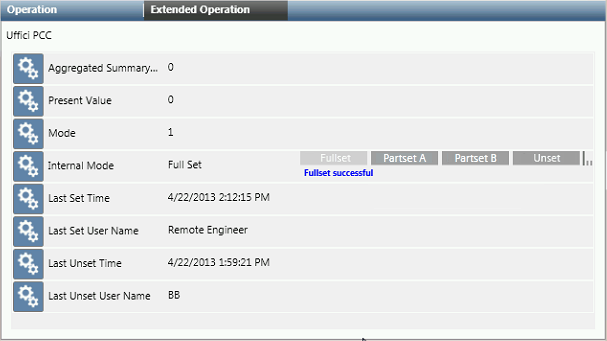
- Select Project > Field Networks > SPC network > [SPC panel] > [… ] > [area].
- In the Operation or Extended Operation tab, you can:
- Click Fullset to arm all zones of the area.
- Click Partset A or Partset B to arm groups of zones (as configured in the intrusion system).
- Click Unset to disarm all armed zones of the area

The inhibit and isolate commands let you bypass an intrusion zone, to temporarily exclude it from the system. This enables you to, for example, arm an intrusion area even if one of its zones has active inputs.
- Select Project > Field Networks > SPC network > [SPC panel] > […] > [area] > [zone].
- In the Extended Operation tab, next to the Mode property, click the required command:
- Inhibit to turn the zone off.
- Isolate to cut the communication with the zone.
- Deinhibit or Deisolate to re-enable the zone.
NOTE: If the Danger Management Propagation extension is installed, you can also bypass all the zones belonging to an area in one shot, as follows:
- Select Project > Field Networks > SPC network > [SPC panel] > […] > [area].
- In the Operation tab, next to the Mode property, click the required command:
- Inhibit to turn off all the zones of this area.
- Isolate to cut communication with all the zones of this area.
- Deinhibit or Deisolate to re-enable all the zones.
The Get Status command performs a single read of the inputs of an intrusion area (unarmed), and reports if any are currently active. Active intrusion inputs, if not bypassed (see Inhibit or Isolate a Zone), prevent the system from being armed.
- In System Browser, select Management View.
- Select Project > Field Networks > [SPC Network] > [SPC panel] > [aggregator] > [area].
- In the Extended Operation tab, select Mode.
- Click Get Status.
NOTE: To reach the Get Status command, you may need to expand the command list under Ready to Arm.
- In a few seconds, if any input is active, the corresponding
Activeevent displays in Event List.
- Check the active inputs in Event List.
- In the Textual Viewer or, if available, in a dedicated graphic, you can have a convenient summary of the area inputs.
The Ready to Arm command starts a continuous read of an intrusion area (unarmed), to identify and monitor any active inputs that are not ready for arming. You can use this command to help prepare an area for arming. Each not-ready input continues to be monitored until:
- The input becomes ready (inactive).
- The area is armed (Fullset or Partset command).
- Communication with the SPC panel is interrupted
- In System Browser, select Management View.
- Select Project > Field Networks > [SPC Network] > [SPC panel] > […] > [area].
- In the Extended Operation tab, select Mode.
- Click Ready to Arm.
NOTE: To reach the Ready to Arm command, you may need to expand the command list under Get Status.
- In a few seconds, if any input is active, the corresponding
Not Readyevent displays in Event List.
- Check the active inputs in Event List.
- In the Textual Viewer or, if available, in a dedicated graphic, you get a convenient summary of the area inputs.
- Remove the not-ready conditions and check the changes of state of the inputs. The Ready to Arm command will continue monitoring them
- When all inputs are in a normal condition, the system can be armed. See Arm the Intrusion Area, above.

Be aware that the Ready to Arm command only monitors the currently active inputs, and any subsequent change of state from normal to active is not reported until you start a new command (Get Status, Ready to Arm or Arm).
