Management Station Schedules
You can create daily or weekly schedules for your management stations, and a management station can run multiple calendars or schedules at the same time.
Management station schedules and calendars run only if the management station is running.
Management station schedules have only one binary output (value active or inactive). You can assign several objects to that output.
For each assigned object, you can select the mode of action for the output value.
Additionally, management station schedules can process both BACnet and non-BACnet object types (BACnet schedules process only BACnet object types).
You can also create exceptions to schedules. When a management station exception is ON, it overrides the weekly schedule.
When the exception is OFF, control returns to the weekly schedule.
Values are displayed as per value scaled units (if configured).
This section provides the general reference information on management station schedules.
To get started with procedures, navigate to the step by step section for management station schedules.
In the case of a weekly schedule, specify the Active or Inactive values only once. These values are applicable for the entire week and for the complete duration of the schedule.
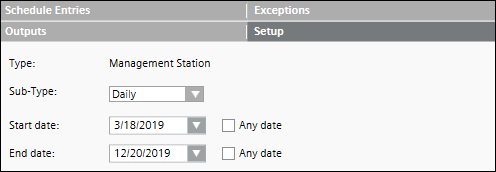
You create a weekly schedule from the Sub-Type drop-down list in the Setup tab. The last state of the day will be retained post-midnight until the next day schedule entry is triggered.
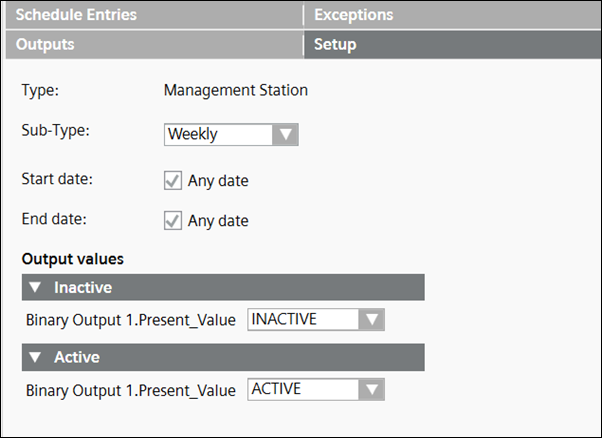
Example 1: Active Value: ON, Inactive Value: OFF:
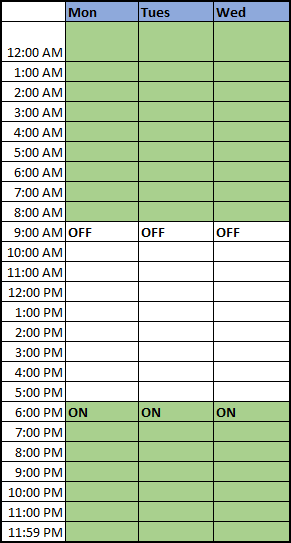
Time period for the schedule (Active : 12:00 a.m., Inactive : 9:00 a.m., Active : 6:00 p.m.)
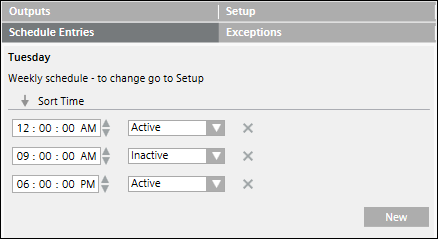
In this example, the Active status of the schedule set at 6 p.m. continues till 9 a.m. the next day.
There is no change of value at midnight because the active status continues as it finds the same active entry at 12.00 a.m. midnight.
However, in order for the midnight effect to continue, you must ensure either of the following:
- The Start date and End date of the schedule in the Setup tab must be set to Any date.
- If you want the midnight effect to happen on a particular day, then the end date of the schedule must be greater than 8 to 10 days from that day. For example, if you want the midnight effect on Monday, 29th June, then you must ensure that the end date of the schedule must be after 8 to 10 days, such as 9th or 10th July.
Example 2: Active Value: ON, Inactive Value: OFF:
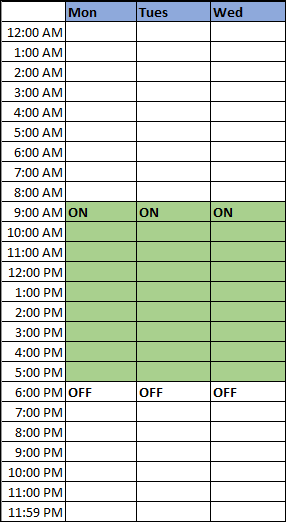
Time period for the schedule (Active: 9:00 a.m., Inactive: 6:00 p.m.)
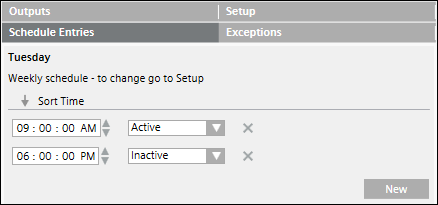
In this example, the Inactive status of the schedule set at 6 p.m. continues till 9 a.m. the next day. There is no change of value at midnight.
This is because the Inactive status continues as it does not find an Active entry at 12.00 a.m. midnight.
If there is no entry post-midnight, then it is by default considered as an Inactive state. However, if the Inactive state is to be discontinued then an Active entry is to be added at midnight.
In case of night shifts, it is recommended that you create a weekly schedule.
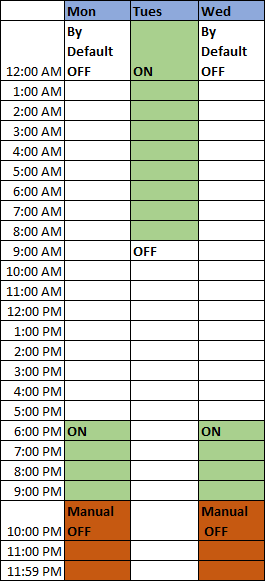
Example 3: Active Value: ON, Inactive Value: OFF:
Time period for the schedule (Active: 6:00 p.m. to 11.59 p.m. on Monday and 12.00 a.m. to 9.00 a.m. on Tuesday).
In this case, if you manually trigger the state of the point to OFF at 10 p.m. on Monday, the schedule shall remain OFF till 11.59 p.m. and shall be triggered back to Active (ON) at 12.00 a.m. on Tuesday.
However, in order for the midnight effect to continue, you must ensure either of the following:
- The Start date and End date of the schedule in the Setup tab must be set to Any date.
- If you want the midnight effect to happen on a particular day, then the end date of the schedule must be greater than 8 to 10 days from that day. For example, if you want the midnight effect on Monday, 29th June, then you must ensure that the end date of the schedule must be after 8 to 10 days, such as 9th or 10th July.
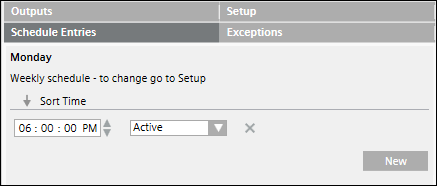
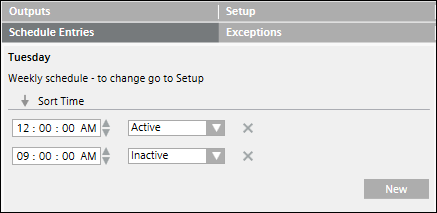
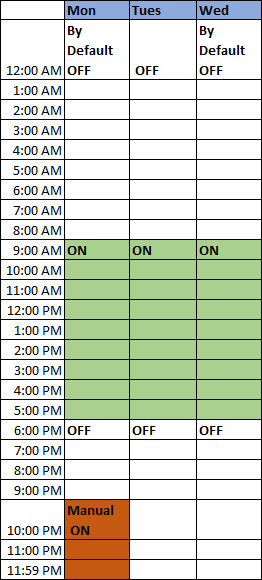
Example 4: Active Value: ON, Inactive Value: OFF:
Time period for the schedule (Inactive: 6:00 p.m. to 11.59 p.m. on Monday and 12.00 a.m. to 8.59 a.m. on Tuesday, Active: 9:00 a.m. to 5.59 p.m. on Tuesday).
In this case, if you manually trigger the state of the point to ON at 10.00 p.m. on Monday, then the schedule shall remain ON till 11.59 p.m. on Monday.
If there is no entry post-midnight, then it is by default considered as an Inactive state. However, if the Inactive state is to be discontinued then an Active entry is to be added at midnight.
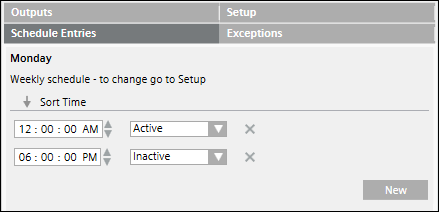
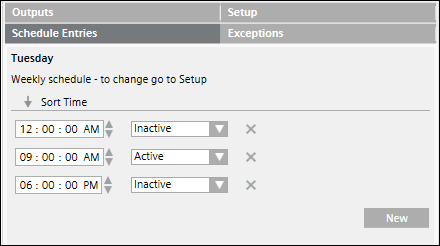
You can create a daily schedule from the Sub-Type drop-down list in the Setup tab and specify either similar active or inactive values for all days of the week or different values for individual days from the Schedule Entries tab.
The daily schedules are treated as single day schedules that are valid till 11.59 PM. Post mid-night the next day's daily schedule is functional.
For example, the daily schedule for Monday, will be functional from 12.00 AM to 11.59 PM.
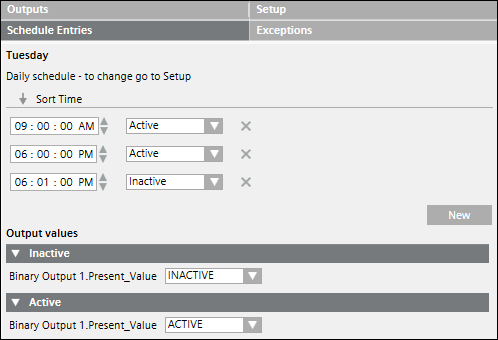
The daily schedule will trigger an Inactive value at midnight. The last state of the day will not be retained post-midnight until the next day schedule entry is triggered.
Consider a schedule with the time periods, Active : 12:00 a.m., In-Active : 9:00 a.m., Active : 6:00 p.m. In this case, even though the value is set to active at 6 p.m., there is a switchover from Active to Inactive at around 11:59 p.m. Post-midnight at 12.00 a.m., this value changes back to Active.
This section provides an overview of the Management Station Schedule Workspace.
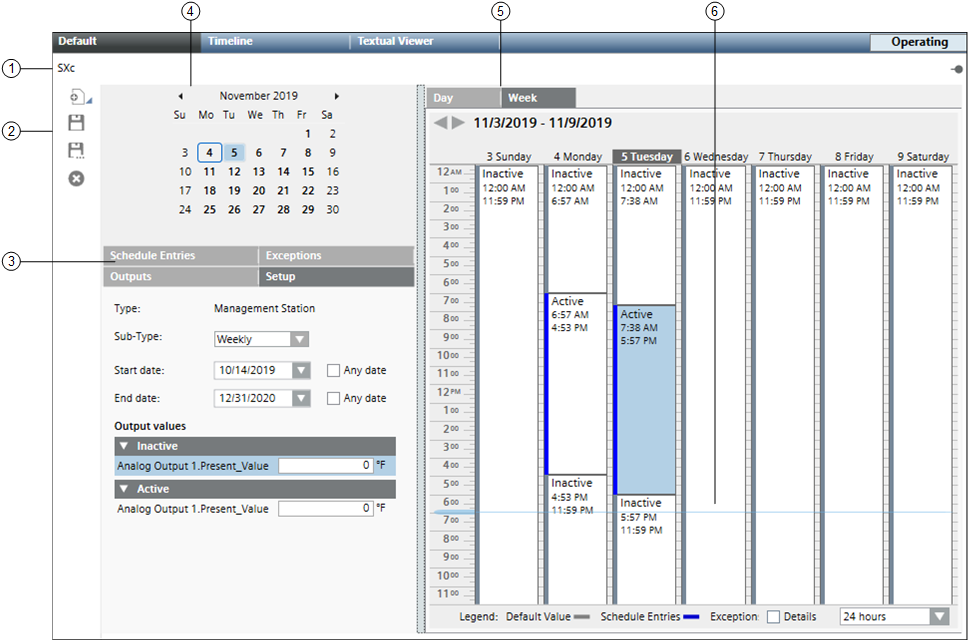
| Name | Description |
1 | Schedule Name | Displays the name of the schedule. |
2 | Scheduler Toolbar | Includes the following icons: |
3 | Tabs | Displays four tabs: Schedule Entries, Outputs, Exceptions, and Setup. Schedule Entries: Displays a list of entries for the selected date and Output values. The Output values indicate the ON and OFF values for Daily schedules only. For weekly schedules the Output values are present in the Setup tab. Outputs: Outputs are objects associated with the schedule. You can drag objects to any tab to add them to the schedule. Dropping them on a tab other than the Outputs tab makes the Outputs tab active. Selecting an object in this section sends data about the object to the Operation/Extended Operation tabs, where you can view additional information about the object and make changes to it. Double-clicking an output makes it the new primary selection. Exceptions: Displays a list of exceptions for the selected date and allows you to set the exception period, including a recurrence pattern. For calendar exceptions, you can choose a calendar object from a drop-down list. This tab also displays schedule entries and ON and OFF values. Adding an exception makes the Exceptions tab active. You can create an exception by right-clicking the schedule or by clicking the New button in the Exceptions tab. Setup: Allows you to specify the type of schedule (Weekly or Daily) that you want to create. You can specify the type of schedule by selecting either Weekly or Daily from the Sub-Type drop down list. You can also specify the start date and end date for the schedule from the Setup tab. The Any date check box next to the Start date defaults to the current date, whereas the Any date check box next to End date, defaults to an infinite date. |
4 | Date Picker | Allows you to select a day to view or create schedule entries. When first displayed or refreshed, the current day is selected by default. By default, every new schedule begins with the current date and never ends. Once a new schedule is opened, you can choose the start and end date for the schedule. |
5 | Schedule | When first displayed or refreshed, the current day is selected by default. Day Tab: Shows a schedule for the day selected in the Date Picker. Selecting the Detail check box reveals calendar entries, weekly schedule entries, and exception schedule entries. The Day tab also displays a horizontal time bar indicating the current time. NOTE: You can schedule entries from the weekly view, however, the weekly view shows only the resulting schedule and not the details of the schedule. For more flexibility in visualizing and creating schedule entries, you can use the Schedule Entries tab. |
6 | Current Time Indicator | Displays a light-blue bar corresponding to the time of day. |
This section provides an overview of the Management Station Calendar Workspace.
Calendars allow you to override scheduled switch commands. In this sense, you can consider calendars as exception schedules, consisting of dates only.
When you create a calendar, you can choose specific dates (January 15), a date range (August 1 – 31), or a week and a day you want the exception to run (third week of the month, on Wednesday).
All calendars are associated with a schedule.
For example, if you want to reduce energy costs in your building during company holidays, you can create a schedule with a calendar reference exception that commands equipment into holiday mode.
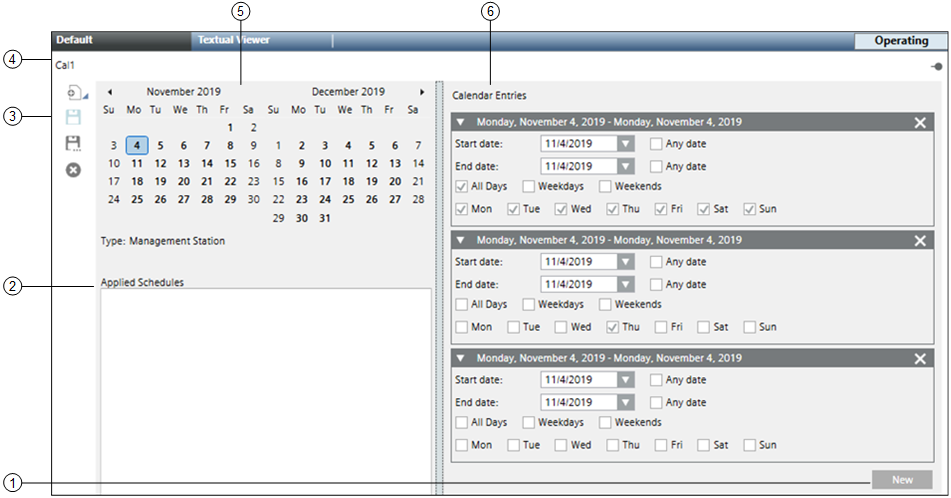
| Name | Description |
1 | New Button | Opens a new calendar entry. |
2 | Applied Schedules | Displays a list of schedules referencing the calendar. |
3 | Scheduler Toolbar | Includes the following icons: |
4 | Calendar Name | Displays the name of the calendar. |
5 | Date Picker | Displays a monthly calendar with entry dates highlighted. When first displayed or refreshed, the current day is selected by default. |
6 | Calendar Entries | Displays a list of entries representing start and end dates and recurrence patterns. |
